Admin configuration refers to the settings and processes that allow administrators to manage a system or application effectively. This includes defining user roles, setting permissions, managing security settings, and configuring system preferences to ensure that the platform operates according to organizational needs. Admin configuration is crucial for maintaining control, security, and efficiency within the system.
Super Admin Access is the highest level of administrative privileges within a system. Here are the key features:
- Full Control: Super admins have unrestricted access to all system functionalities, including user management, configuration settings, and data access.
- User Management: They can create, modify, or delete user accounts across the entire system.
- Permission Settings: Super admins can define roles and permissions for other users, ensuring that individuals only have access to the functionalities necessary for their roles.
- System Configuration: They can configure system-wide settings, manage integrations, and oversee security protocols.
- Audit and Monitoring: Super admins often have access to logs and reports, enabling them to monitor system usage and address any issues.
Provider Admin Accounts
Provider Admin Accounts are created for specific departments, teams, or service providers within an organization. Here’s what defines these accounts:
- Role-Specific Access: Provider admins have permissions tailored to their specific responsibilities, allowing them to manage users and settings relevant to their area without broader system access.
- User Management: They can create and manage user accounts for their department or team, assign roles, and set permissions as needed.
- Operational Focus: Provider admins can focus on operational aspects of their area, such as overseeing workflows, managing resources, and ensuring compliance with internal policies.
- Limited Scope: Unlike super admins, provider admins do not have access to system-wide configurations or sensitive data that falls outside their scope.
Introduction
The Super Admin page provides the highest level of administrative control, including the ability to create and manage Provider Admin accounts.
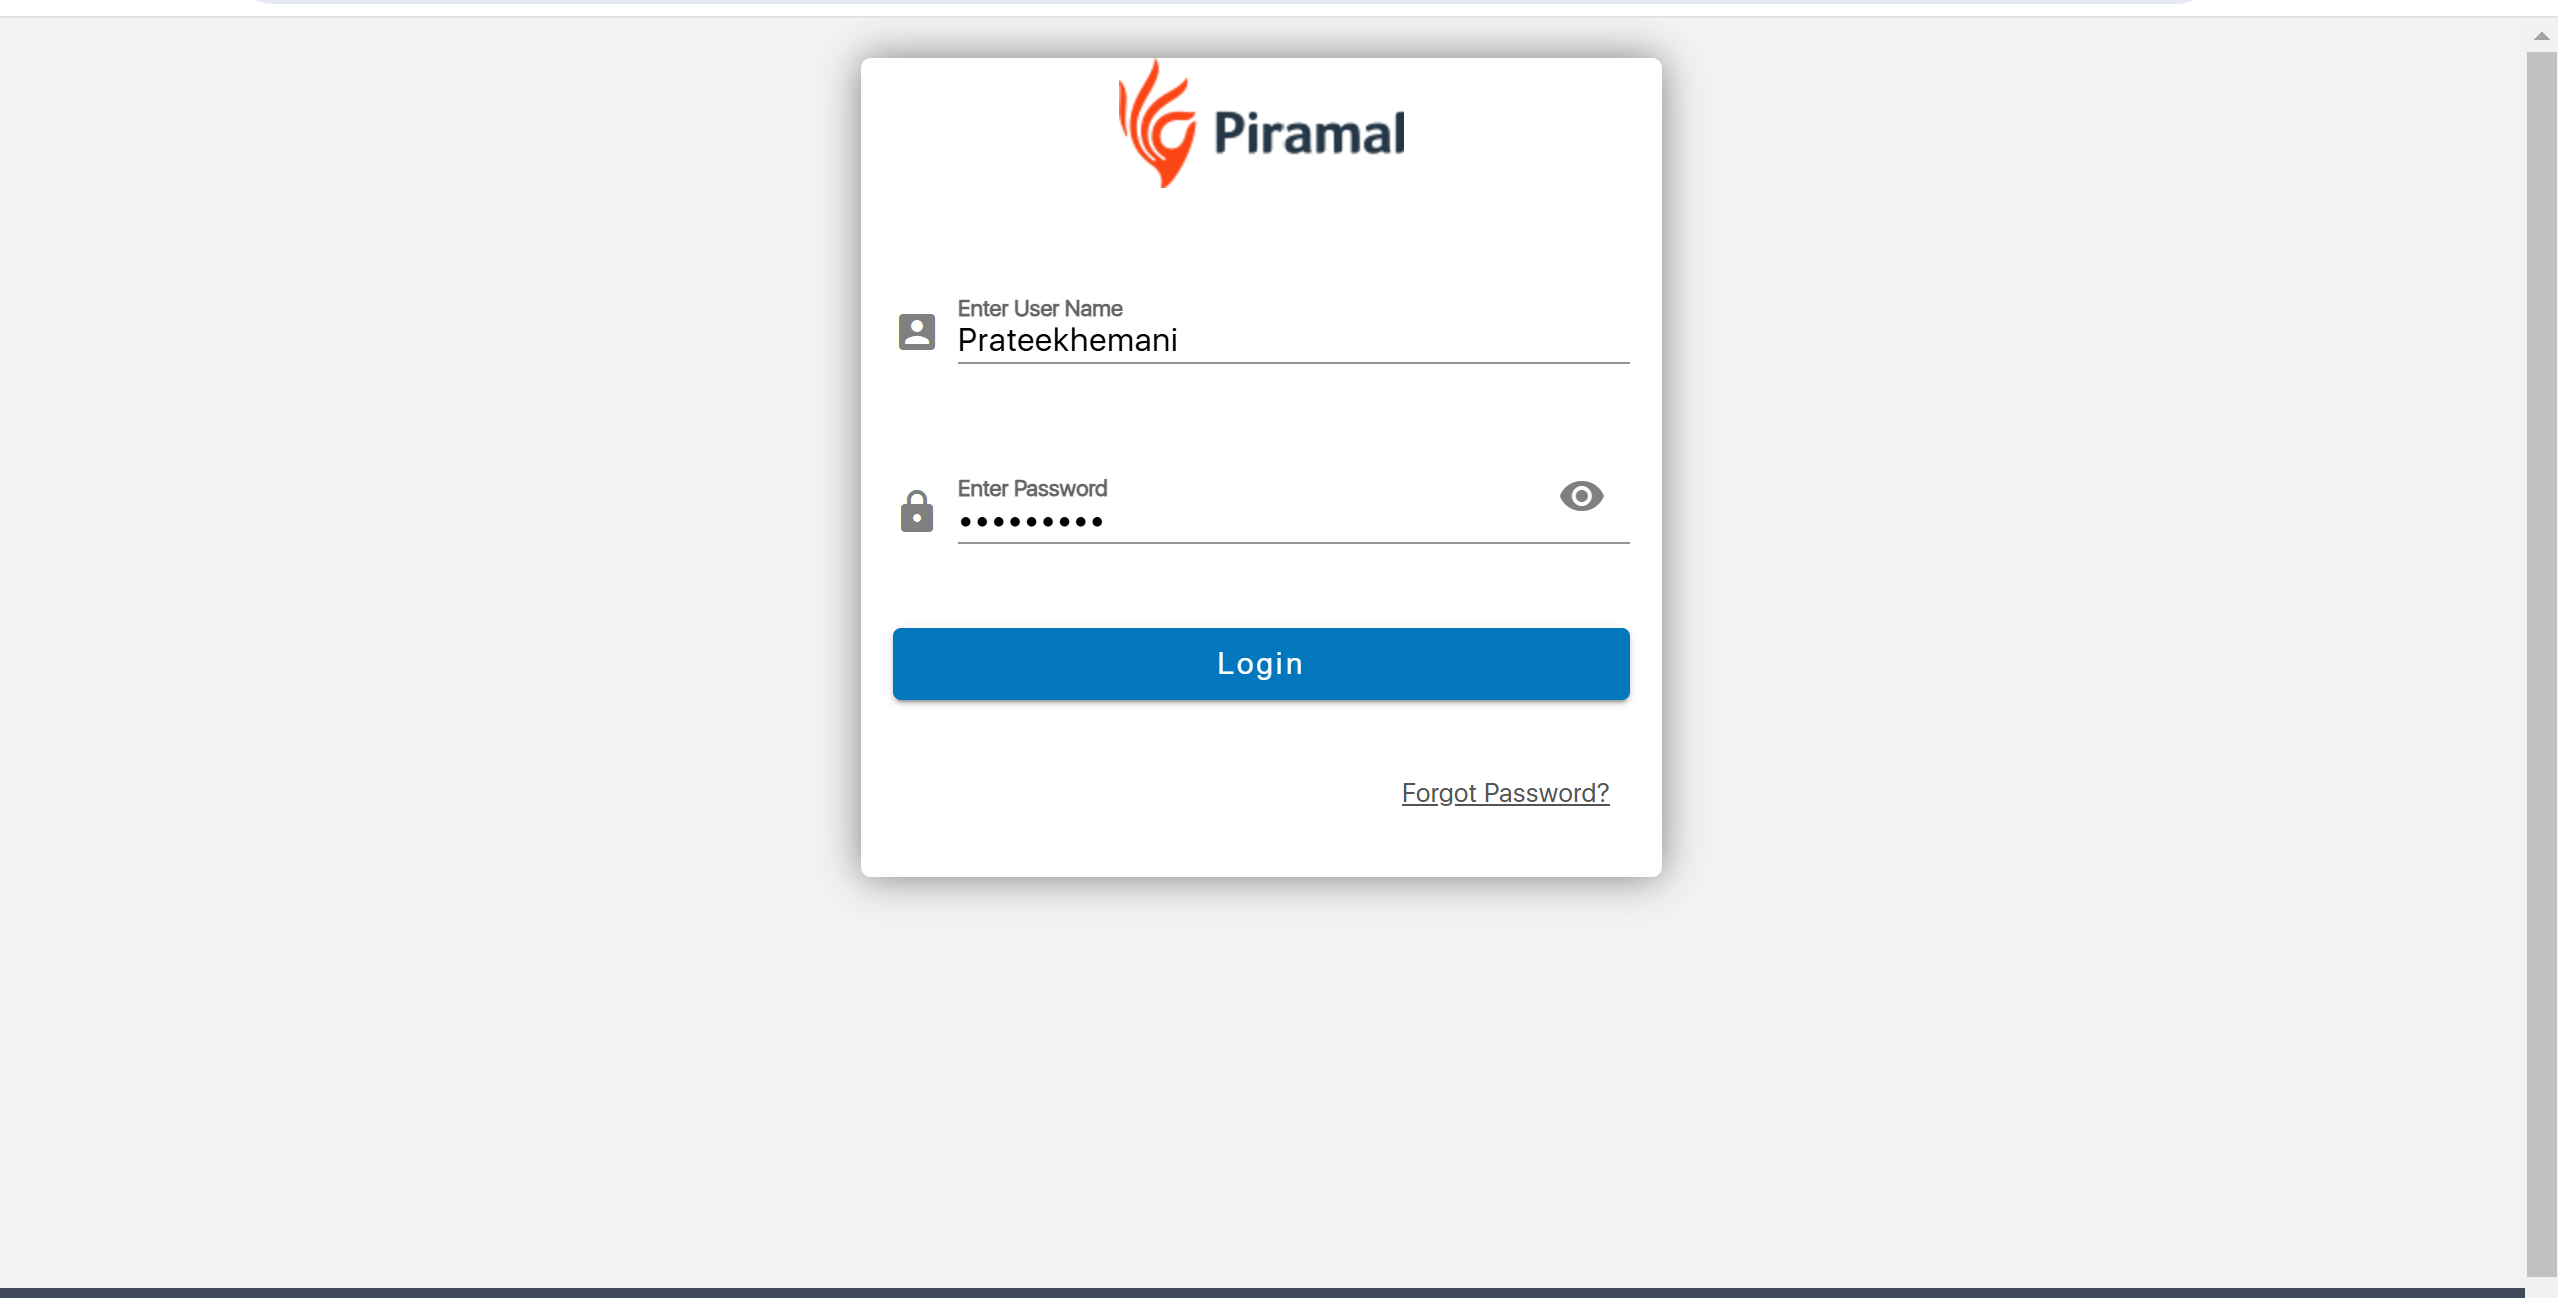
Accessing the Super Admin Page
Open Login Page
- Navigate to the Super Admin login page using the provided URL.:- https://uatamrit.piramalswasthya.org/admin-ui-next/login
Enter Credentials
- Username: [Enter Username]
- Password: [Enter Password]
- Click on the Login button to access the Super Admin dashboard.
Creating a Provider Admin
Provider Admin refers to a user role with specific administrative capabilities related to managing service providers within the software. This role is crucial for organizations that interact with multiple service providers, such as healthcare systems, vendors, or contractors. Here’s a concise overview:
Provider Admin in Application
Role Overview
- Function: Manages provider-related data and operations within the application.
- Scope: Focuses on a specific area or group of providers relevant to the organization.
Key Responsibilities
User Management:
- Create and manage accounts for providers and their staff.
Data Maintenance:
- Update and maintain accurate provider profiles, including contact information and services offered.
Access Control:
- Set and manage permissions for users interacting with provider data.
Performance Tracking:
- Monitor and evaluate provider performance metrics to ensure quality and compliance.
Compliance Management:
- Ensure providers meet necessary regulatory and organizational standards
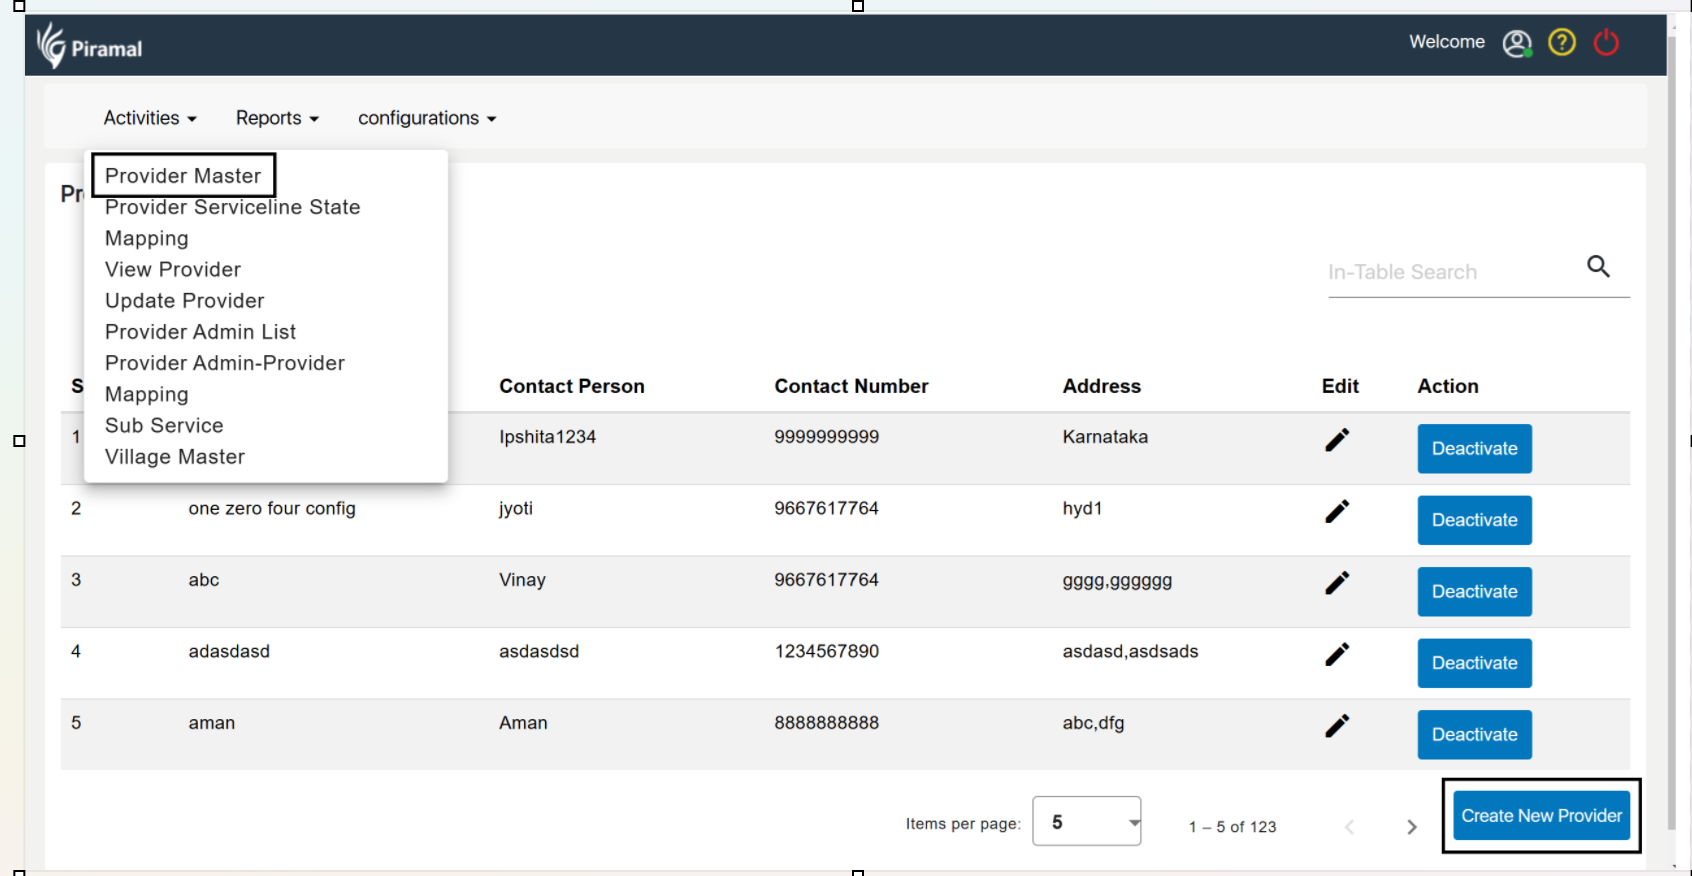
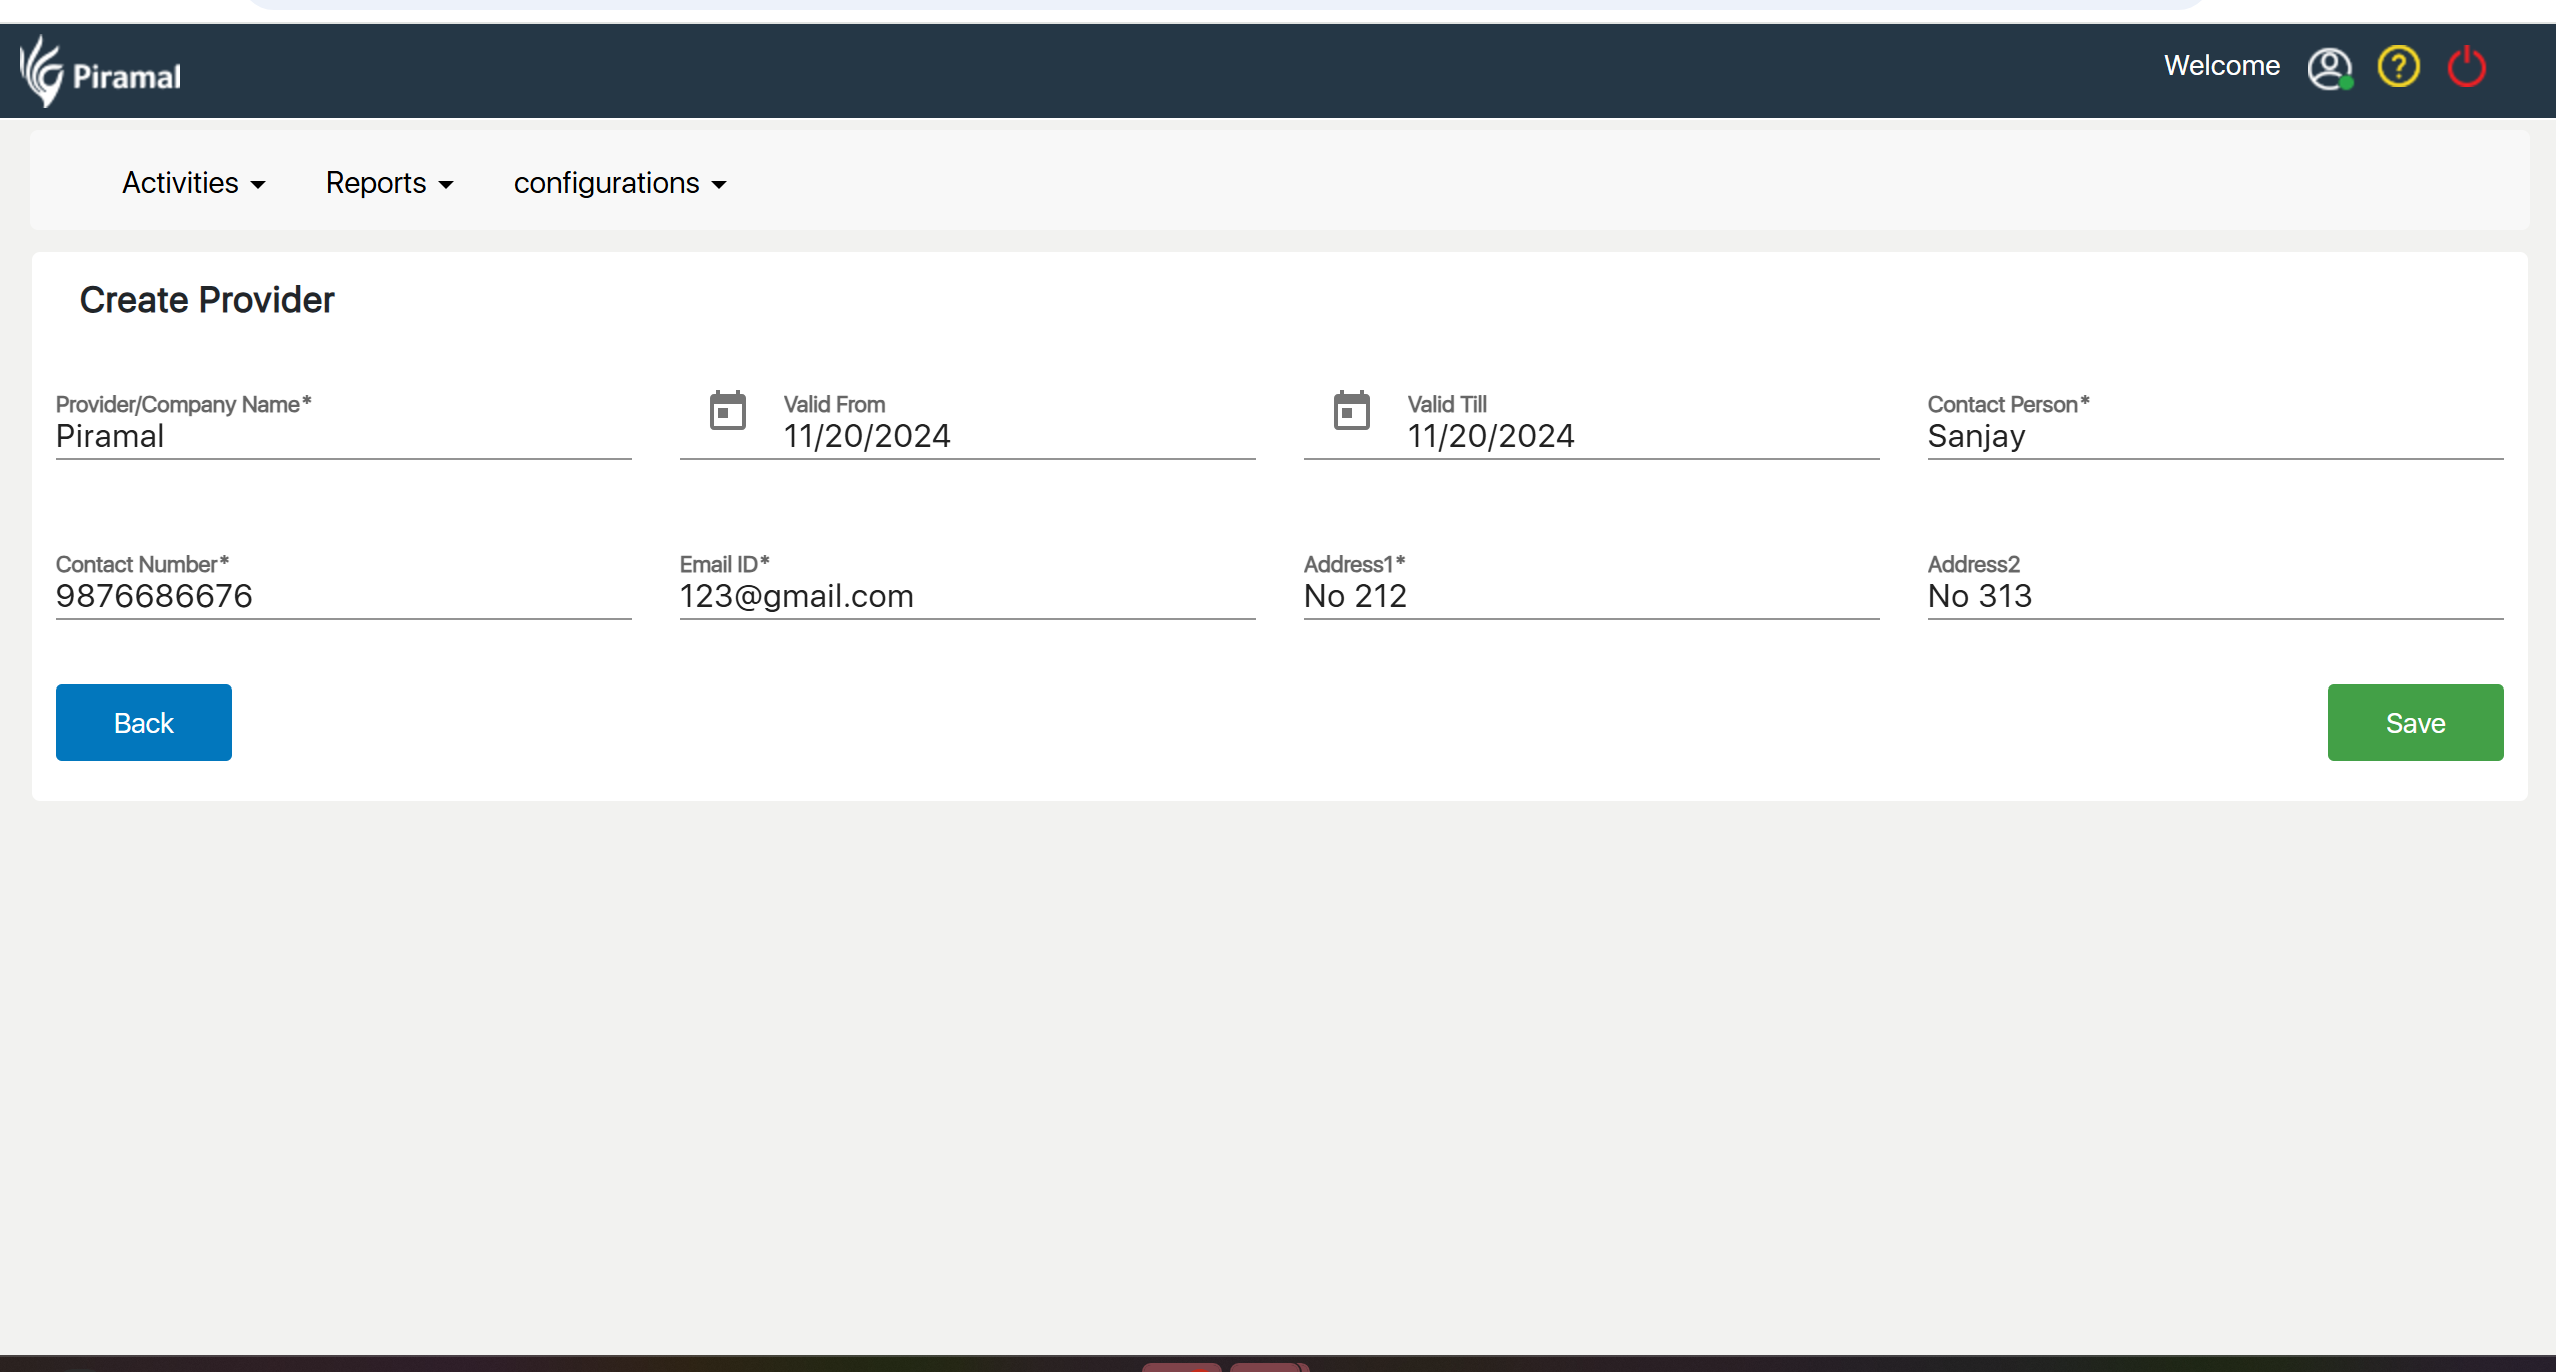
Creating a Provider in Provider Master
Navigate to Provider Master: Locate and click on the "Provider Master" option in the menu.
Add a New Provider: Click on the "Create Provider" button to open the new provider form.
Enter Provider Details: Fill in the required information for the new provider in the provided fields.
Save the Provider: Once all necessary details have been entered, click the "Save" button to finalize and store the provider information.
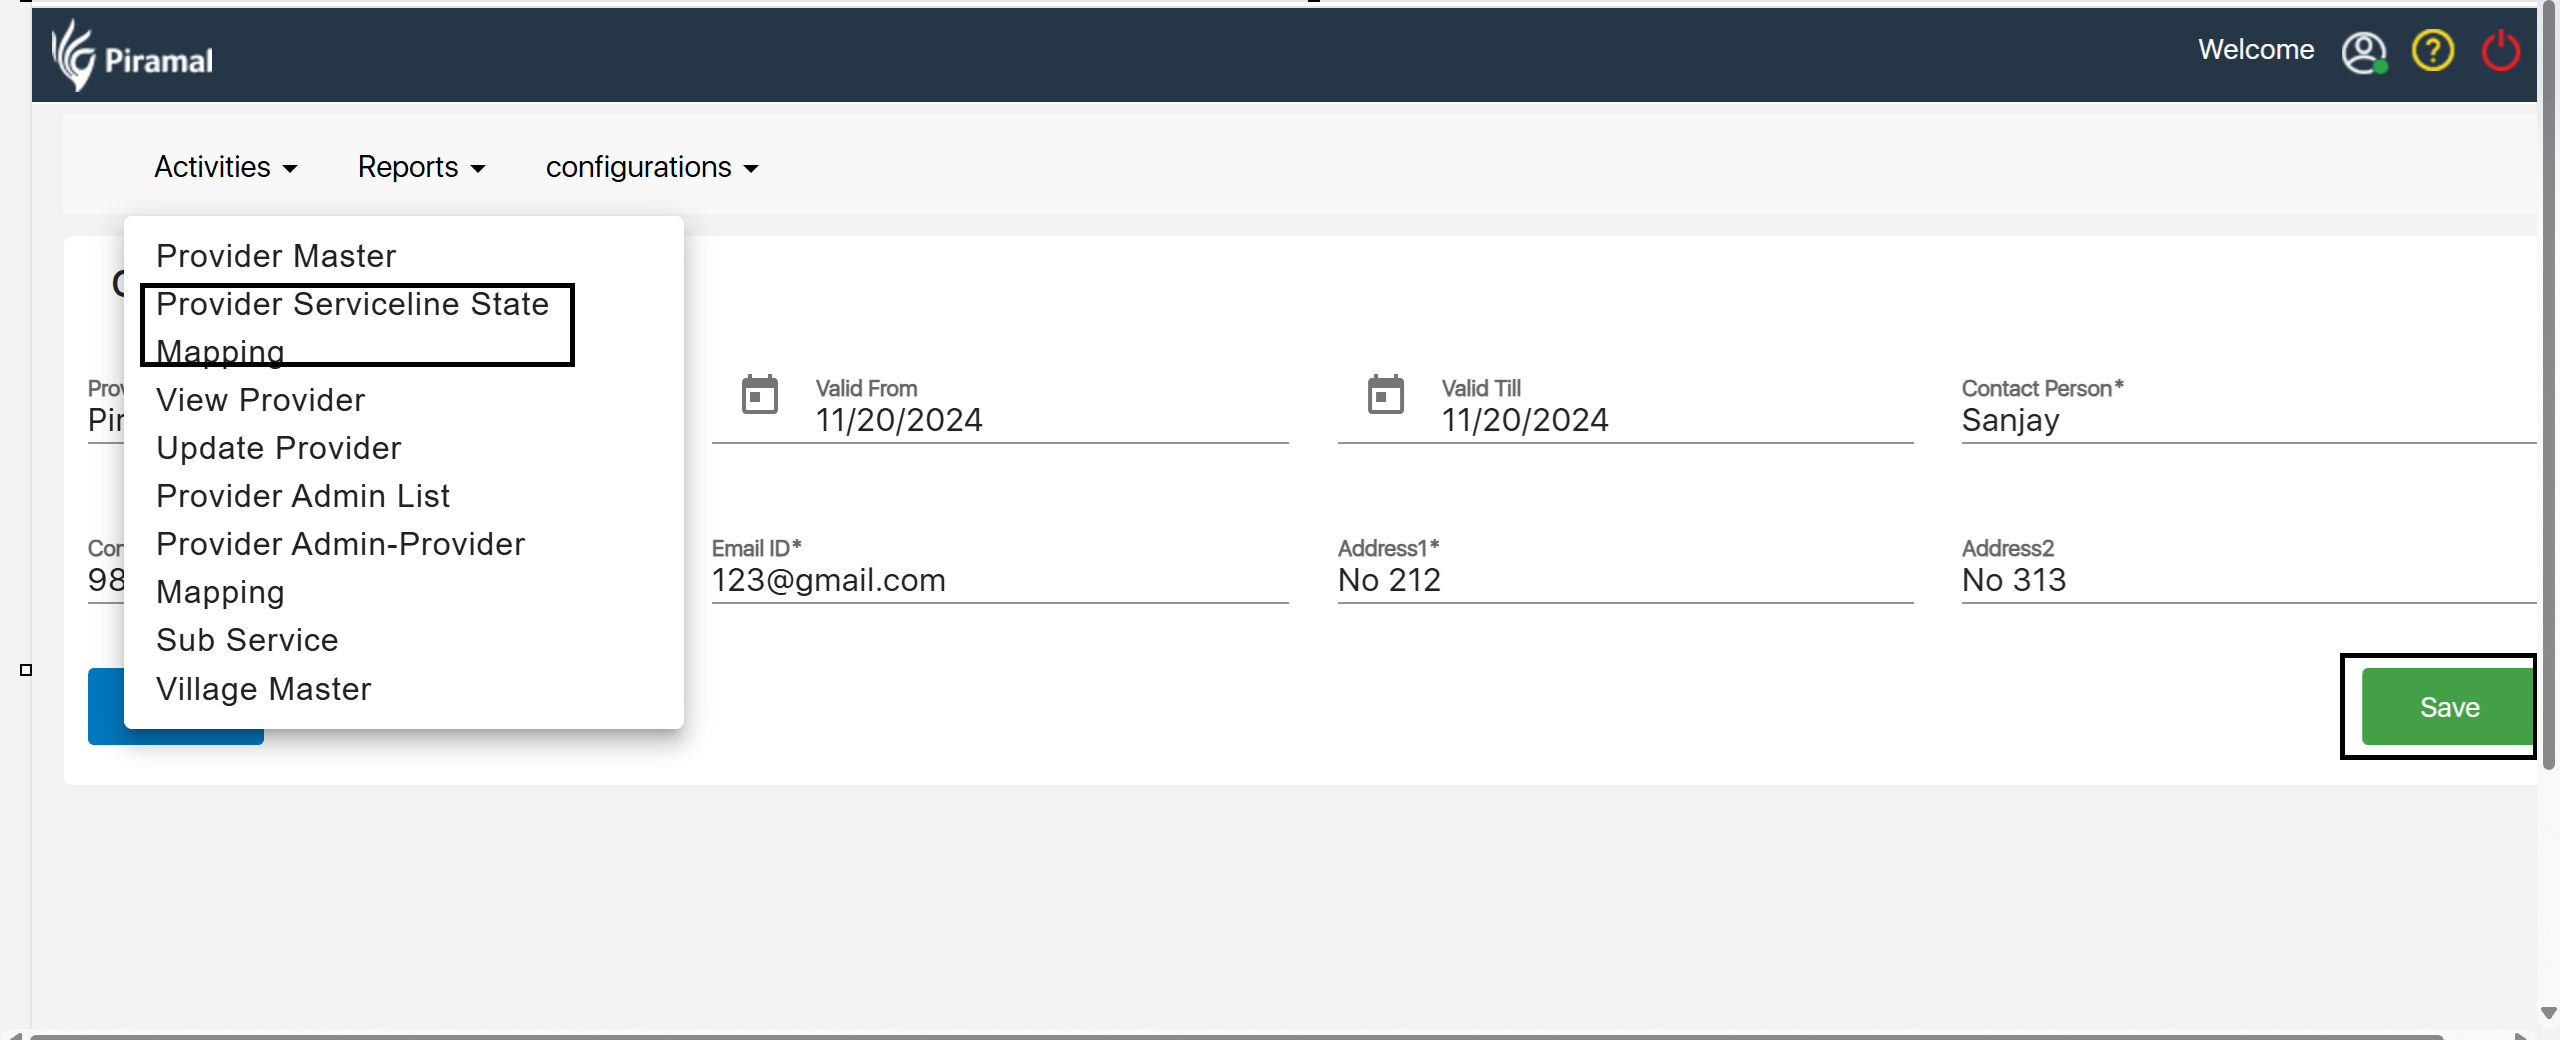
Provider Service Line State Mapping
Provider Service Line State Mapping can specifically refer to organizing and managing health services offered by Health and Wellness Centers and Mobile Medical Units (MMUs) across different states. Here’s how this works:
Provider Service Line State Mapping: Health and Wellness Centers and MMUs
Key Components
Service Lines:
- Health and Wellness Centers: These facilities provide a range of services focused on preventive care, health education, and wellness programs.
- Mobile Medical Units (MMUs): These are mobile clinics that deliver healthcare services directly to communities, especially in underserved areas.
State Mapping:
- Each state has unique regulations, service availability, and population health needs. Mapping helps clarify where each service line operates.
Uses in Admin Configuration
Centralized Data Management:
- Administrators can create a central database that lists each Health and Wellness Center and MMU, along with the specific services they offer and their locations within each state.
Regulatory Compliance:
- Ensures that both Health and Wellness Centers and MMUs adhere to state-specific health regulations. Admins can update mappings when regulations change or when new services are added.
Service Availability:
- Helps identify which services are available in each state, enabling public health officials to understand where resources are concentrated and where there may be gaps in care.
Emergency Response Coordination:
- During health crises, such as outbreaks or natural disasters, knowing which MMUs can be deployed in specific states allows for rapid and efficient response efforts.
Data Analysis and Reporting:
- Administrators can generate reports on service distribution, usage patterns, and health outcomes, aiding in strategic planning and public health initiatives.
Improving Access:
- By mapping services, public health organizations can ensure that communities are aware of the available Health and Wellness Centers and MMUs, facilitating better access to care.
Community Health Assessments:
- Supports the evaluation of community health needs by identifying existing services and determining where additional services may be required, guiding public health initiatives.
Navigation is explained
- Open Provider Service Line State Mapping from the menu.
- Click "Add New Mapping".
- Enter the required details (provider, service line, state).
- Click "Save" to finalize the mapping
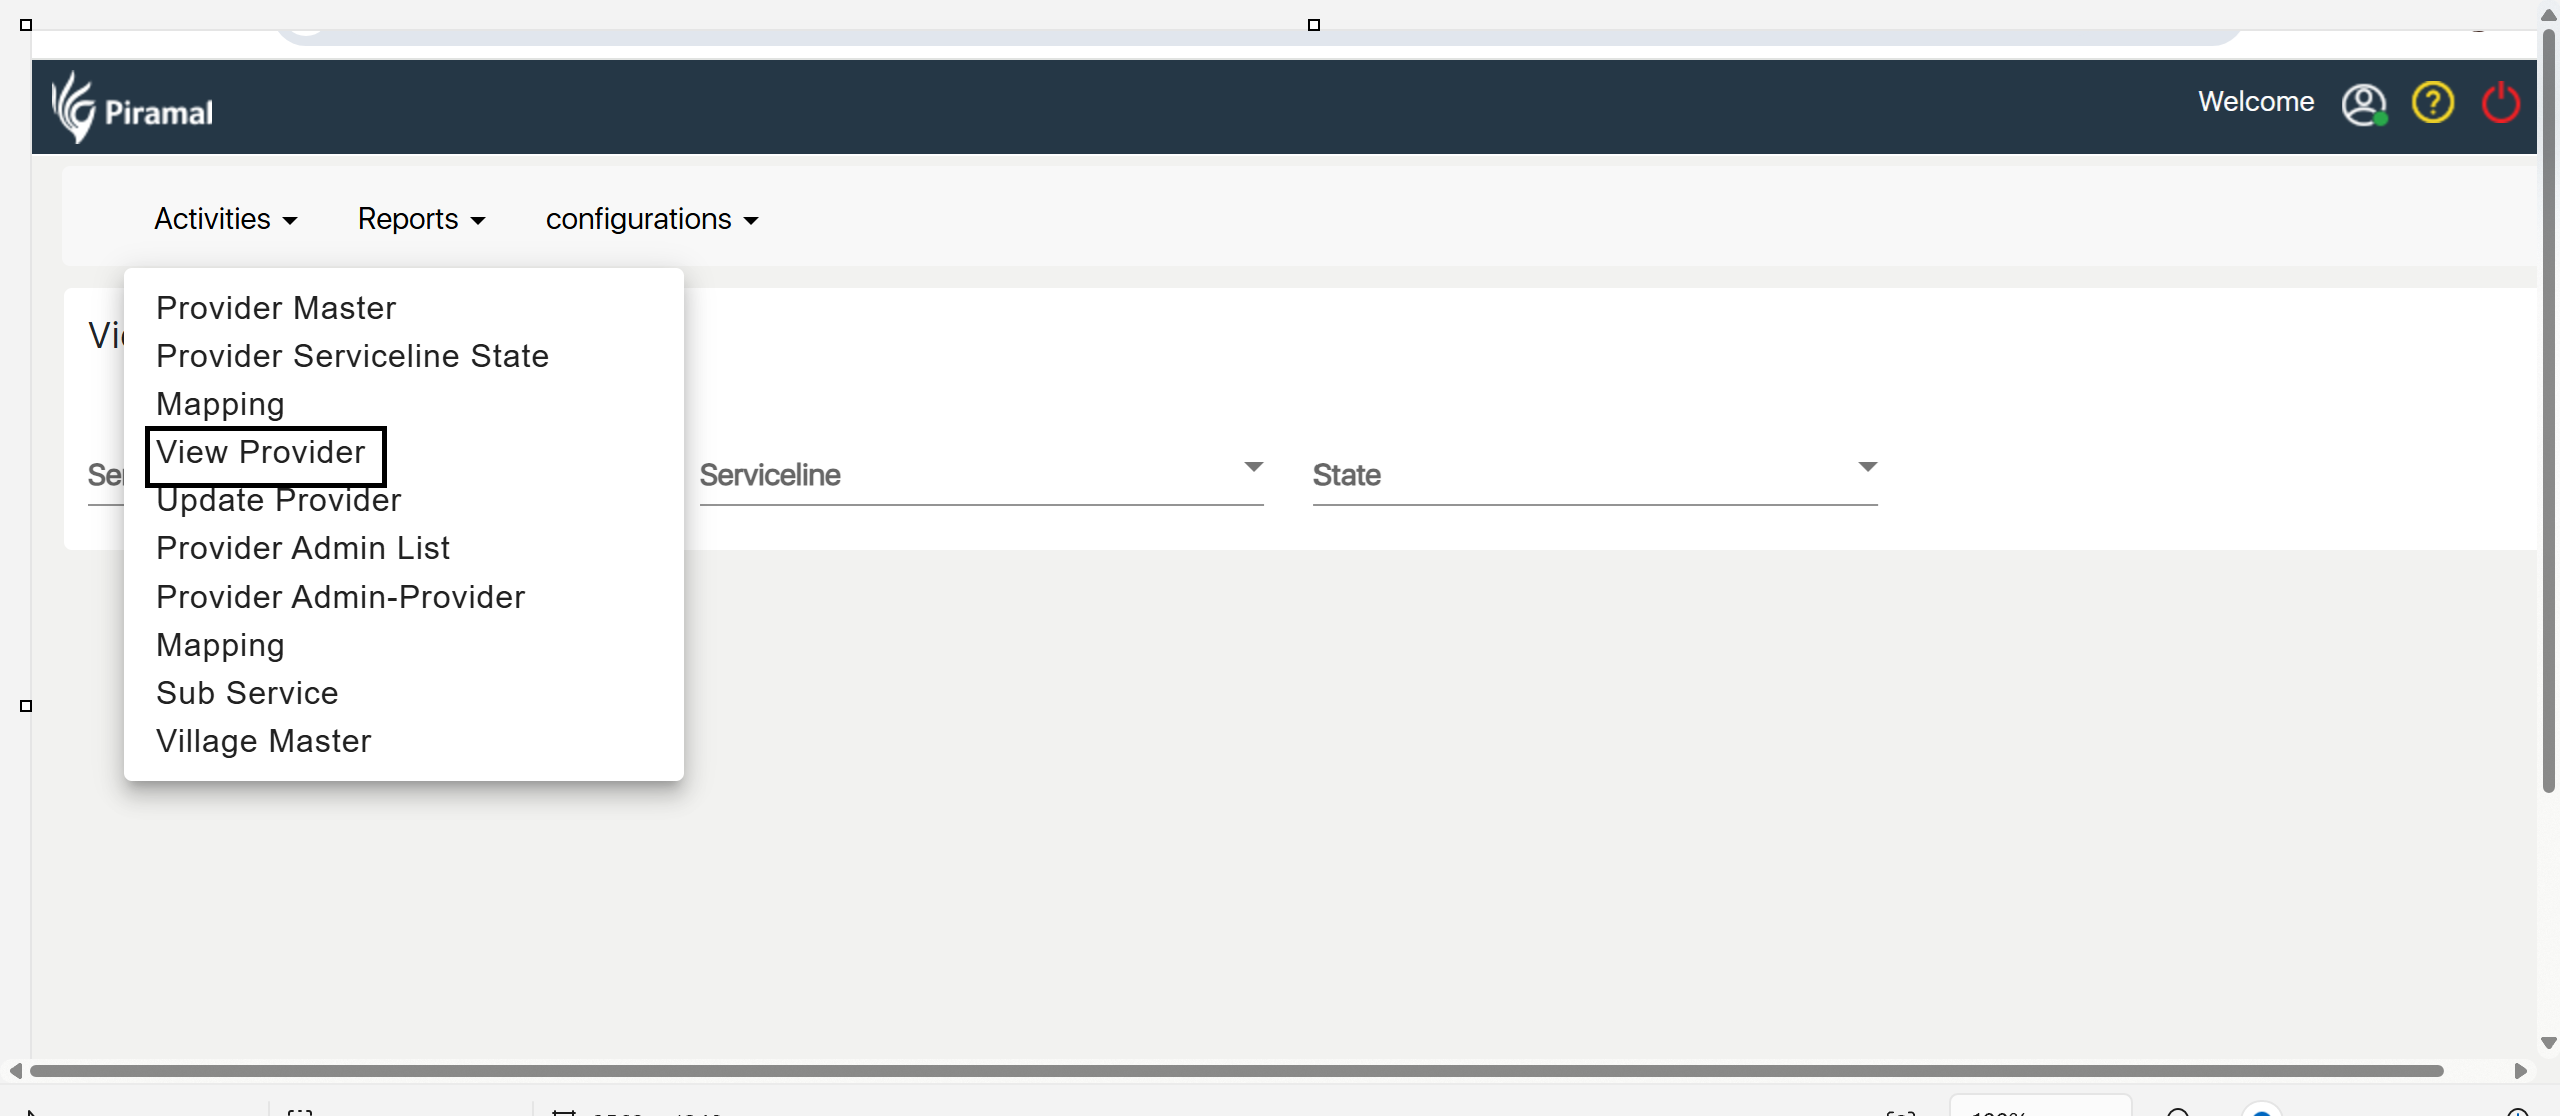
Viewing Provider Details
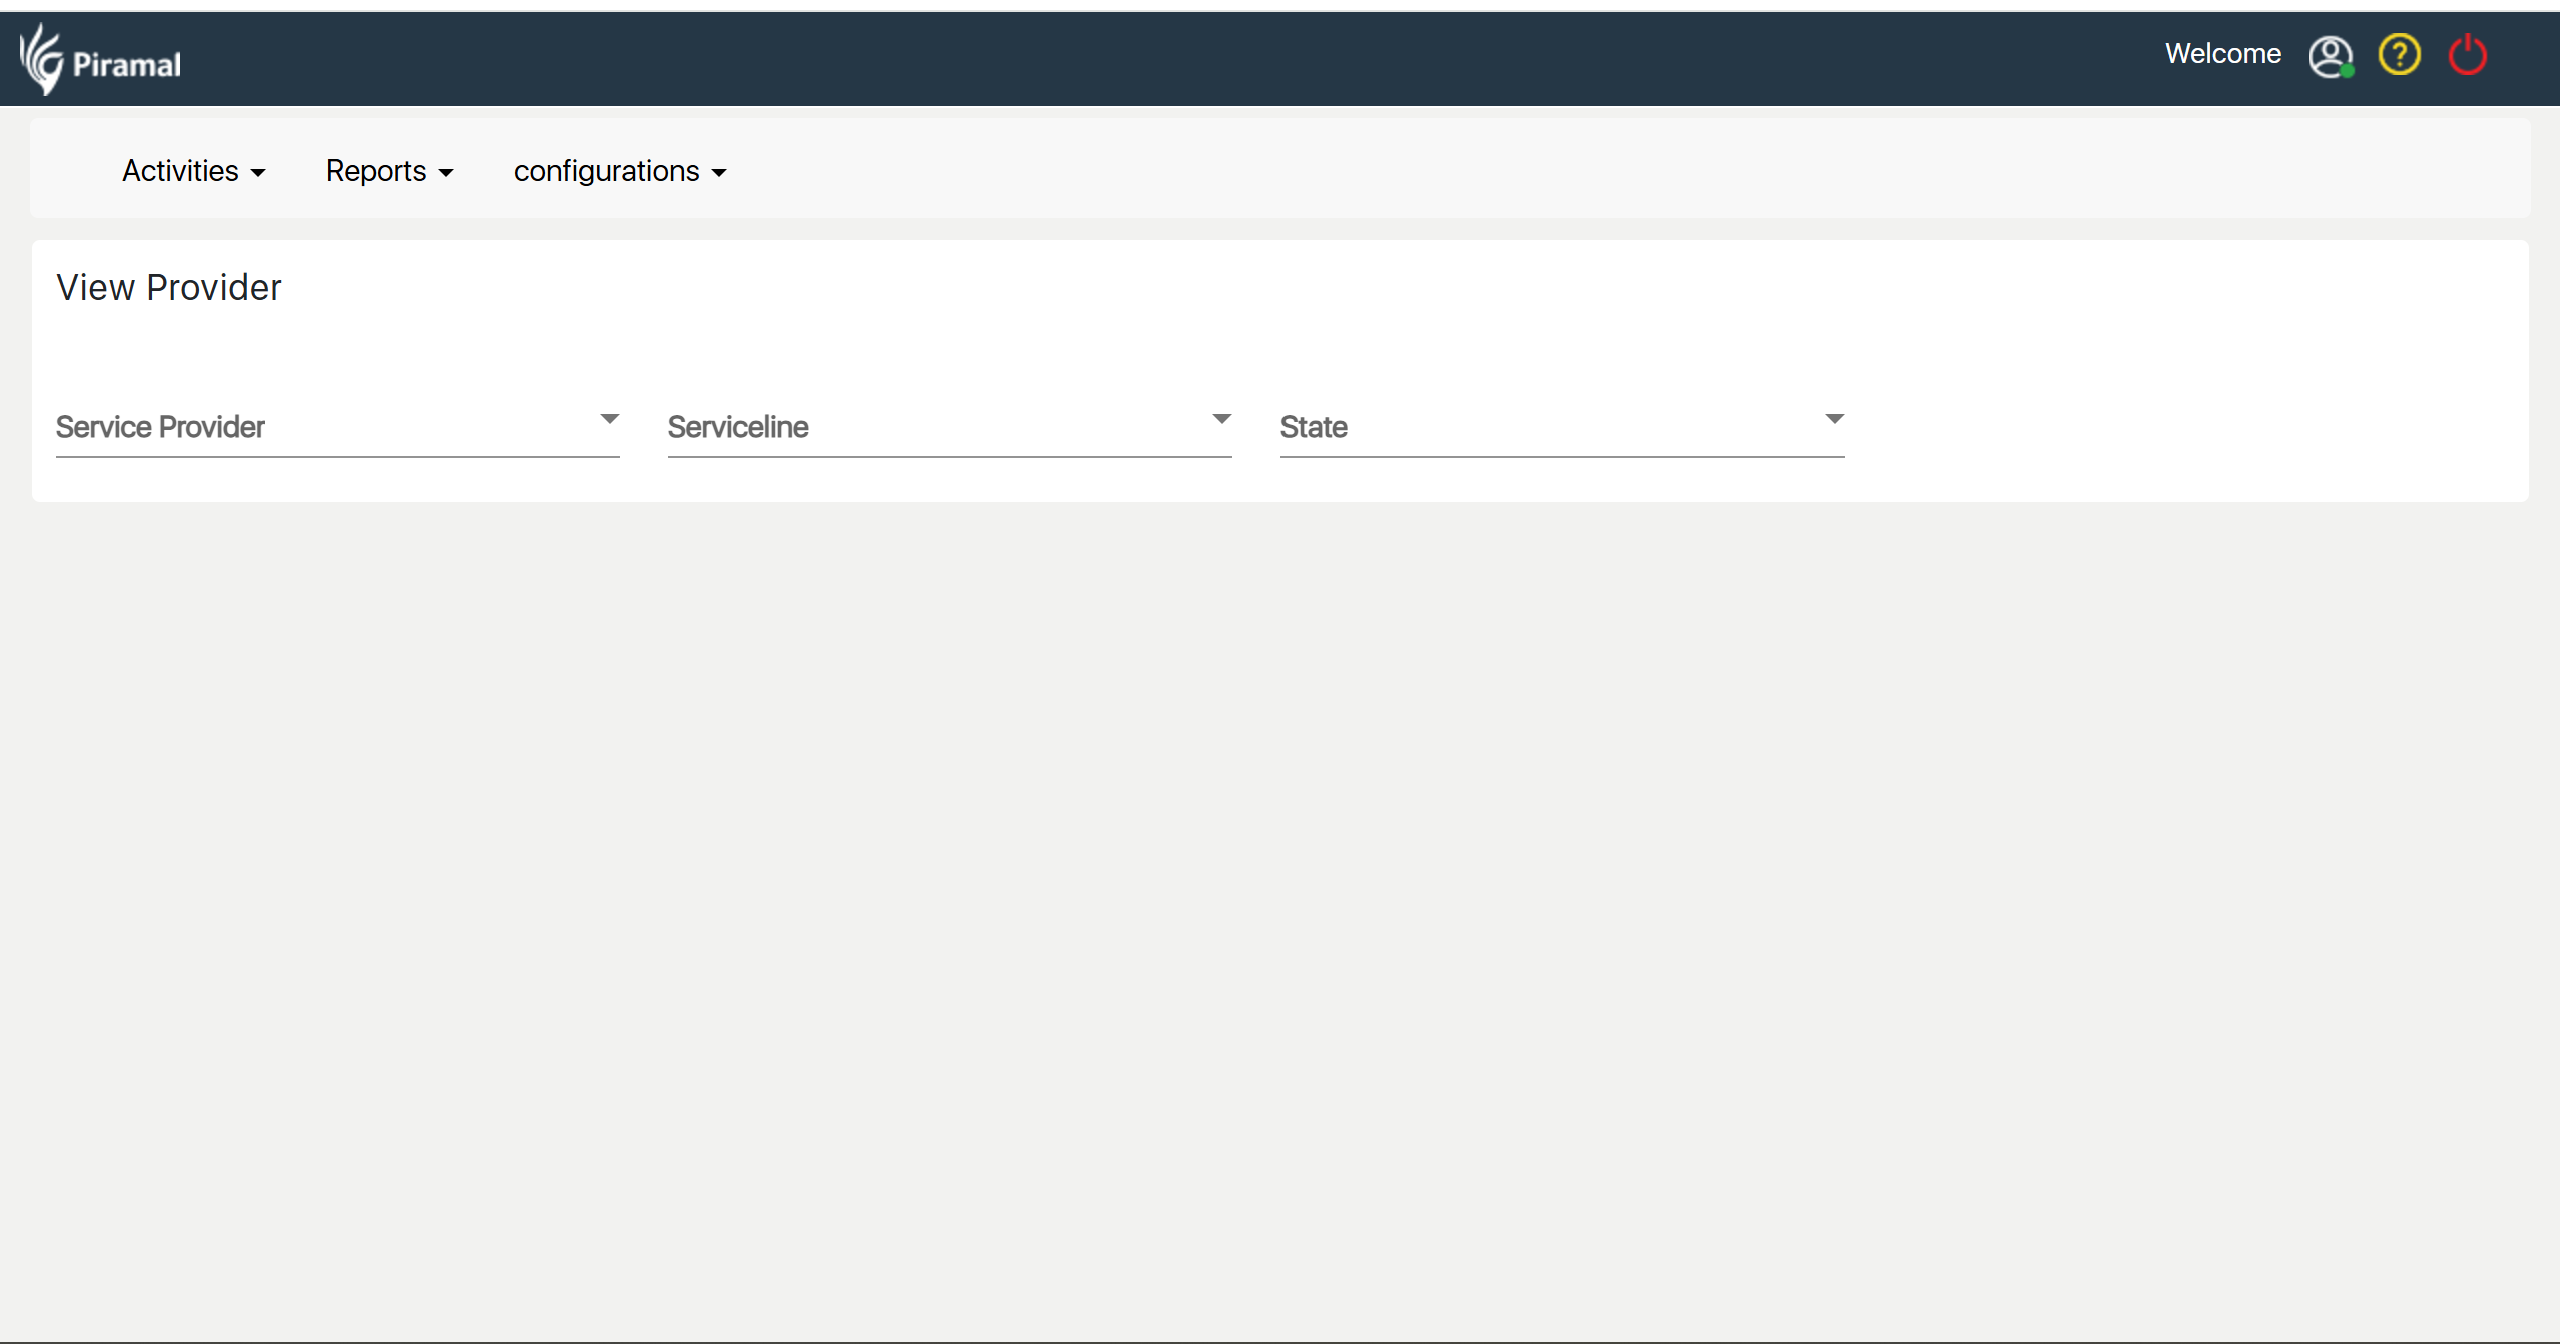
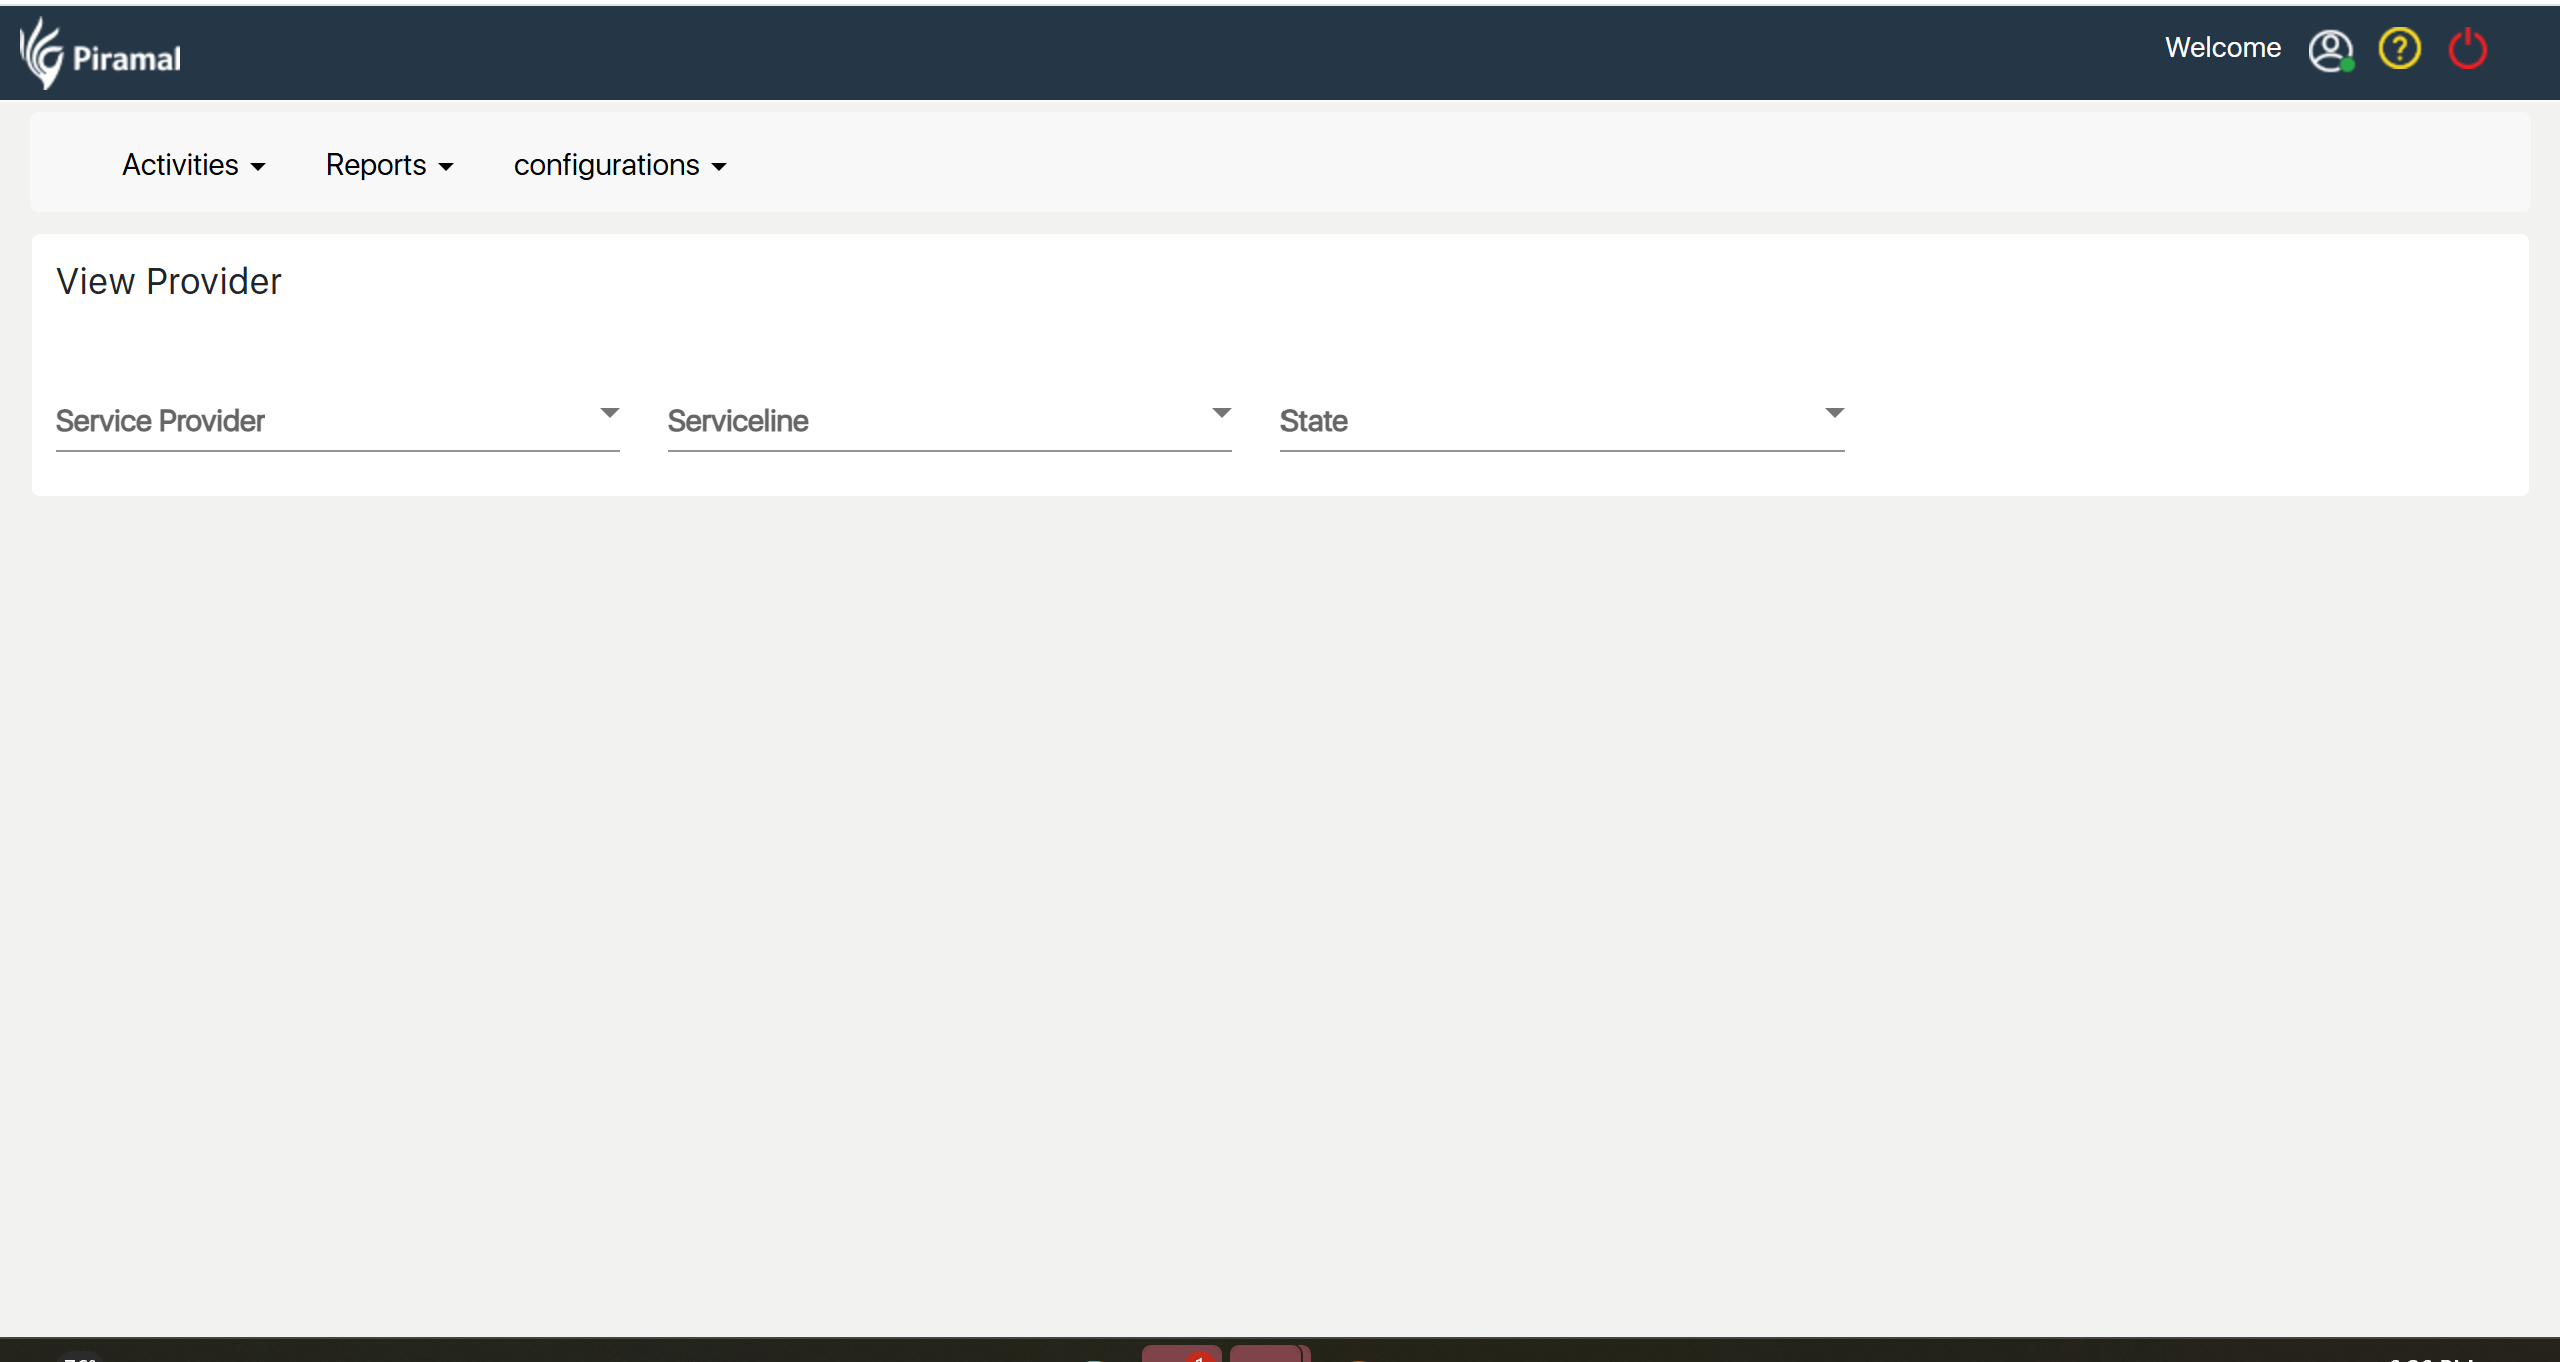
Navigate to View Provider: Select the "View Provider" option from the menu.
Select the Provider: Choose the specific provider from the list.
Review Details: Check the displayed information, including:
- Service Provider: The name of the service provider.
- Service Line: The associated service line.
- State: The state linked to the provider.
Updating Provider Information
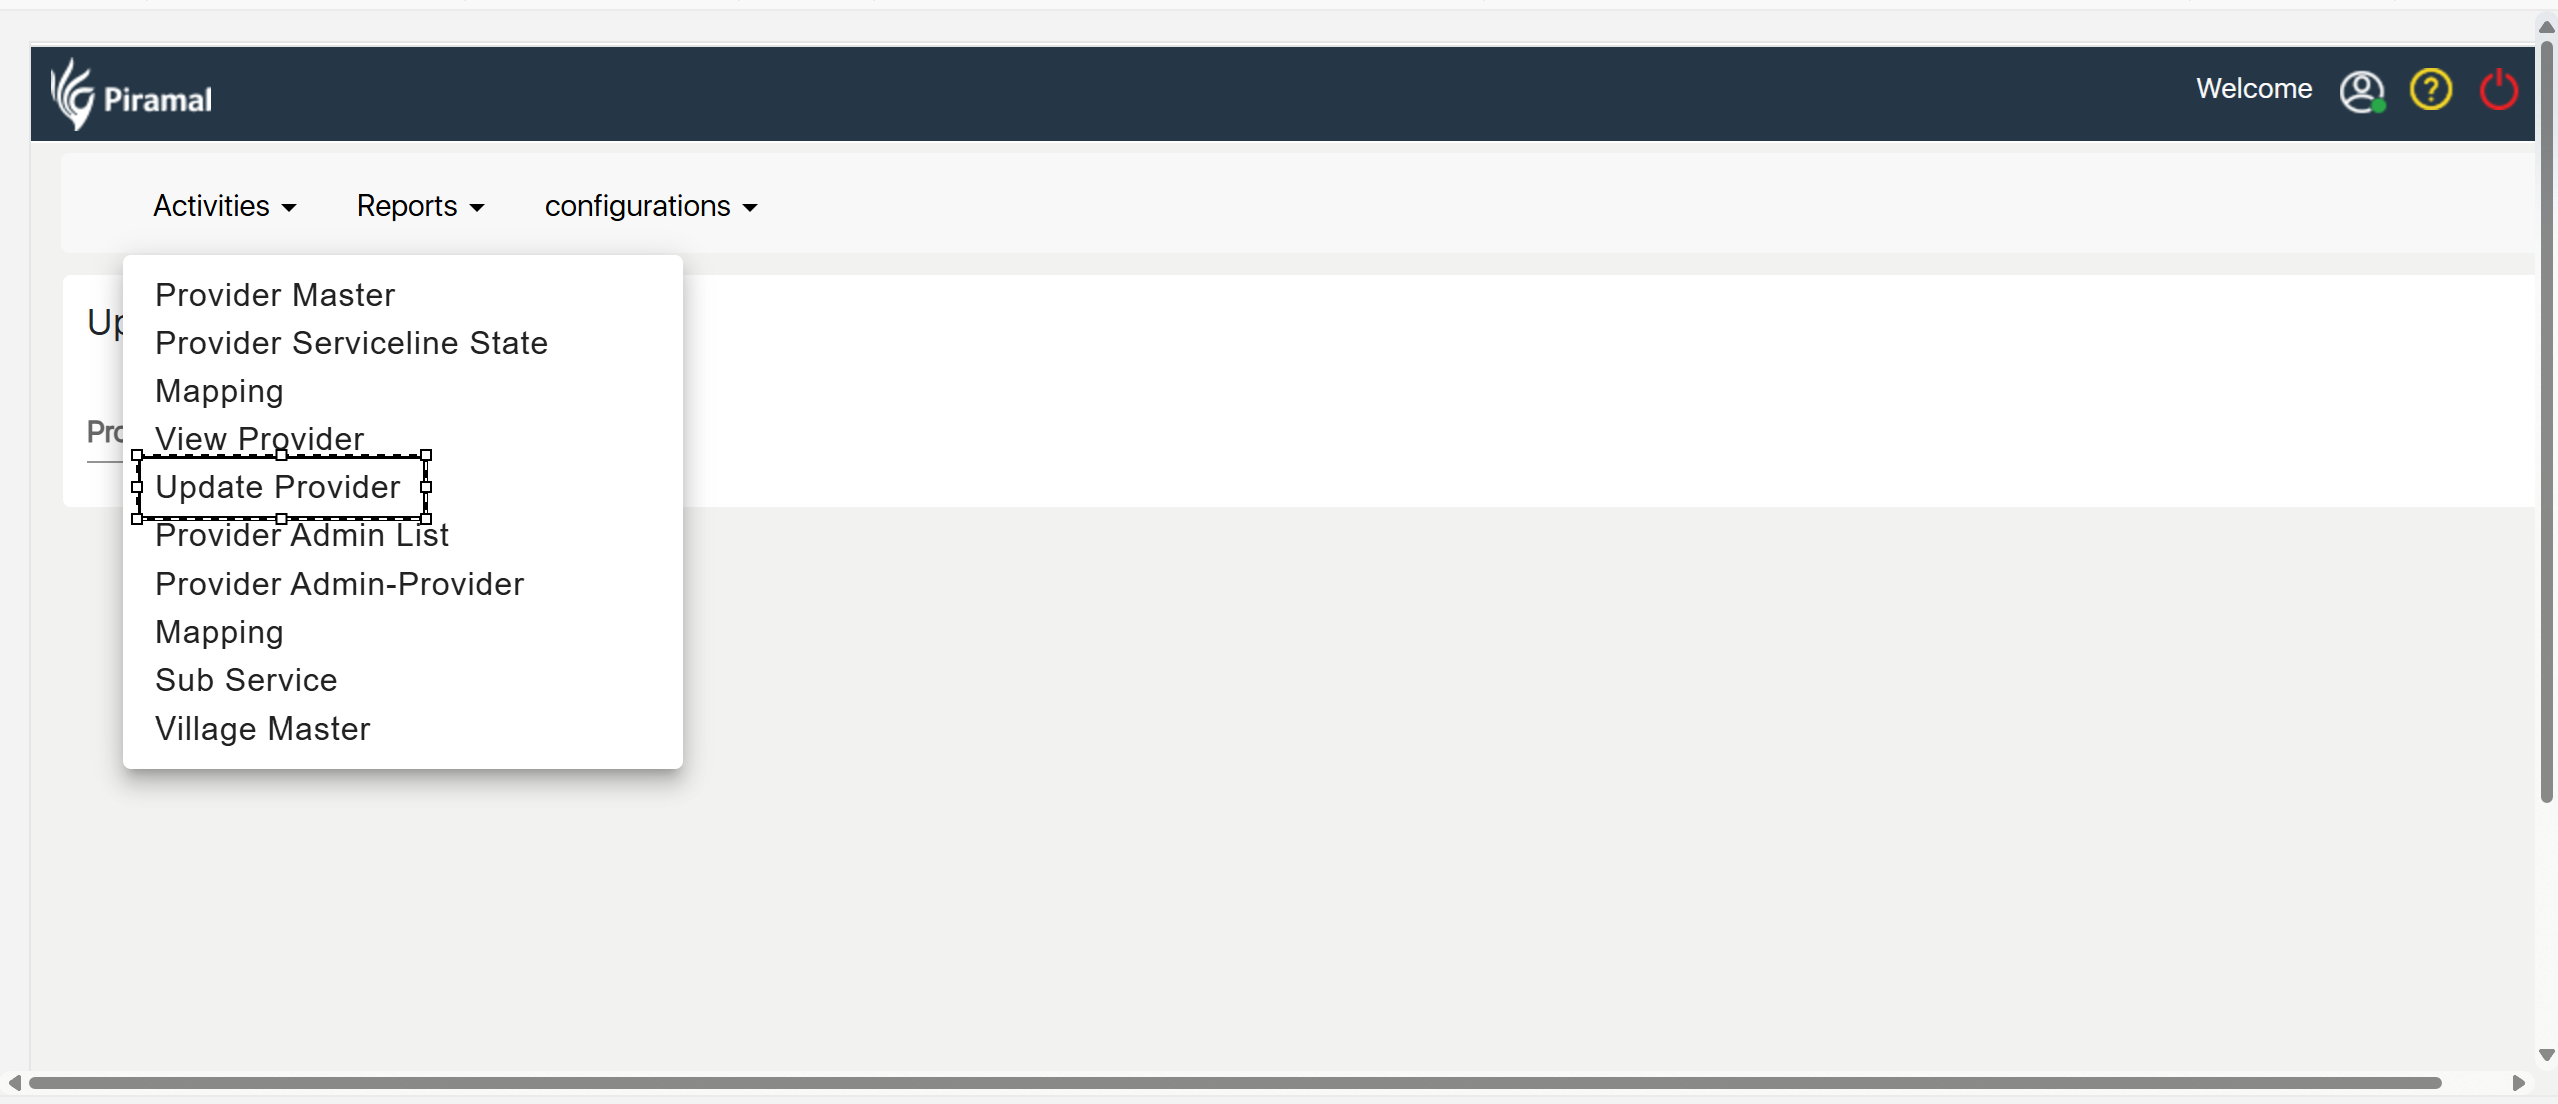
Go to Update Provider: Select the "Update Provider" option from the menu.
Select the Provider: Choose the provider whose information needs to be updated.
Edit Details: Modify the required fields as needed.
Save Changes: Click "Save" to apply the updates.
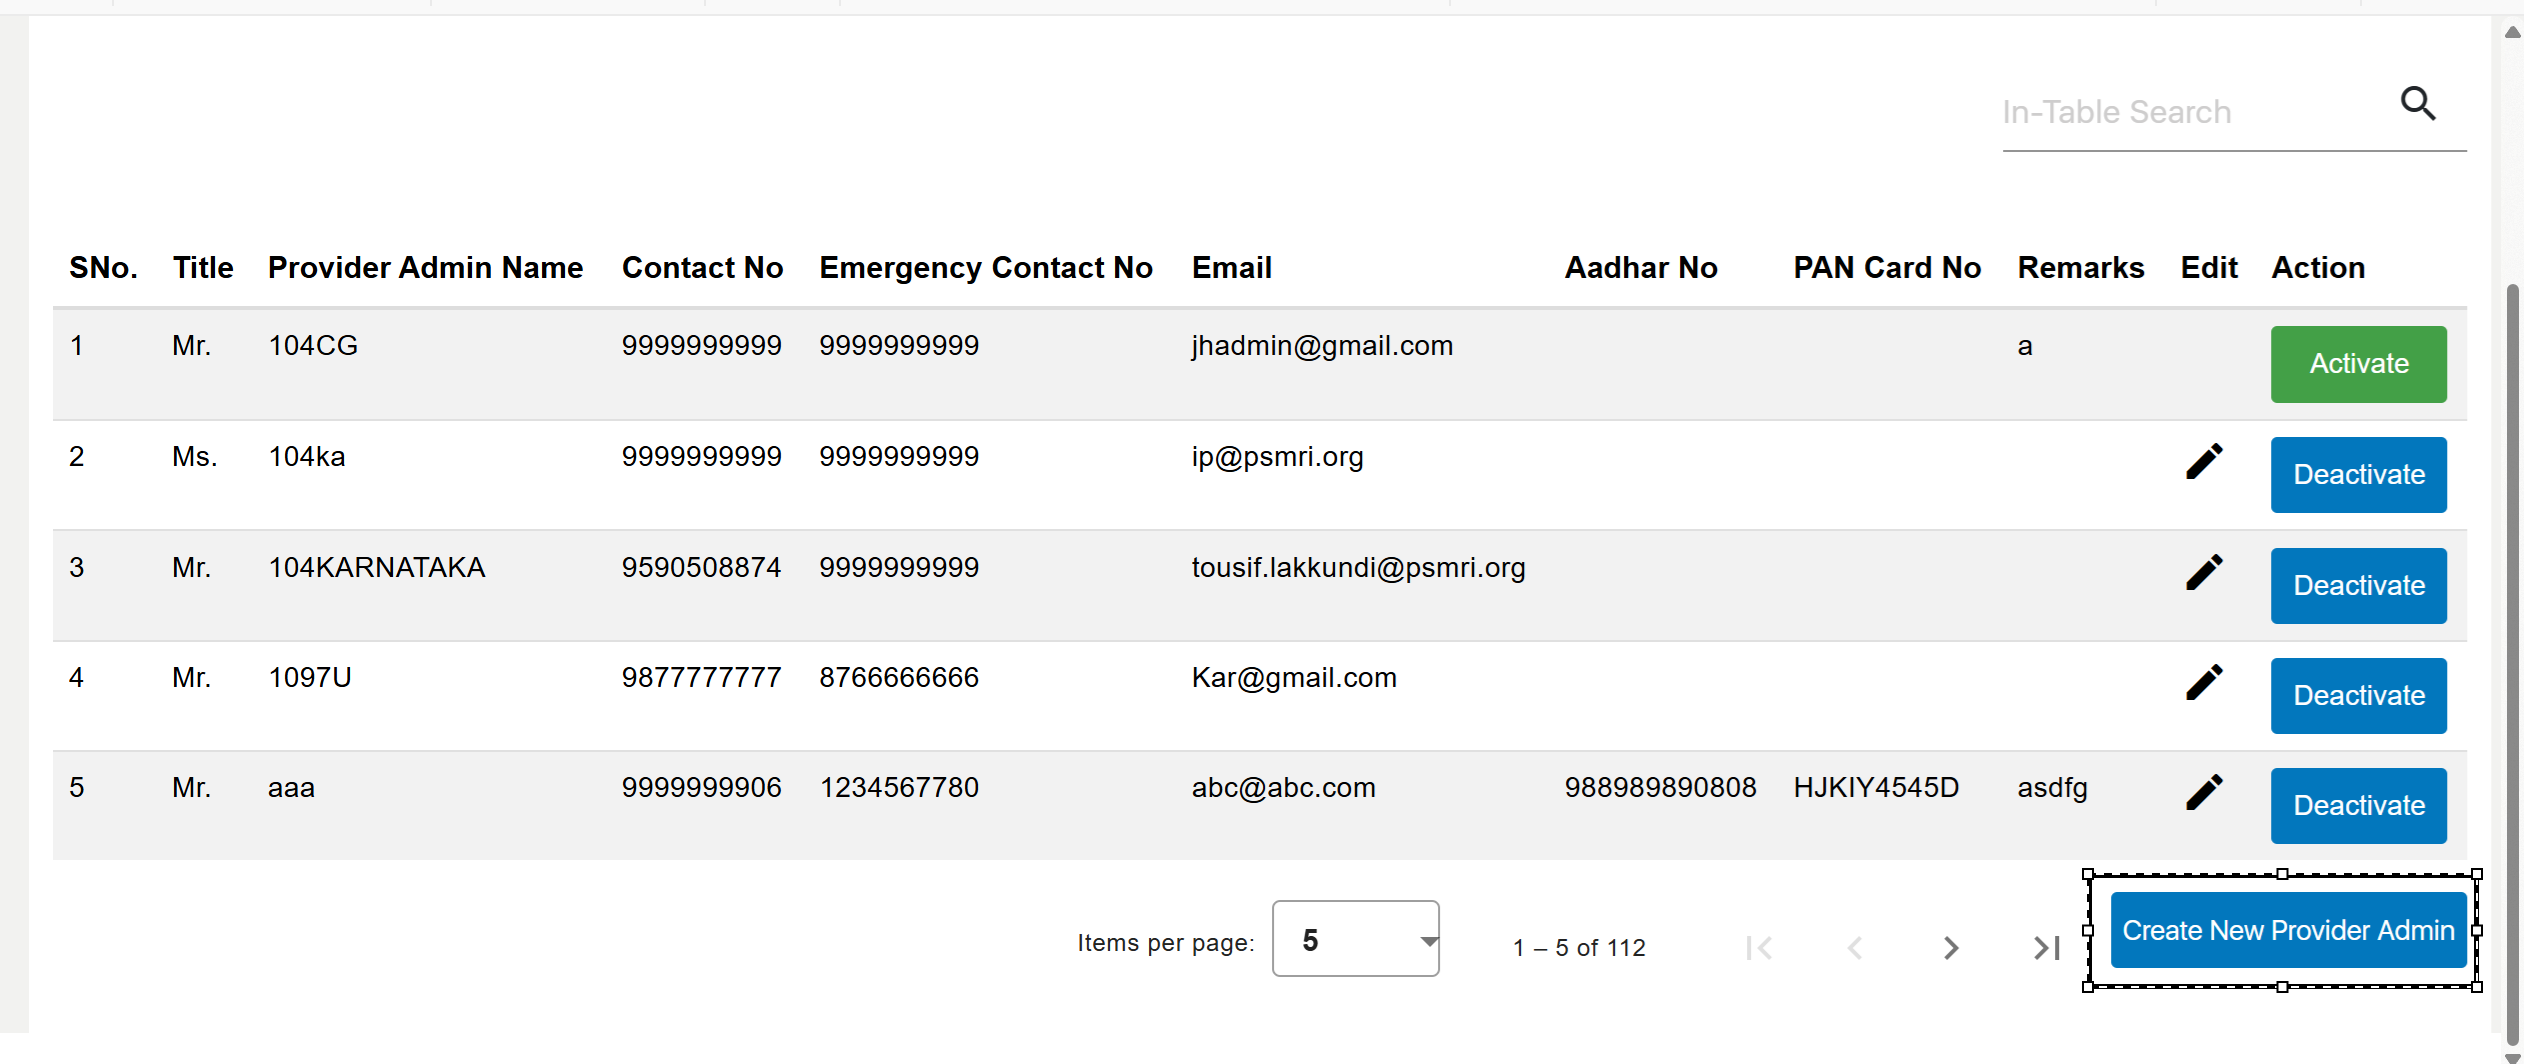
Creating a New Provider Admin
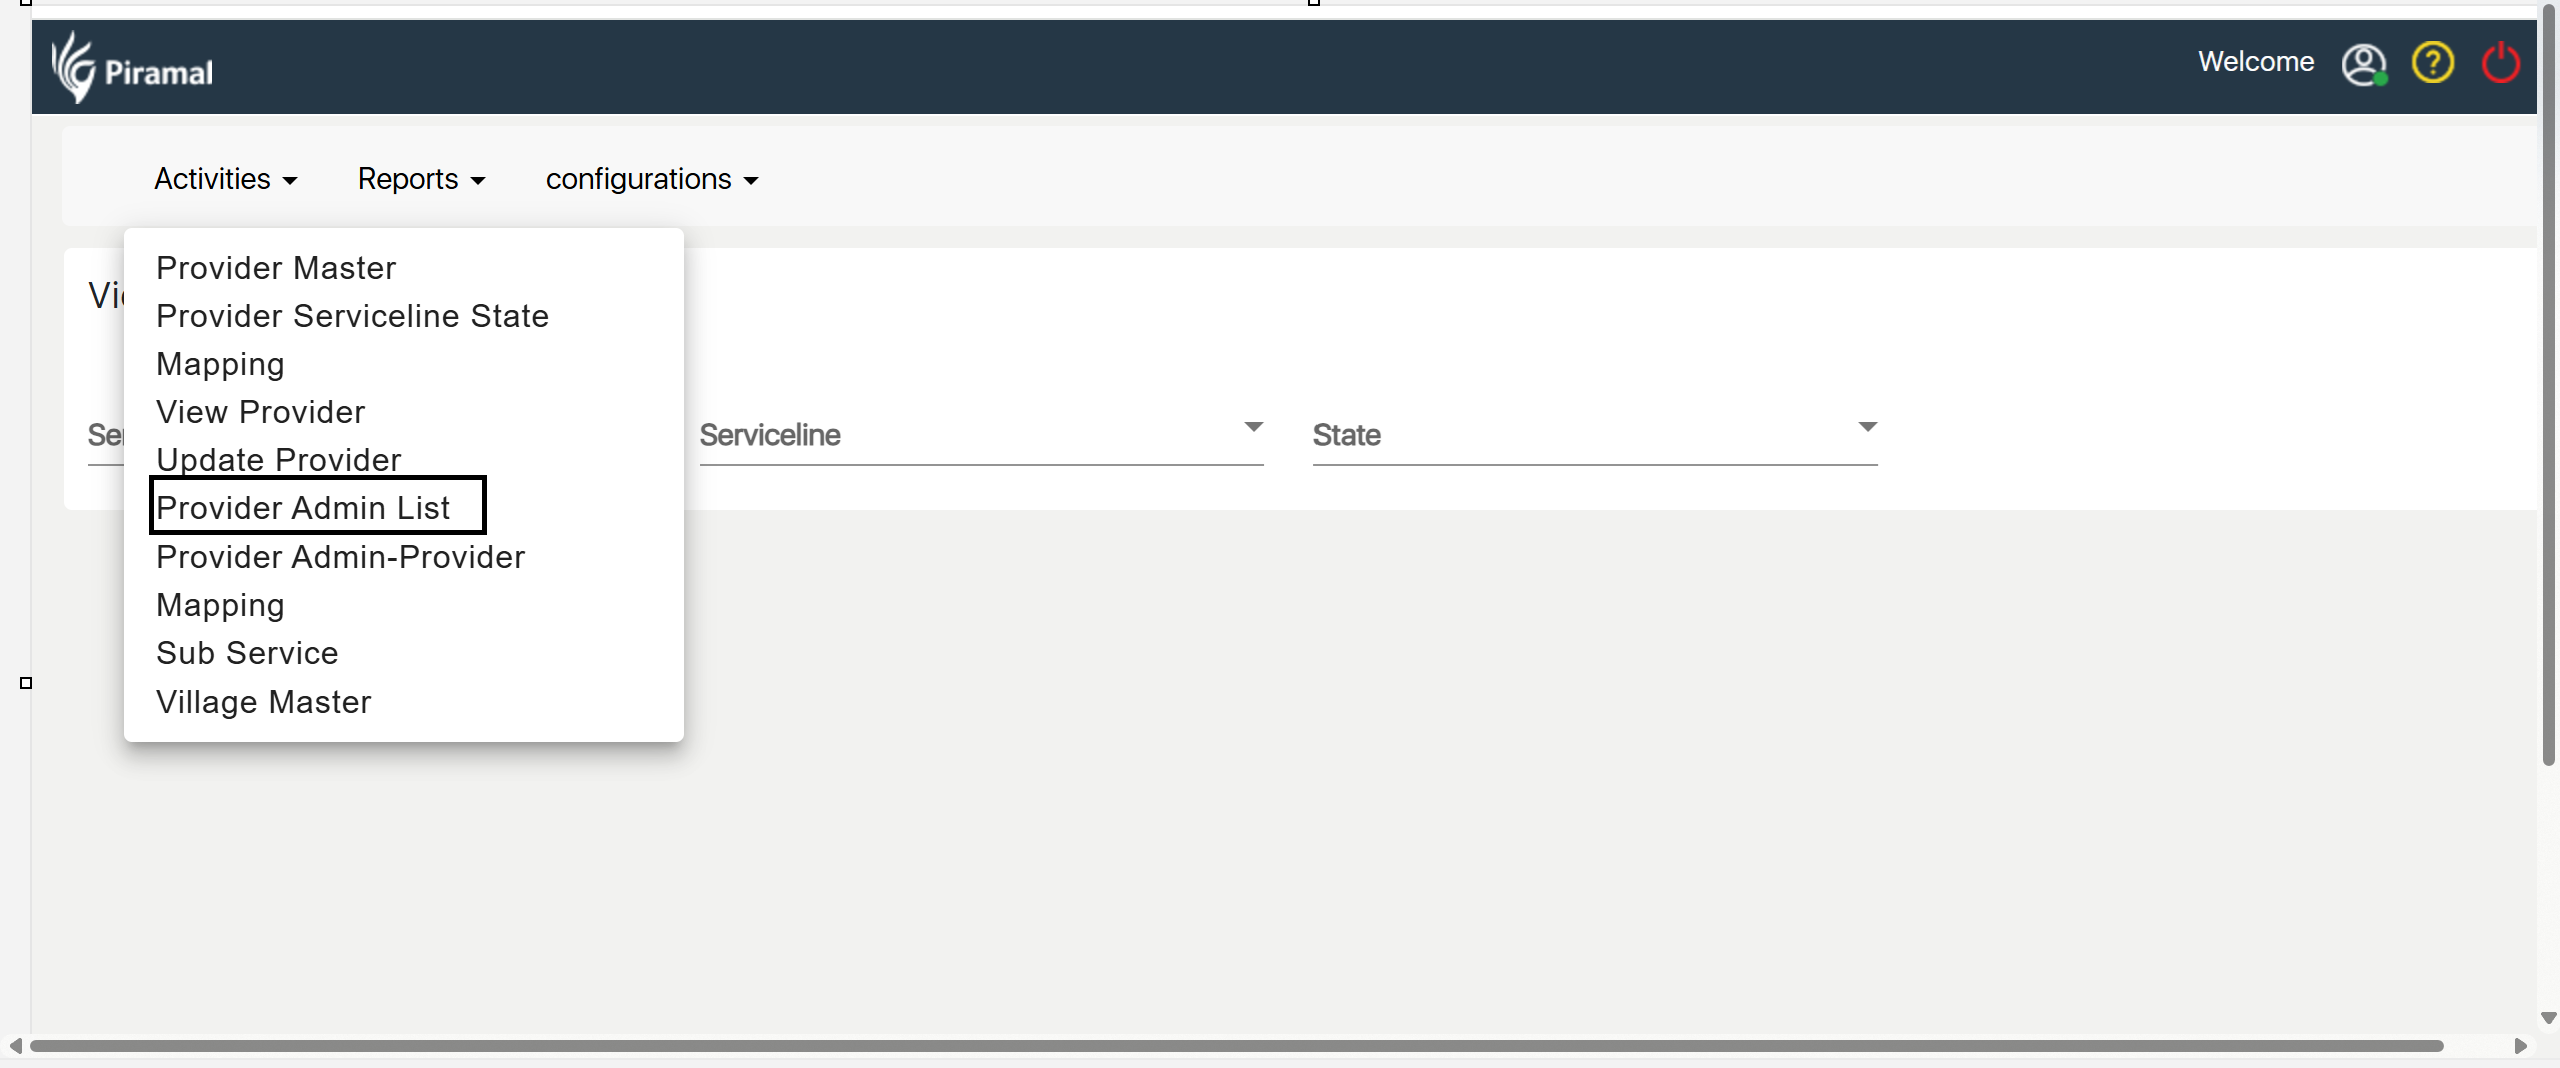
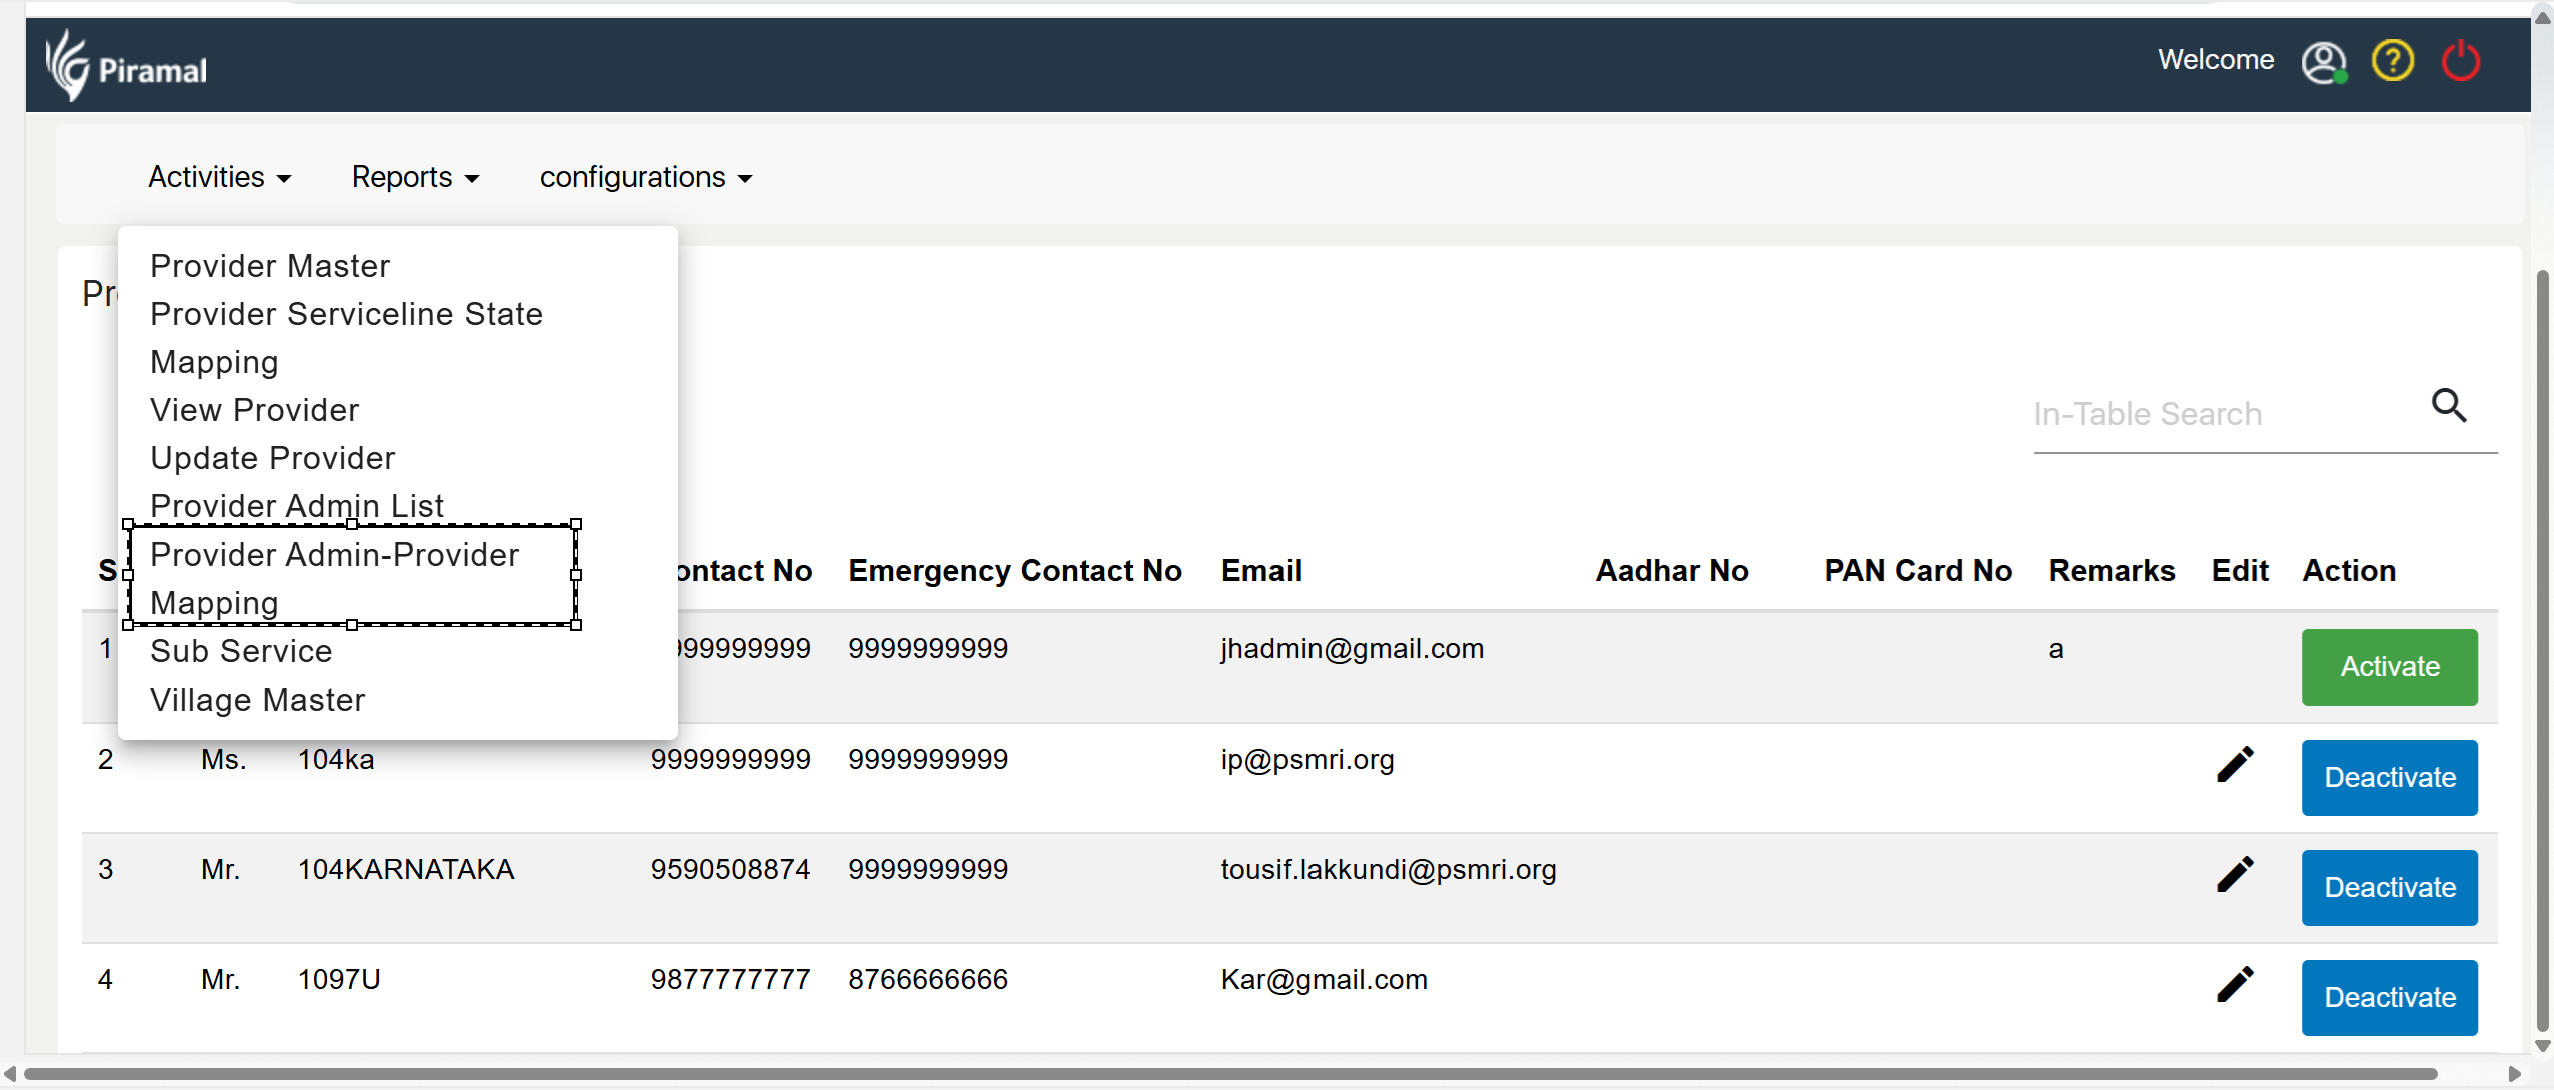
Navigate to Provider Admin List: Select the "Provider Admin List" option from the menu.
Click "Create New Admin": Initiate the process to add a new provider admin.
Enter Admin Details: Fill in the required information for the new provider admin.
Save the Admin: Click "Save" to store the new provider admin details.
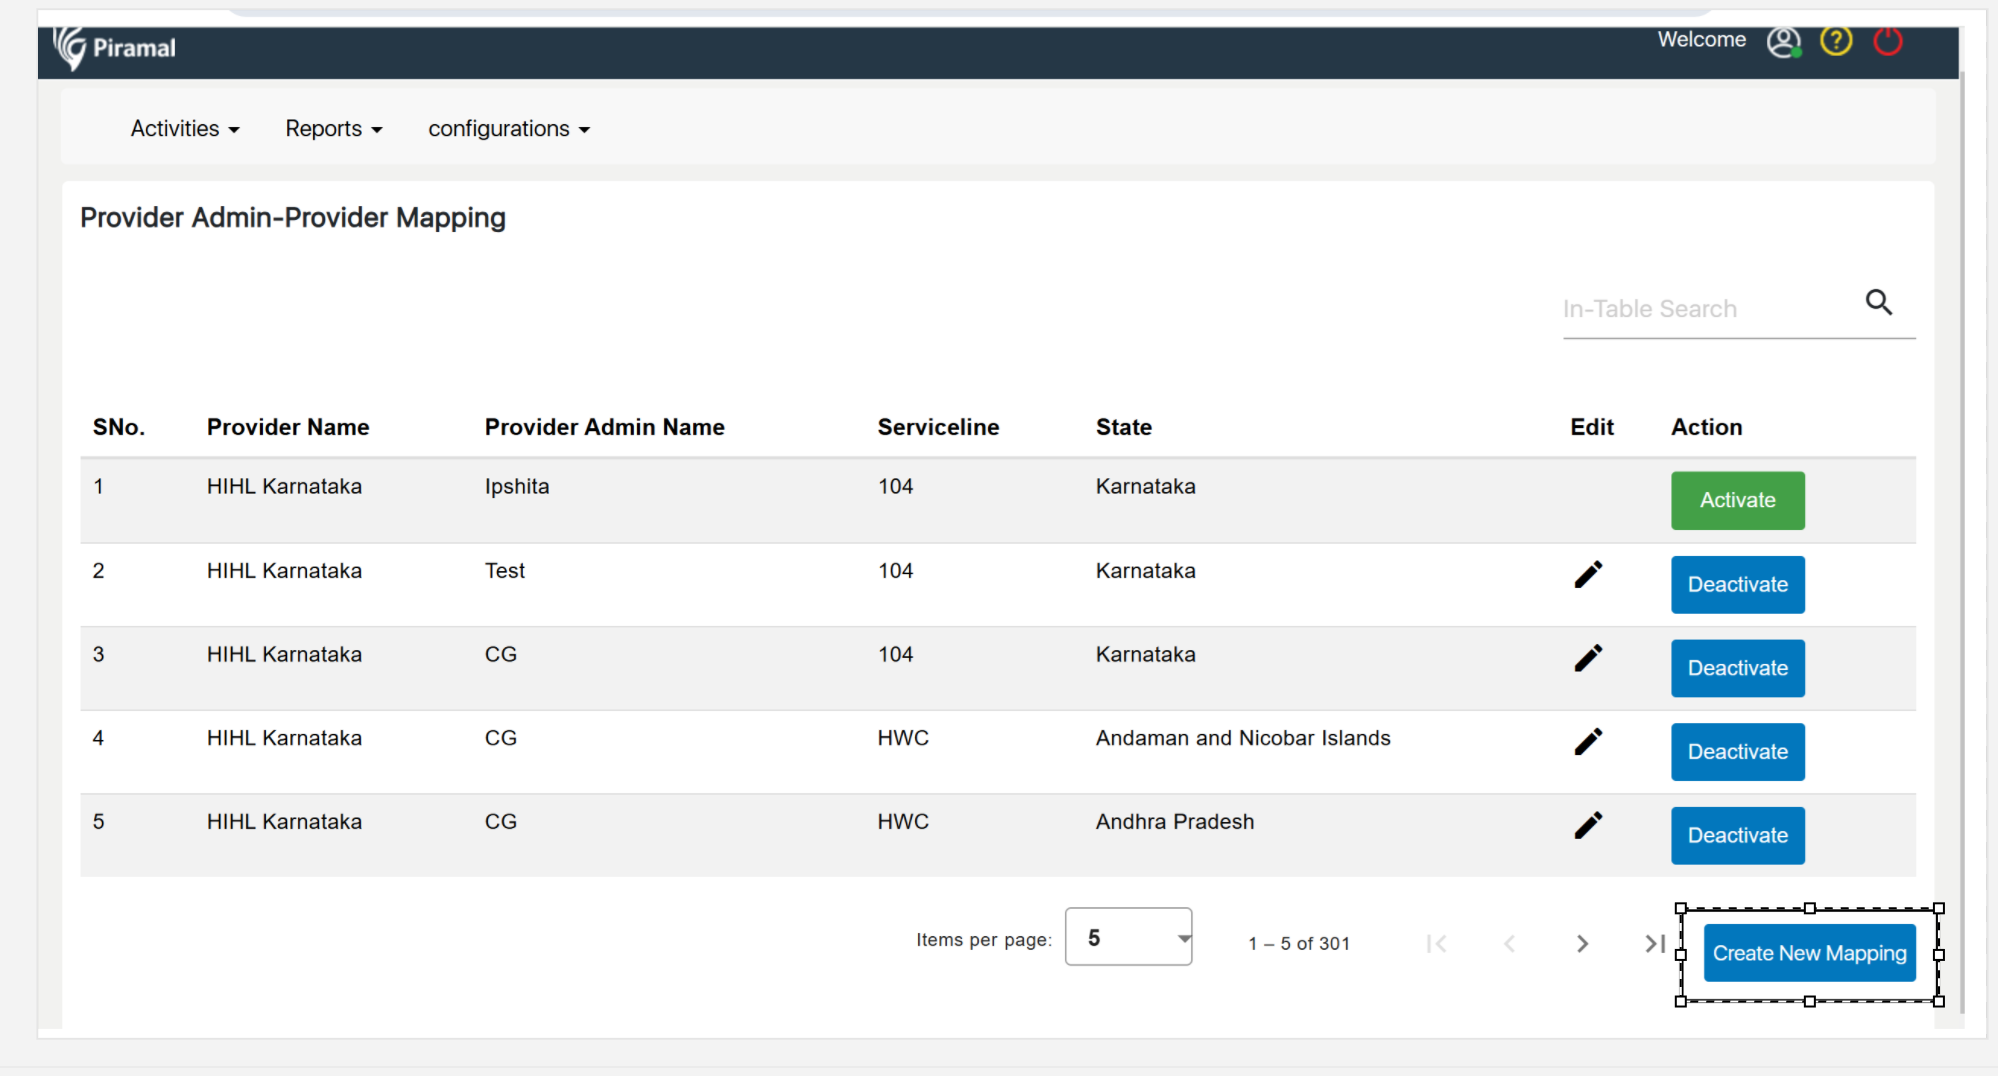
Provider Admin-Provider Mapping
In an Admin Configuration system, particularly within the context of healthcare applications or platforms, Provider Admin-Provider Mapping typically refers to the relationship and configuration settings between administrators and healthcare providers. Here’s a detailed explanation:
Provider Admin-Provider Mapping Overview:
Provider (Healthcare Provider):
- A healthcare provider can be an individual doctor, nurse, medical practitioner, or a healthcare institution (hospital, clinic) offering medical services.
Provider Admin:
- This refers to the administrator responsible for managing one or more healthcare providers within a healthcare system. The admin usually handles tasks like user management, provider-specific configurations, permissions, and access control.
Mapping:
- Mapping in this context refers to linking or assigning specific providers to administrators who are responsible for their management. It allows system admins to control which administrators are responsible for managing which healthcare providers within the system.
Purpose of Provider Admin-Provider Mapping:
Access Control & Permissions:
- By mapping a provider to a provider admin, you can control which admin has the authority to manage the provider’s data, settings, and users. This ensures that only authorized personnel have access to sensitive information and functionality.
Scalability:
- In large healthcare systems, there may be multiple providers (clinics, doctors) and admins. Mapping ensures that each admin is responsible only for a subset of providers, helping distribute responsibilities and reduce administrative overload.
Customization & Configuration:
- Provider admins may have unique configurations for their assigned providers, such as setting up different workflows, handling provider-specific requests, and managing provider-specific users and roles.
Accountability:
- The mapping creates clear accountability. If there are issues with a particular provider, the admin responsible for managing that provider can be easily identified.
- Go to Provider Admin-Provider Mapping: Select the "Provider Admin-Provider Mapping" option from the menu.
- Click "Add New Mapping": Start creating a new admin-provider mapping.
- Select Admin and Provider: Choose the appropriate provider admin and provider from the lists.
- Save Mapping: Click "Save" to finalize and store the mapping.
Admin Module
Log in to the Admin module, create users under the Provider admin, and enter the username and password
and click in Login.
In essence, the Admin Configuration for these modules allows system administrators to define the structure and boundaries of their operational areas and manage the outreach efforts within those zones. It provides a high level of control over how geographical areas are handled and ensures that outreach activities are targeted effectively.
Outreach Master, Zone Master, and Create Zone List are typically configured to allow administrators to manage the system's operational and geographical settings. Here's how these might function in an admin configuration context:
Outreach Master (Admin Configuration):
- Admins can configure settings related to outreach activities, including:
- Defining outreach programs and objectives (e.g., health campaigns, educational outreach)
- Adding or modifying target groups or audiences for outreach.
- Scheduling outreach events or campaigns.
- Assigning outreach tasks to specific teams or zones.
- Setting rules for tracking and reporting outreach performance.
- Admins can configure settings related to outreach activities, including:
Zone Master (Admin Configuration):
- This section allows administrators to manage geographical zones, which could be important for various operational tasks. Functions might include:
- Creating new zones: Defining new geographical areas or zones based on regions, districts, or custom criteria.
- Editing zones: Modifying existing zones to update boundaries or attributes.
- Assigning resources: Allocating resources (e.g., personnel, equipment) or outreach activities to specific zones.
- Zone hierarchy management: Setting up parent-child relationships between zones (e.g., regions containing multiple districts).
- Viewing zones: Viewing a complete list or map of all defined zones for easy management.
- This section allows administrators to manage geographical zones, which could be important for various operational tasks. Functions might include:
Create Zone List (Admin Configuration):
- This feature allows admins to generate and manage lists of zones within the system. It may involve:
- Selecting or grouping zones based on specific criteria (e.g., high-priority areas for outreach).
- Organizing zones into lists for tasks such as outreach scheduling, reporting, or resource allocation.
- Adding or removing zones from the list as operational needs change.
- Exporting zone lists for external use (e.g., for reporting or integration with other systems).
- This feature allows admins to generate and manage lists of zones within the system. It may involve:
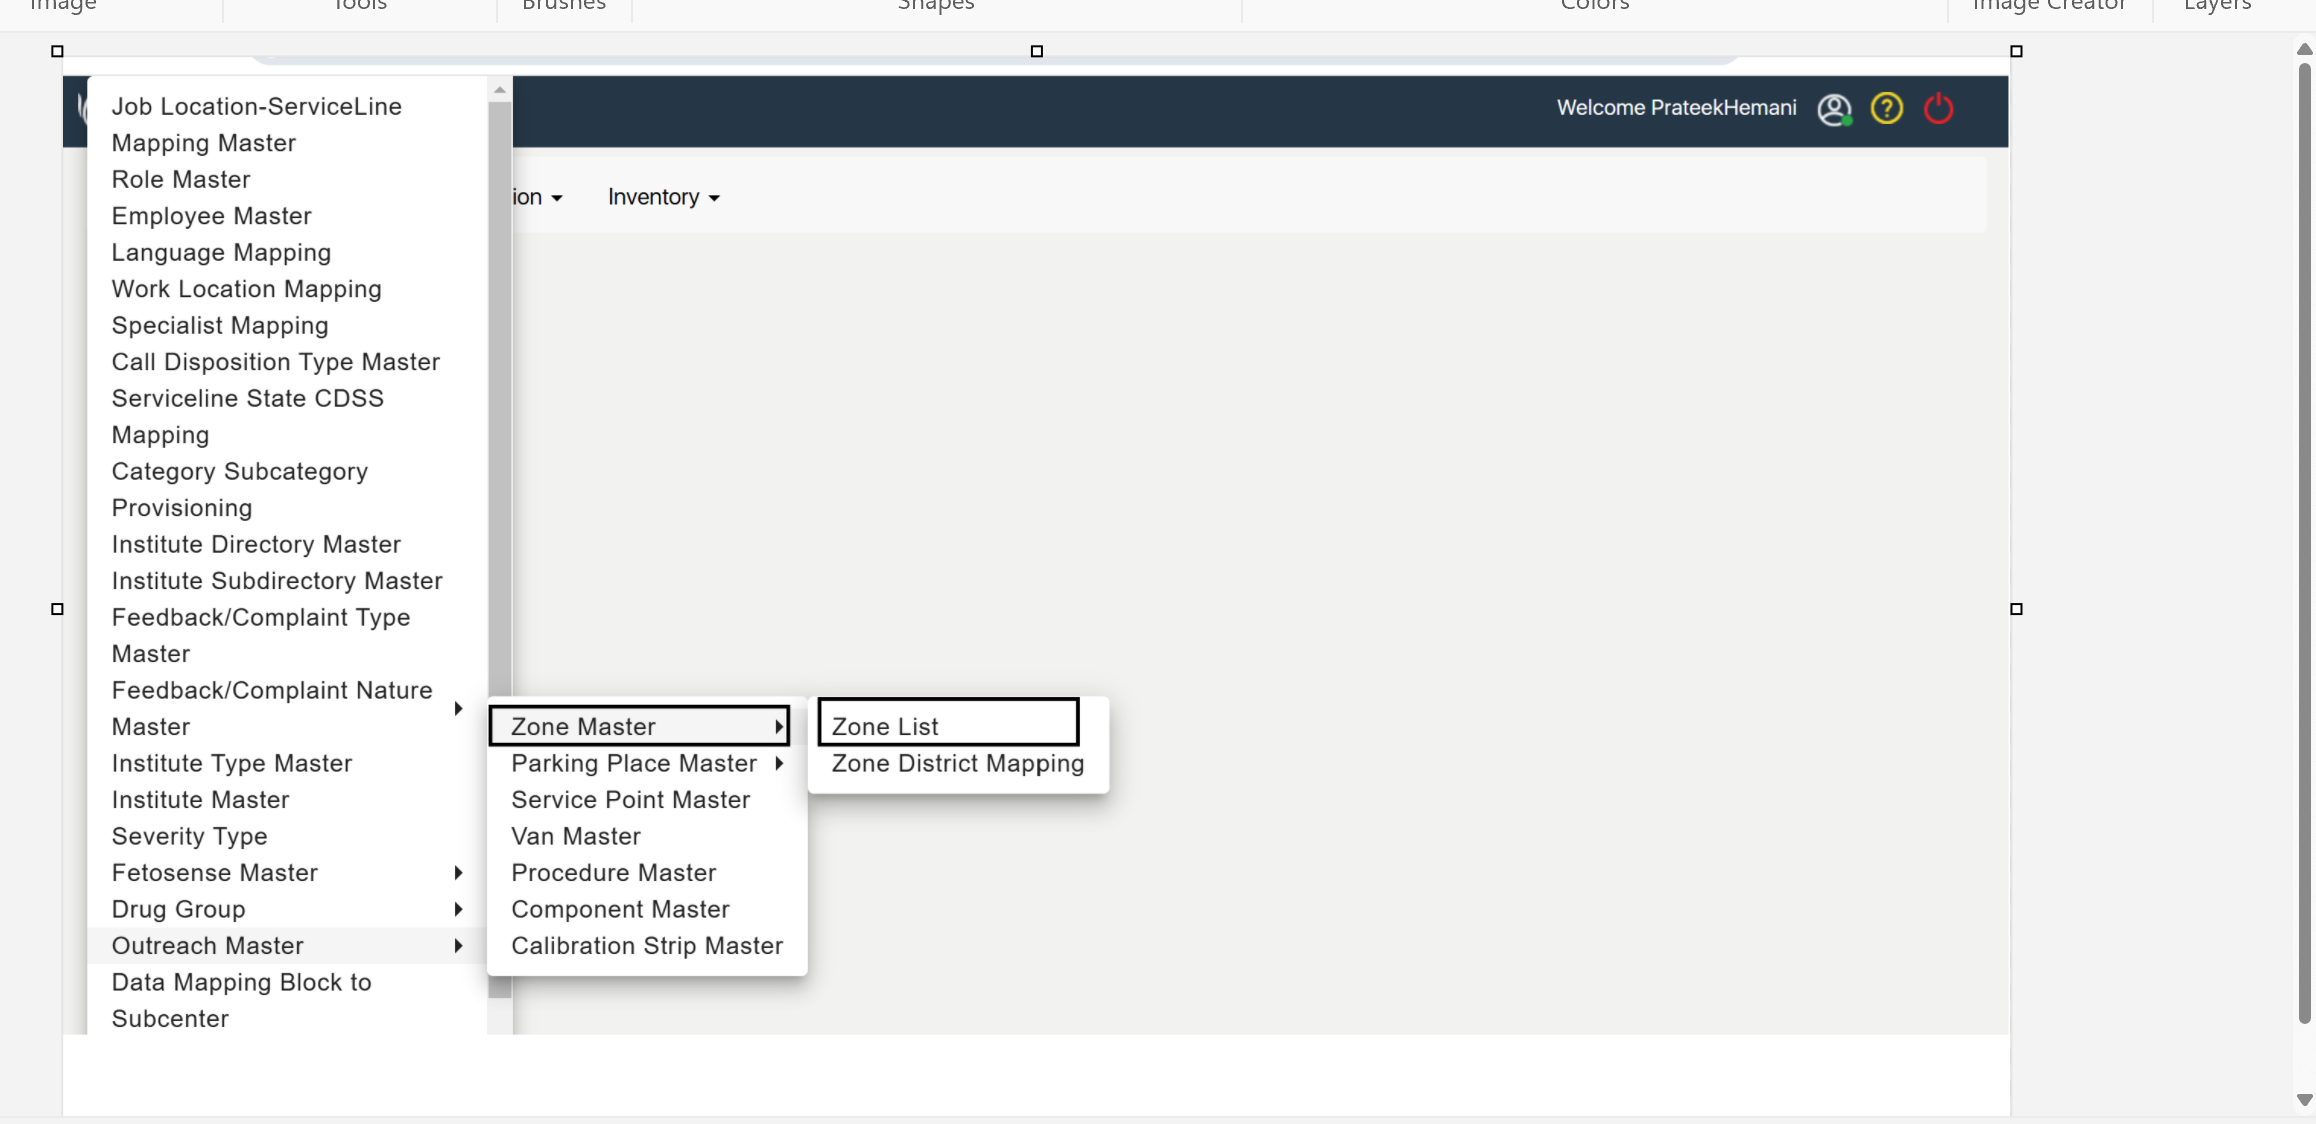
- Go to Activities: Navigate to the "Activities" section.
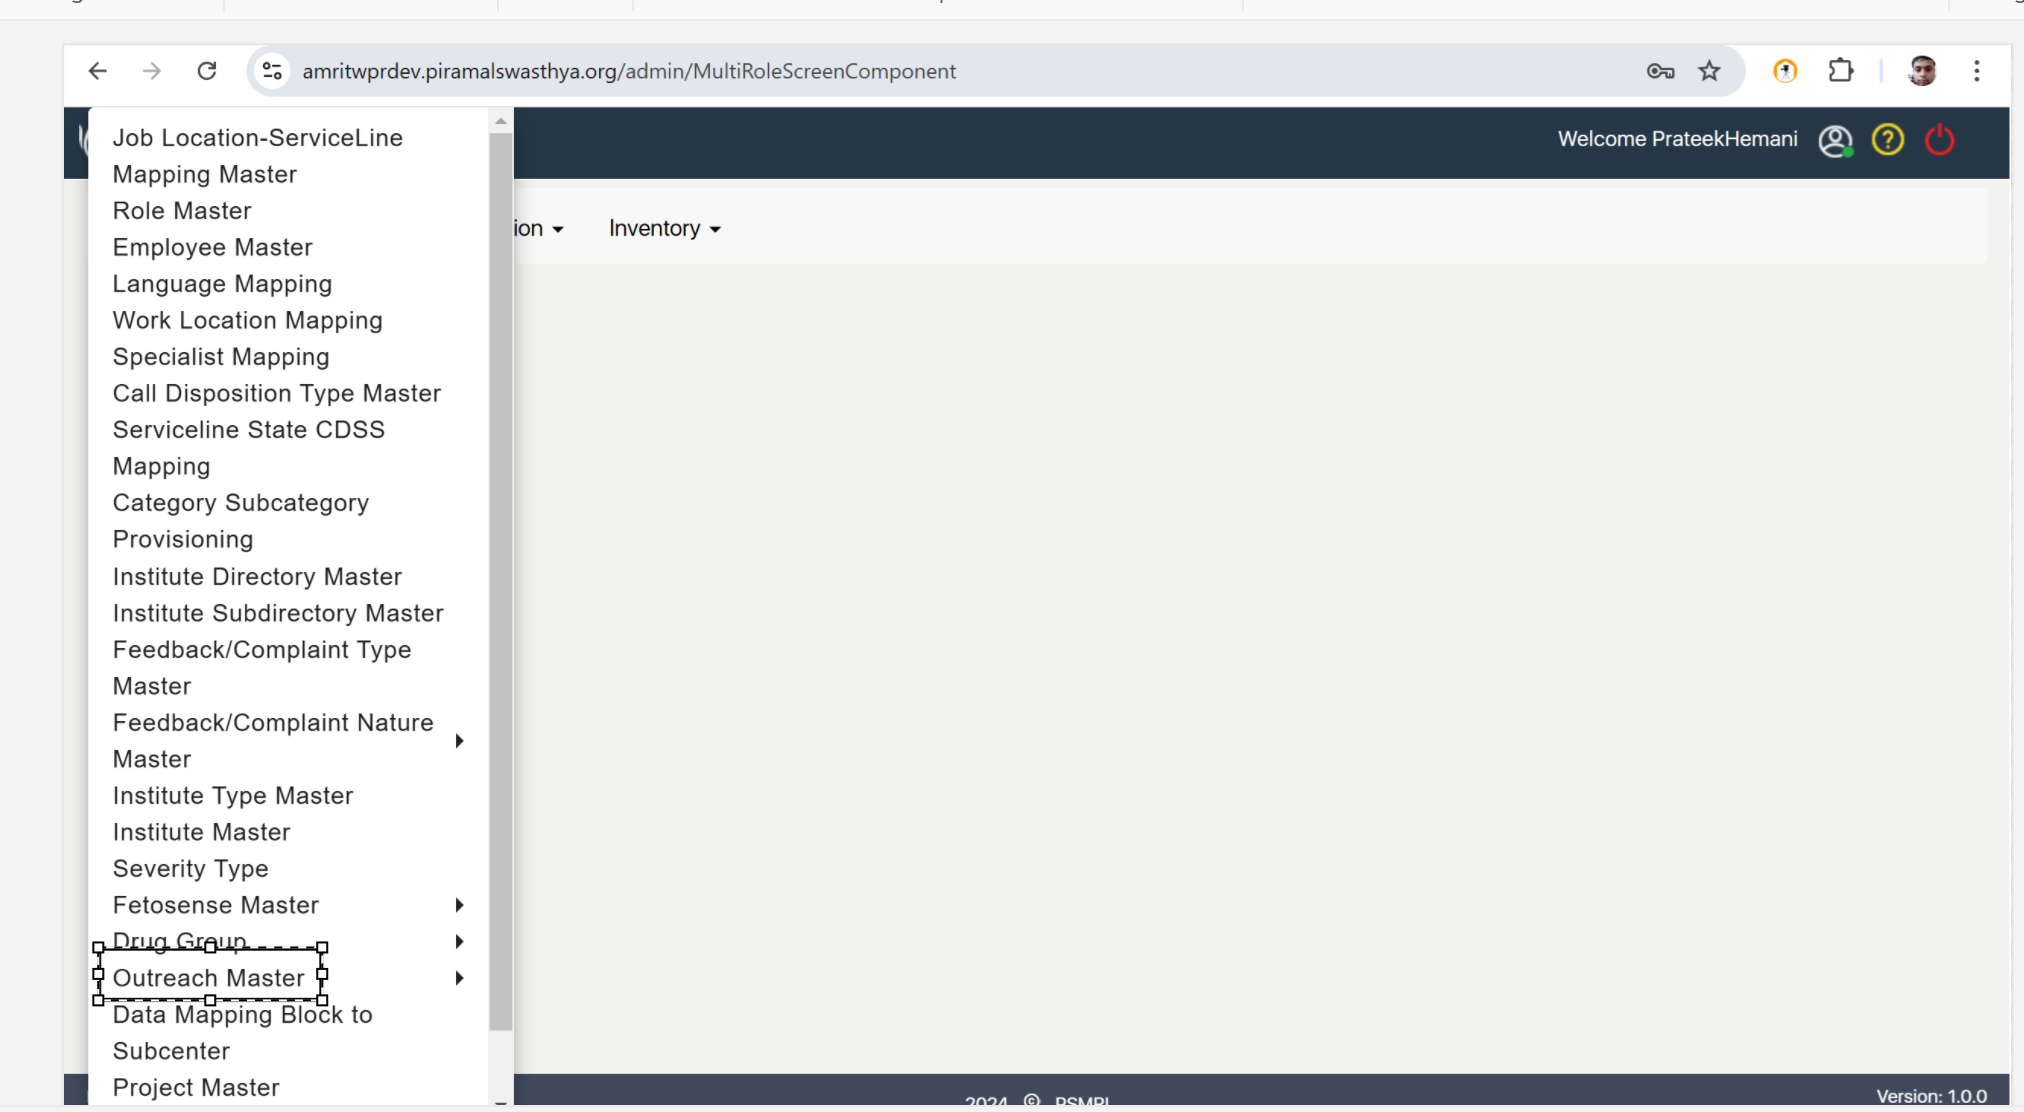
- Select Outreach Master: Click on "Outreach Master."
- Access Zone Master: Choose "Zone Master."
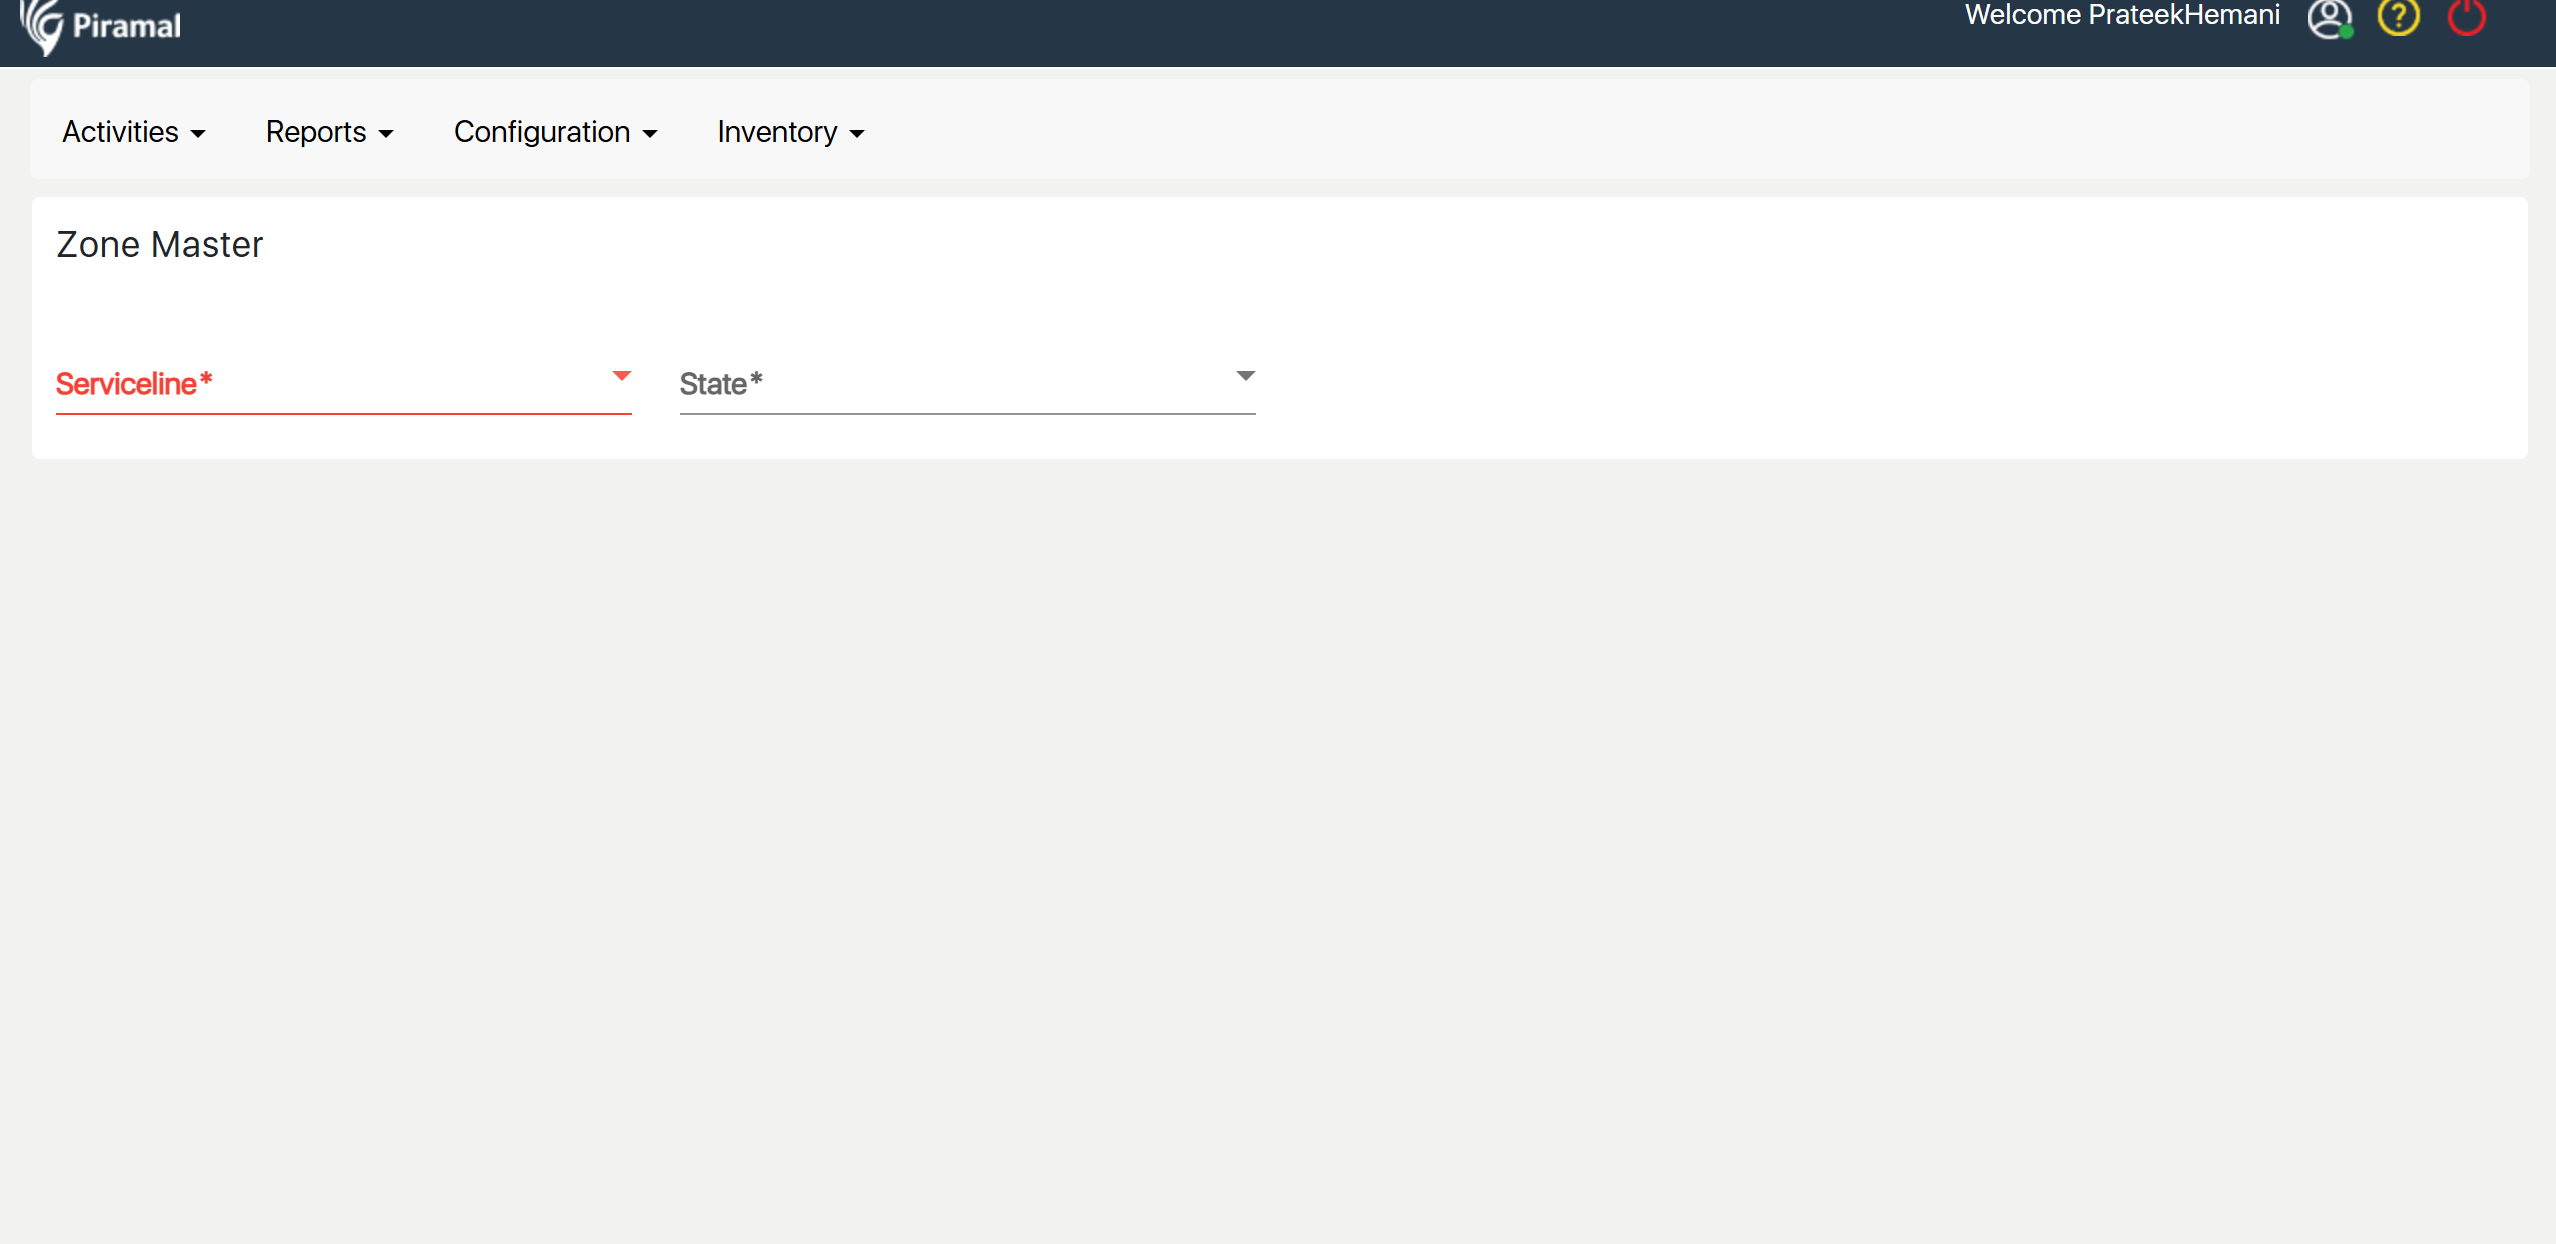
- Create Zone List: Click "Create Zone List" and enter the required details.
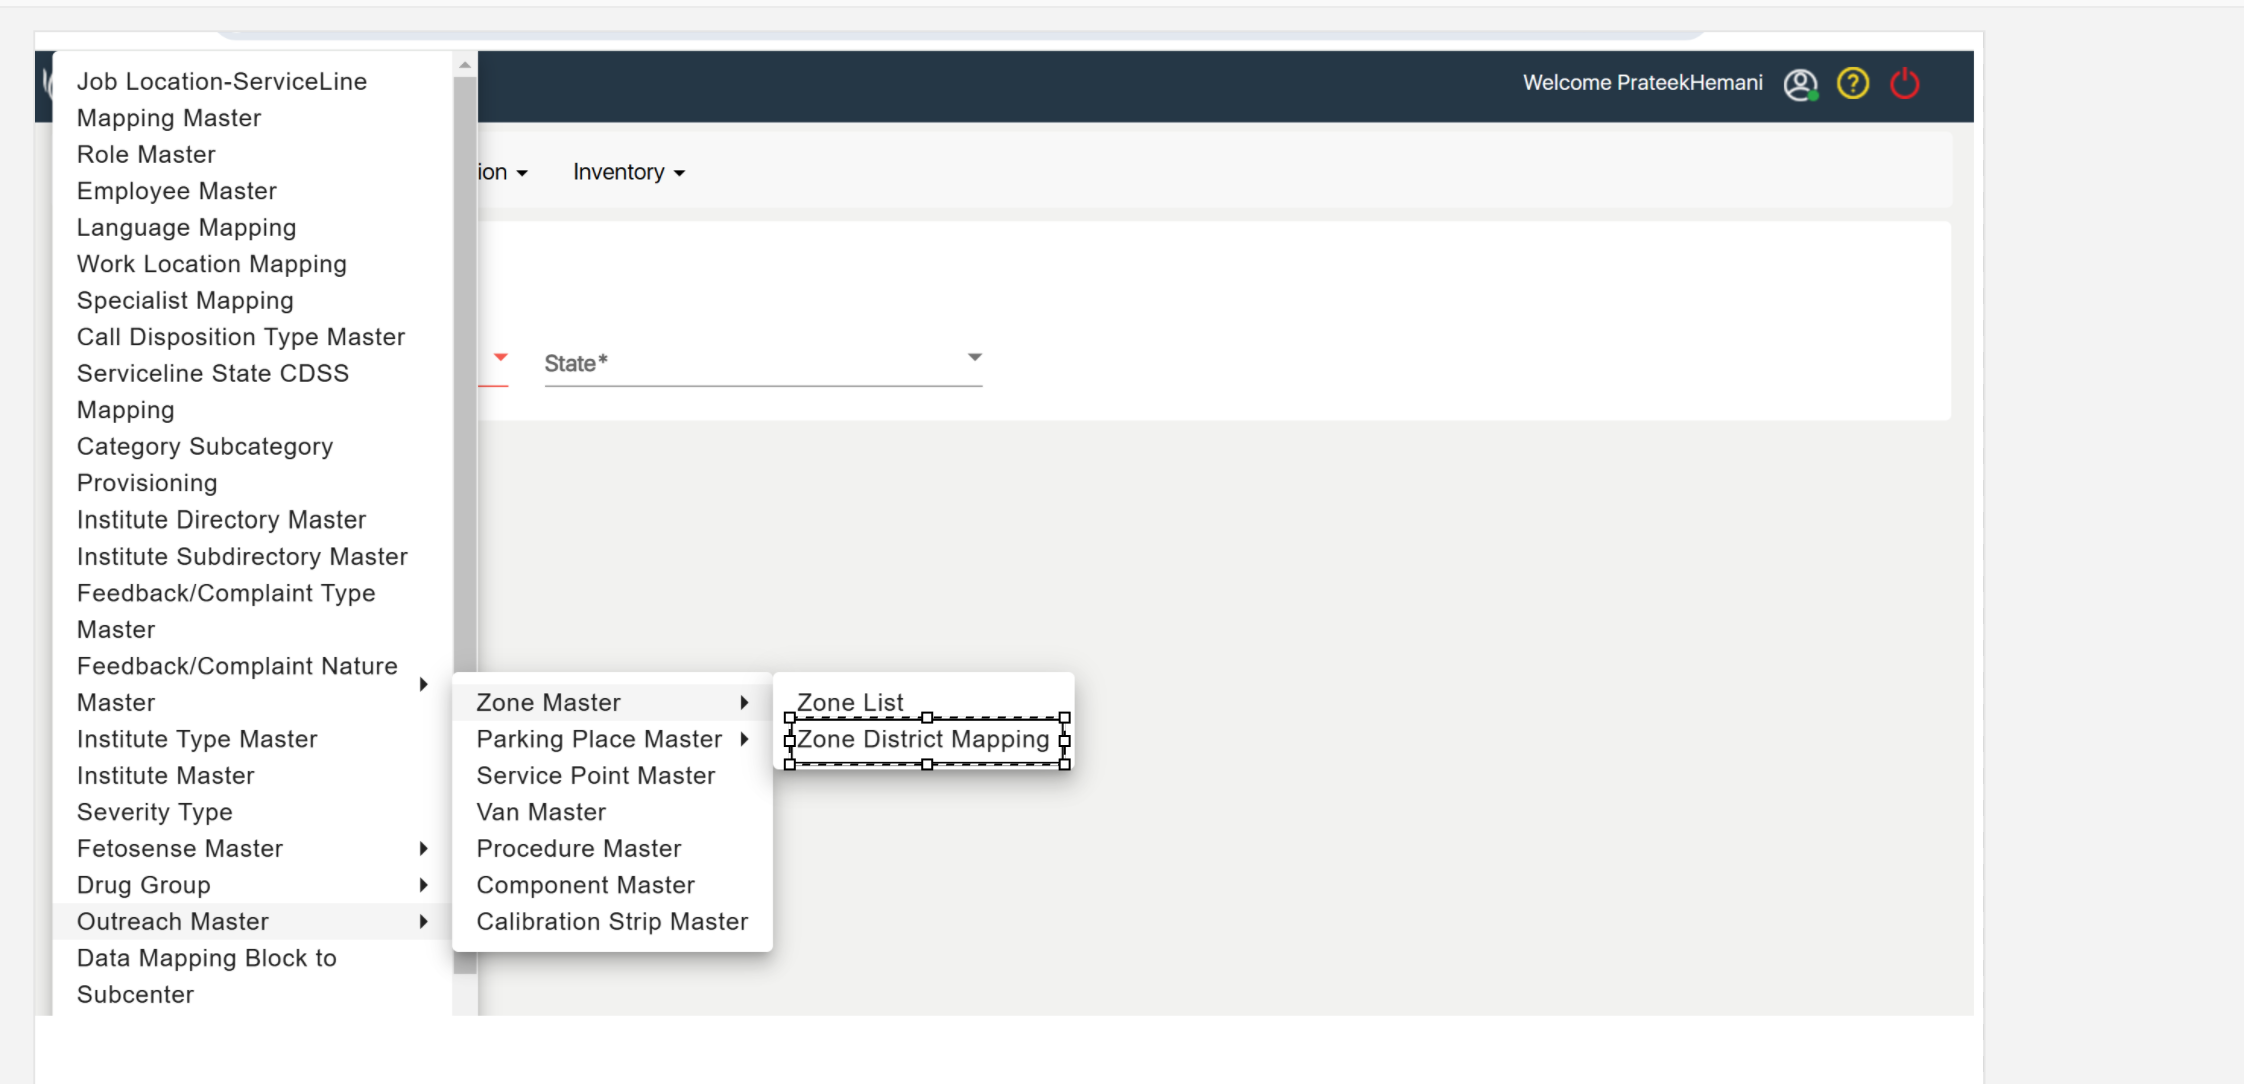
Navigate to Zone Master under Outreach Master, select Zone District Mapping, and create the zone-district mapping.
Parking Place Master
Parking Place/Hub Master for Healthcare Facilities (HWC and MMU)
Defining Parking Hubs:
- The Parking Place/Hub Master helps administrators set up and manage designated parking areas for Health and Wellness Centres and Mobile Medical Units. This includes defining specific locations where these services operate, such as permanent sites for HWCs and temporary sites for MMUs during outreach programs.
Managing Availability:
- It tracks the availability of parking spaces for healthcare staff, patients, and mobile units. For instance, ensuring that there are enough spots for healthcare workers at the HWC and that MMUs have designated parking areas when they arrive at different locations.
Organizing Parking Types:
- The system categorizes parking spaces based on their intended use. For example:
- Reserved spots for healthcare professionals.
- Accessible parking for patients with disabilities.
- Loading zones for MMUs when they set up for community outreach.
- The system categorizes parking spaces based on their intended use. For example:
Facilitating Reservations:
- The Parking Place/Hub Master can enable the reservation of parking spaces ahead of time for specific events or outreach activities, ensuring that the necessary areas are available when the HWC or MMU is active.
Monitoring Usage:
- It provides data on how parking spaces are utilized, helping administrators understand peak usage times and make informed decisions about resource allocation. This information can be crucial for planning outreach events and ensuring smooth operations.
- Go to Parking Place Master: Navigate to "Parking Place Master" under Outreach Master.
- Select Parking Place List: Click on "Parking Place List."
- Add New Parking Place: Click "Add New Parking Place."
- Enter Details: Fill in the required parking place information.
- Save Parking Place: Click "Save" to store the parking place.
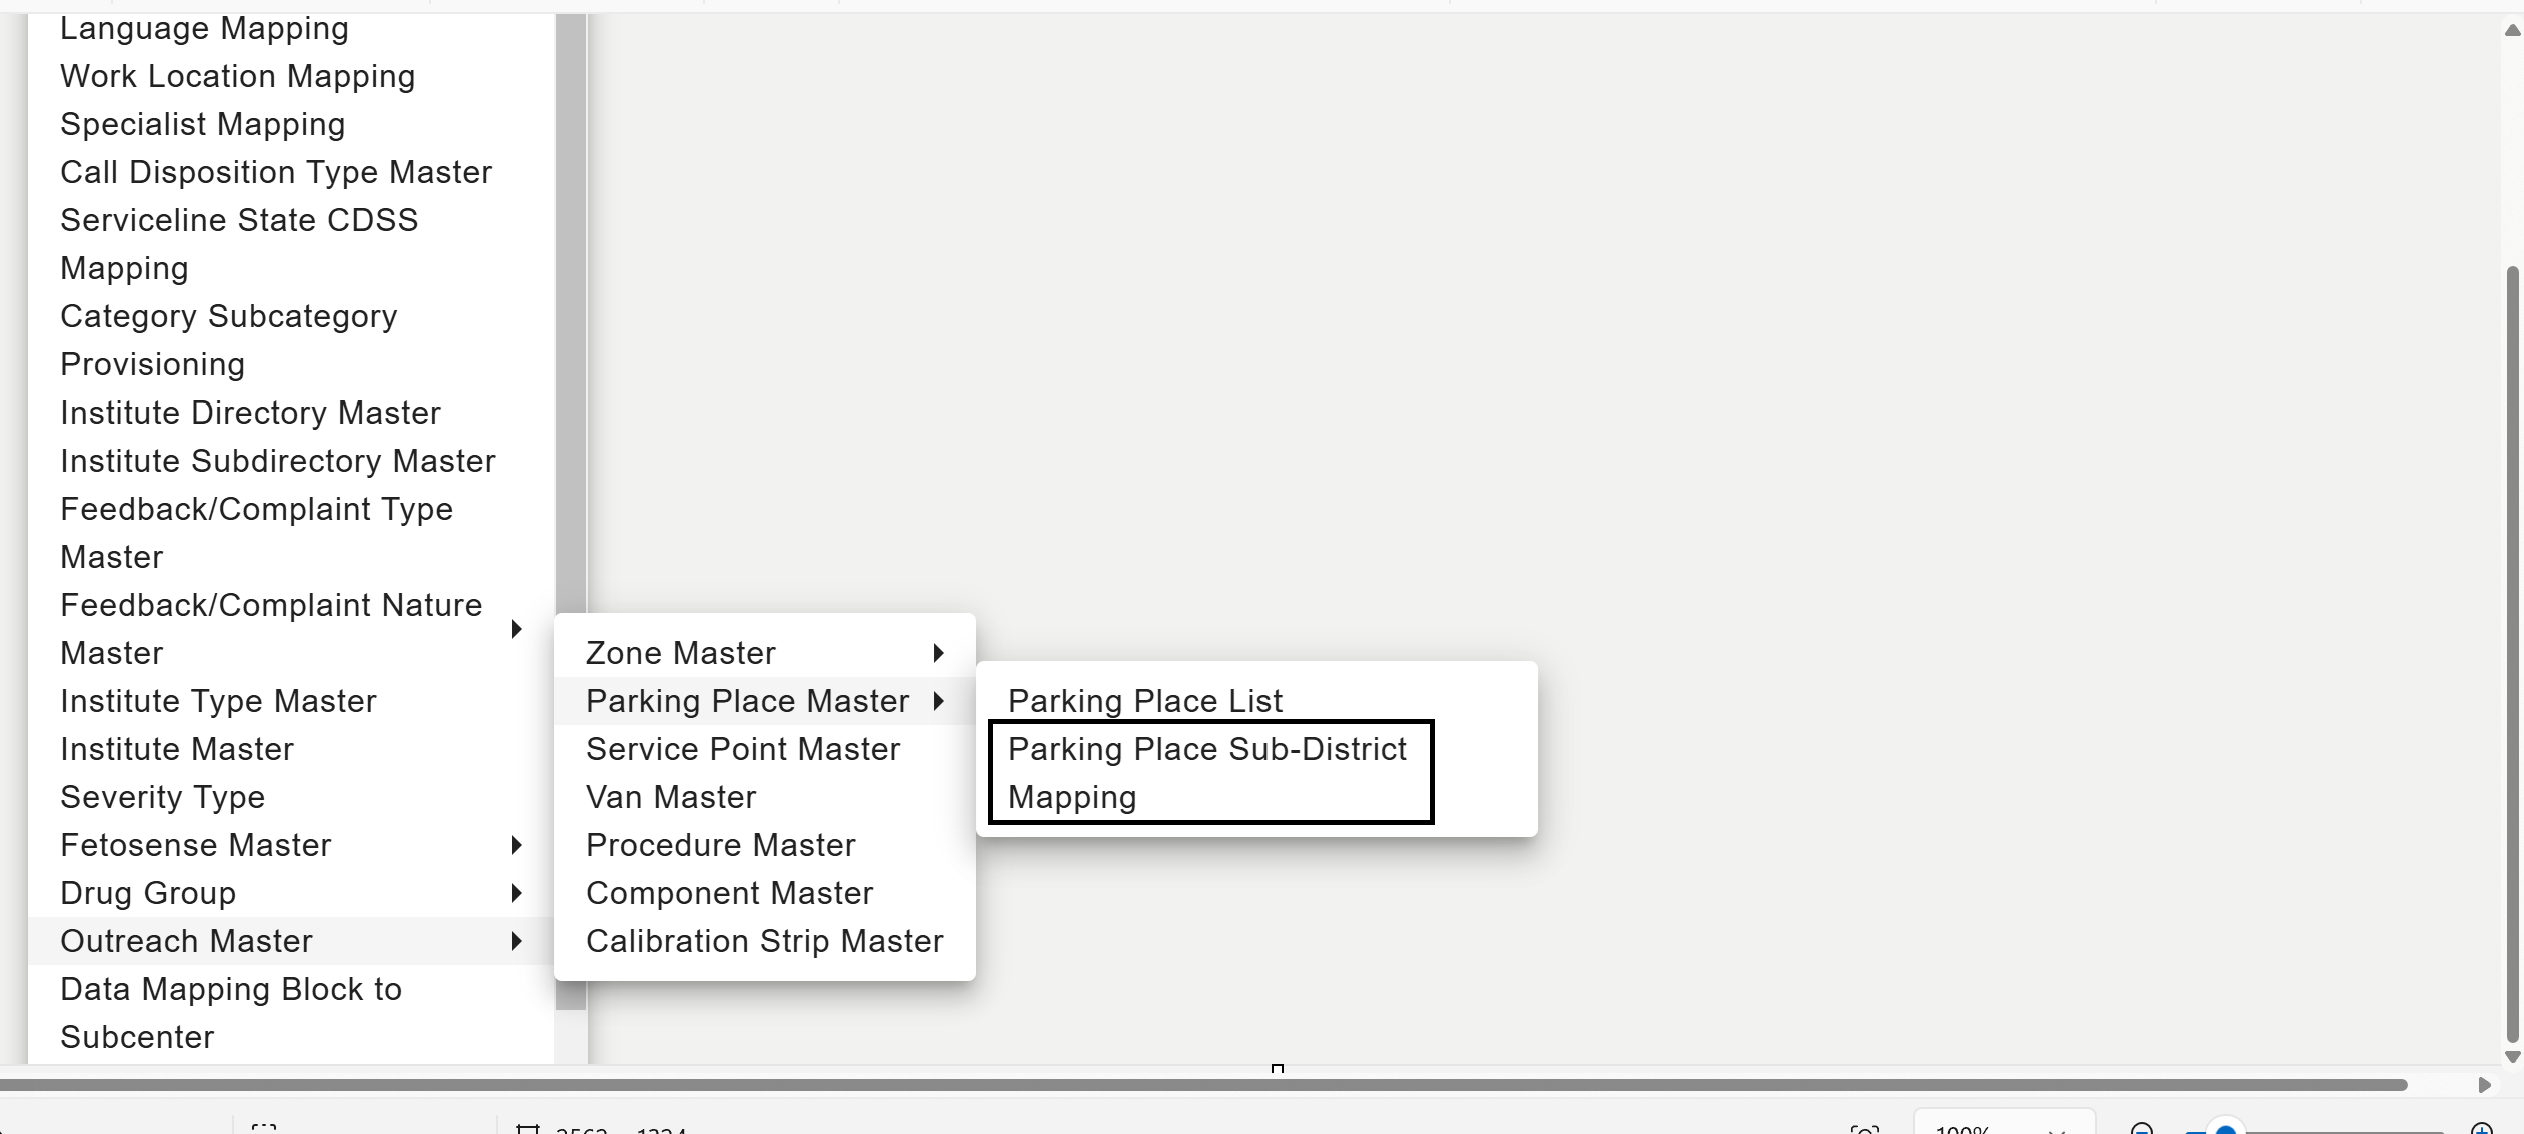
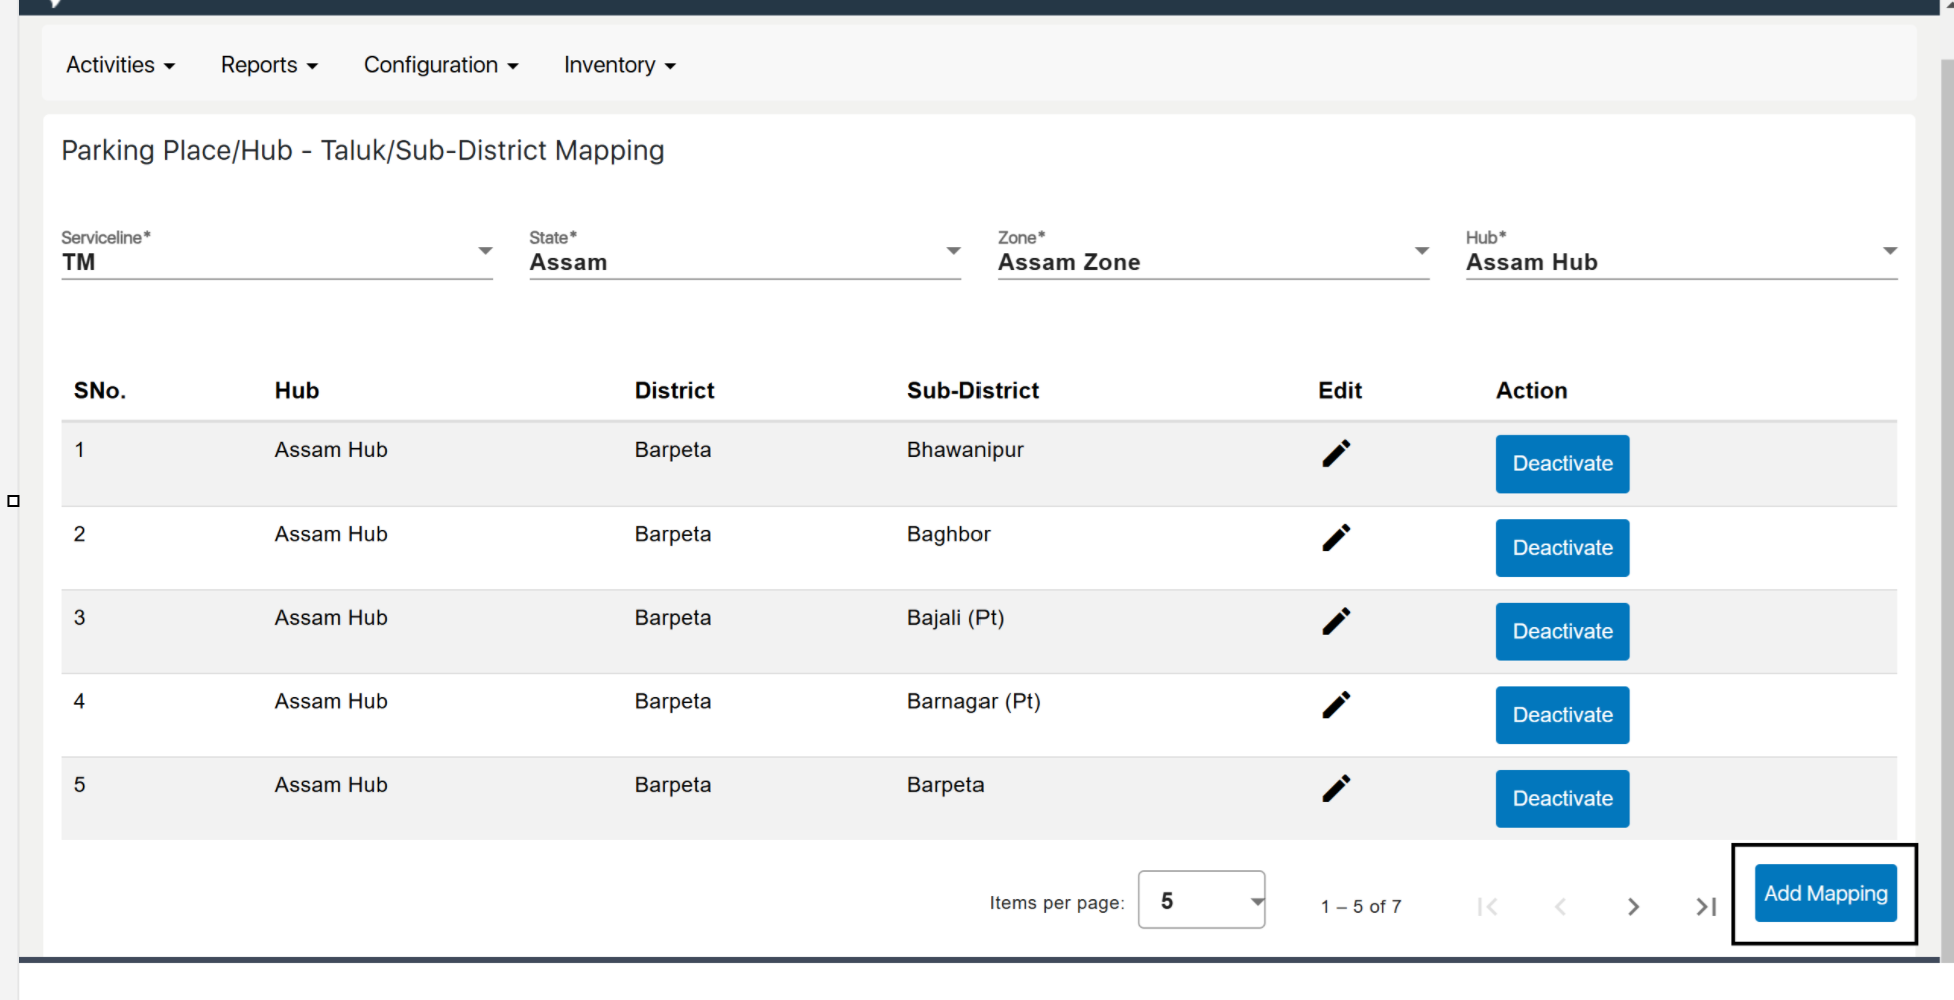
Parking Place Sub-district Mapping
- Select Parking Place Sub-district Mapping: Click on "Parking Place Sub-district Mapping."
- Add New Mapping: Click "Add New Mapping."
- Enter Details: Select the parking place and corresponding sub-district.
- Save Mapping: Click "Save" to finalize the mapping.
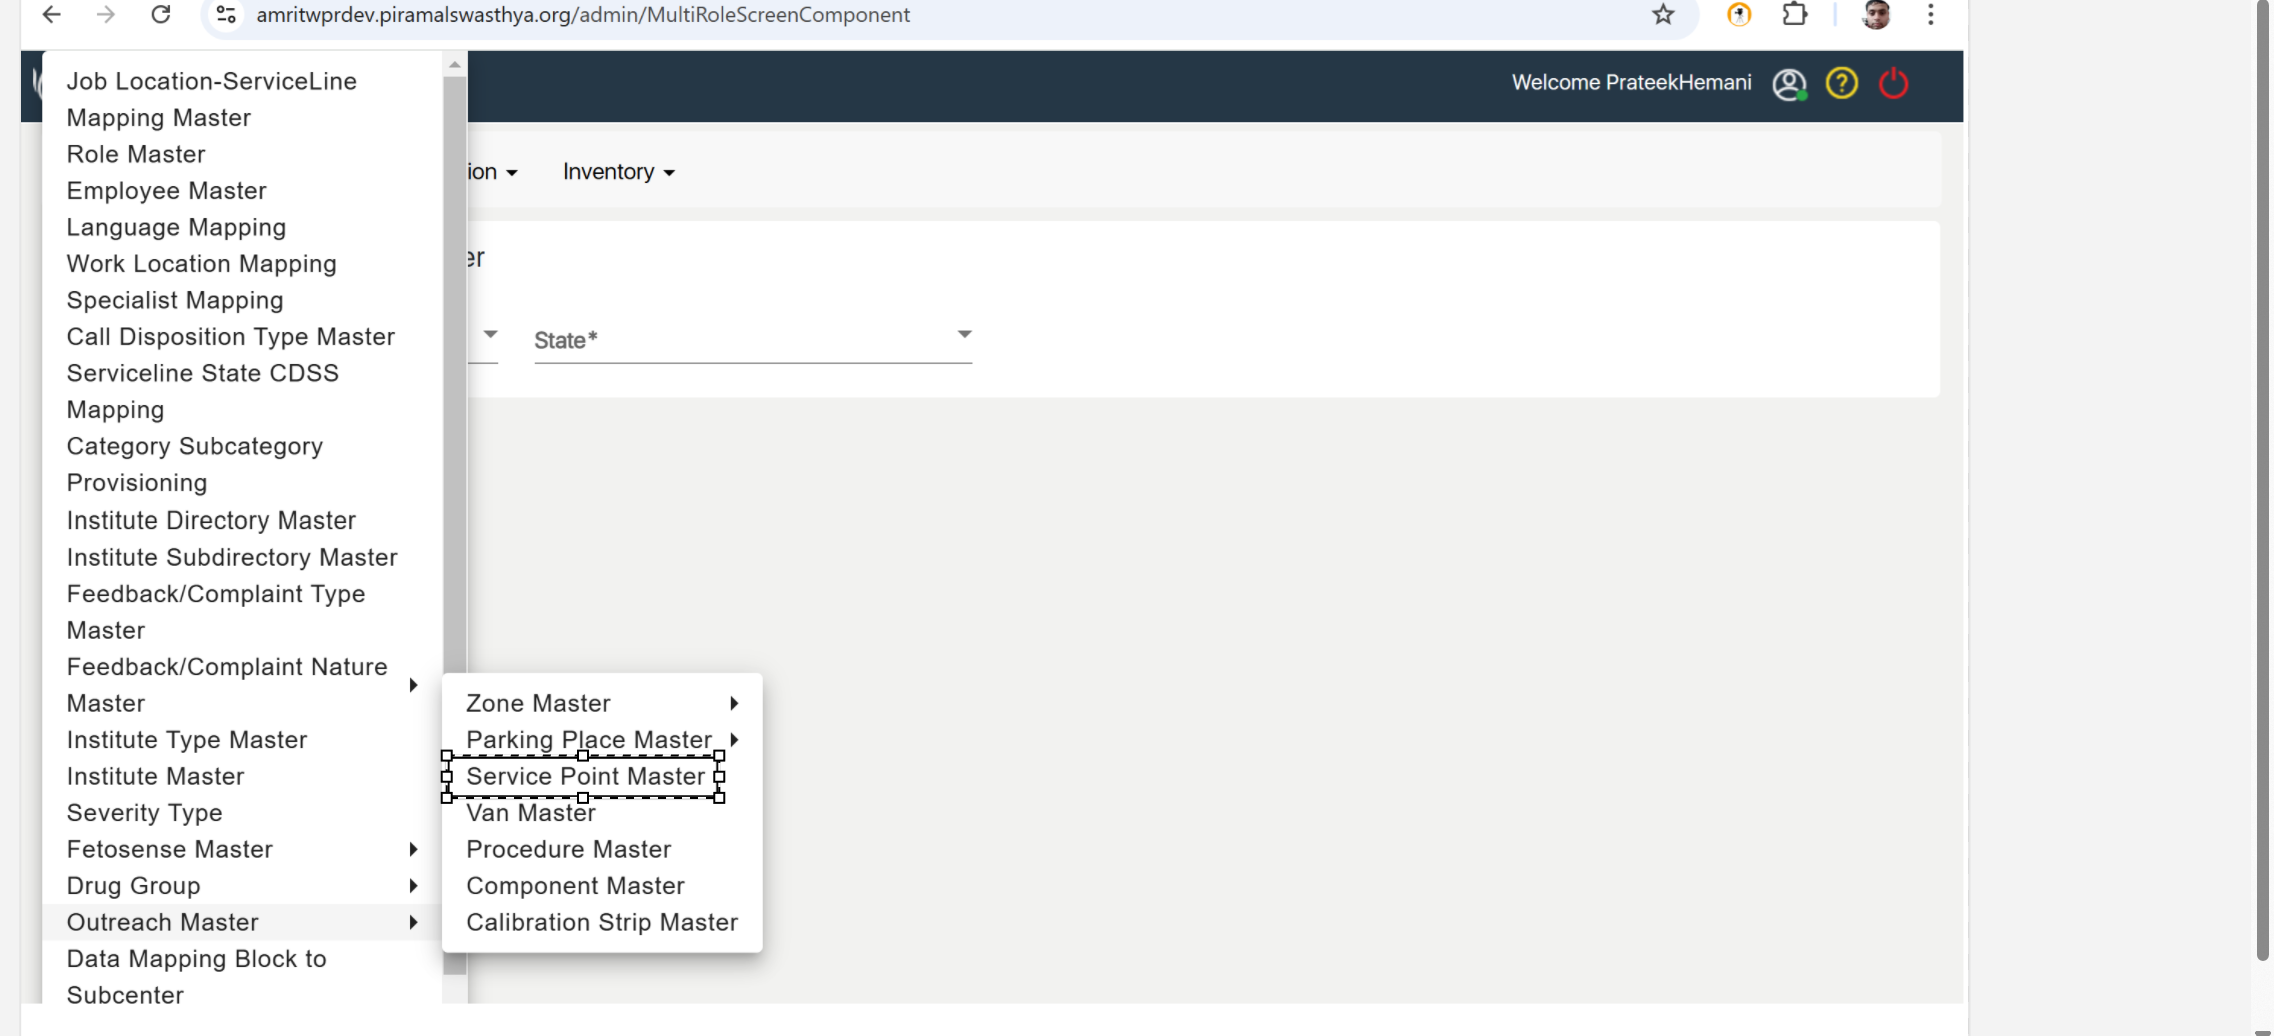
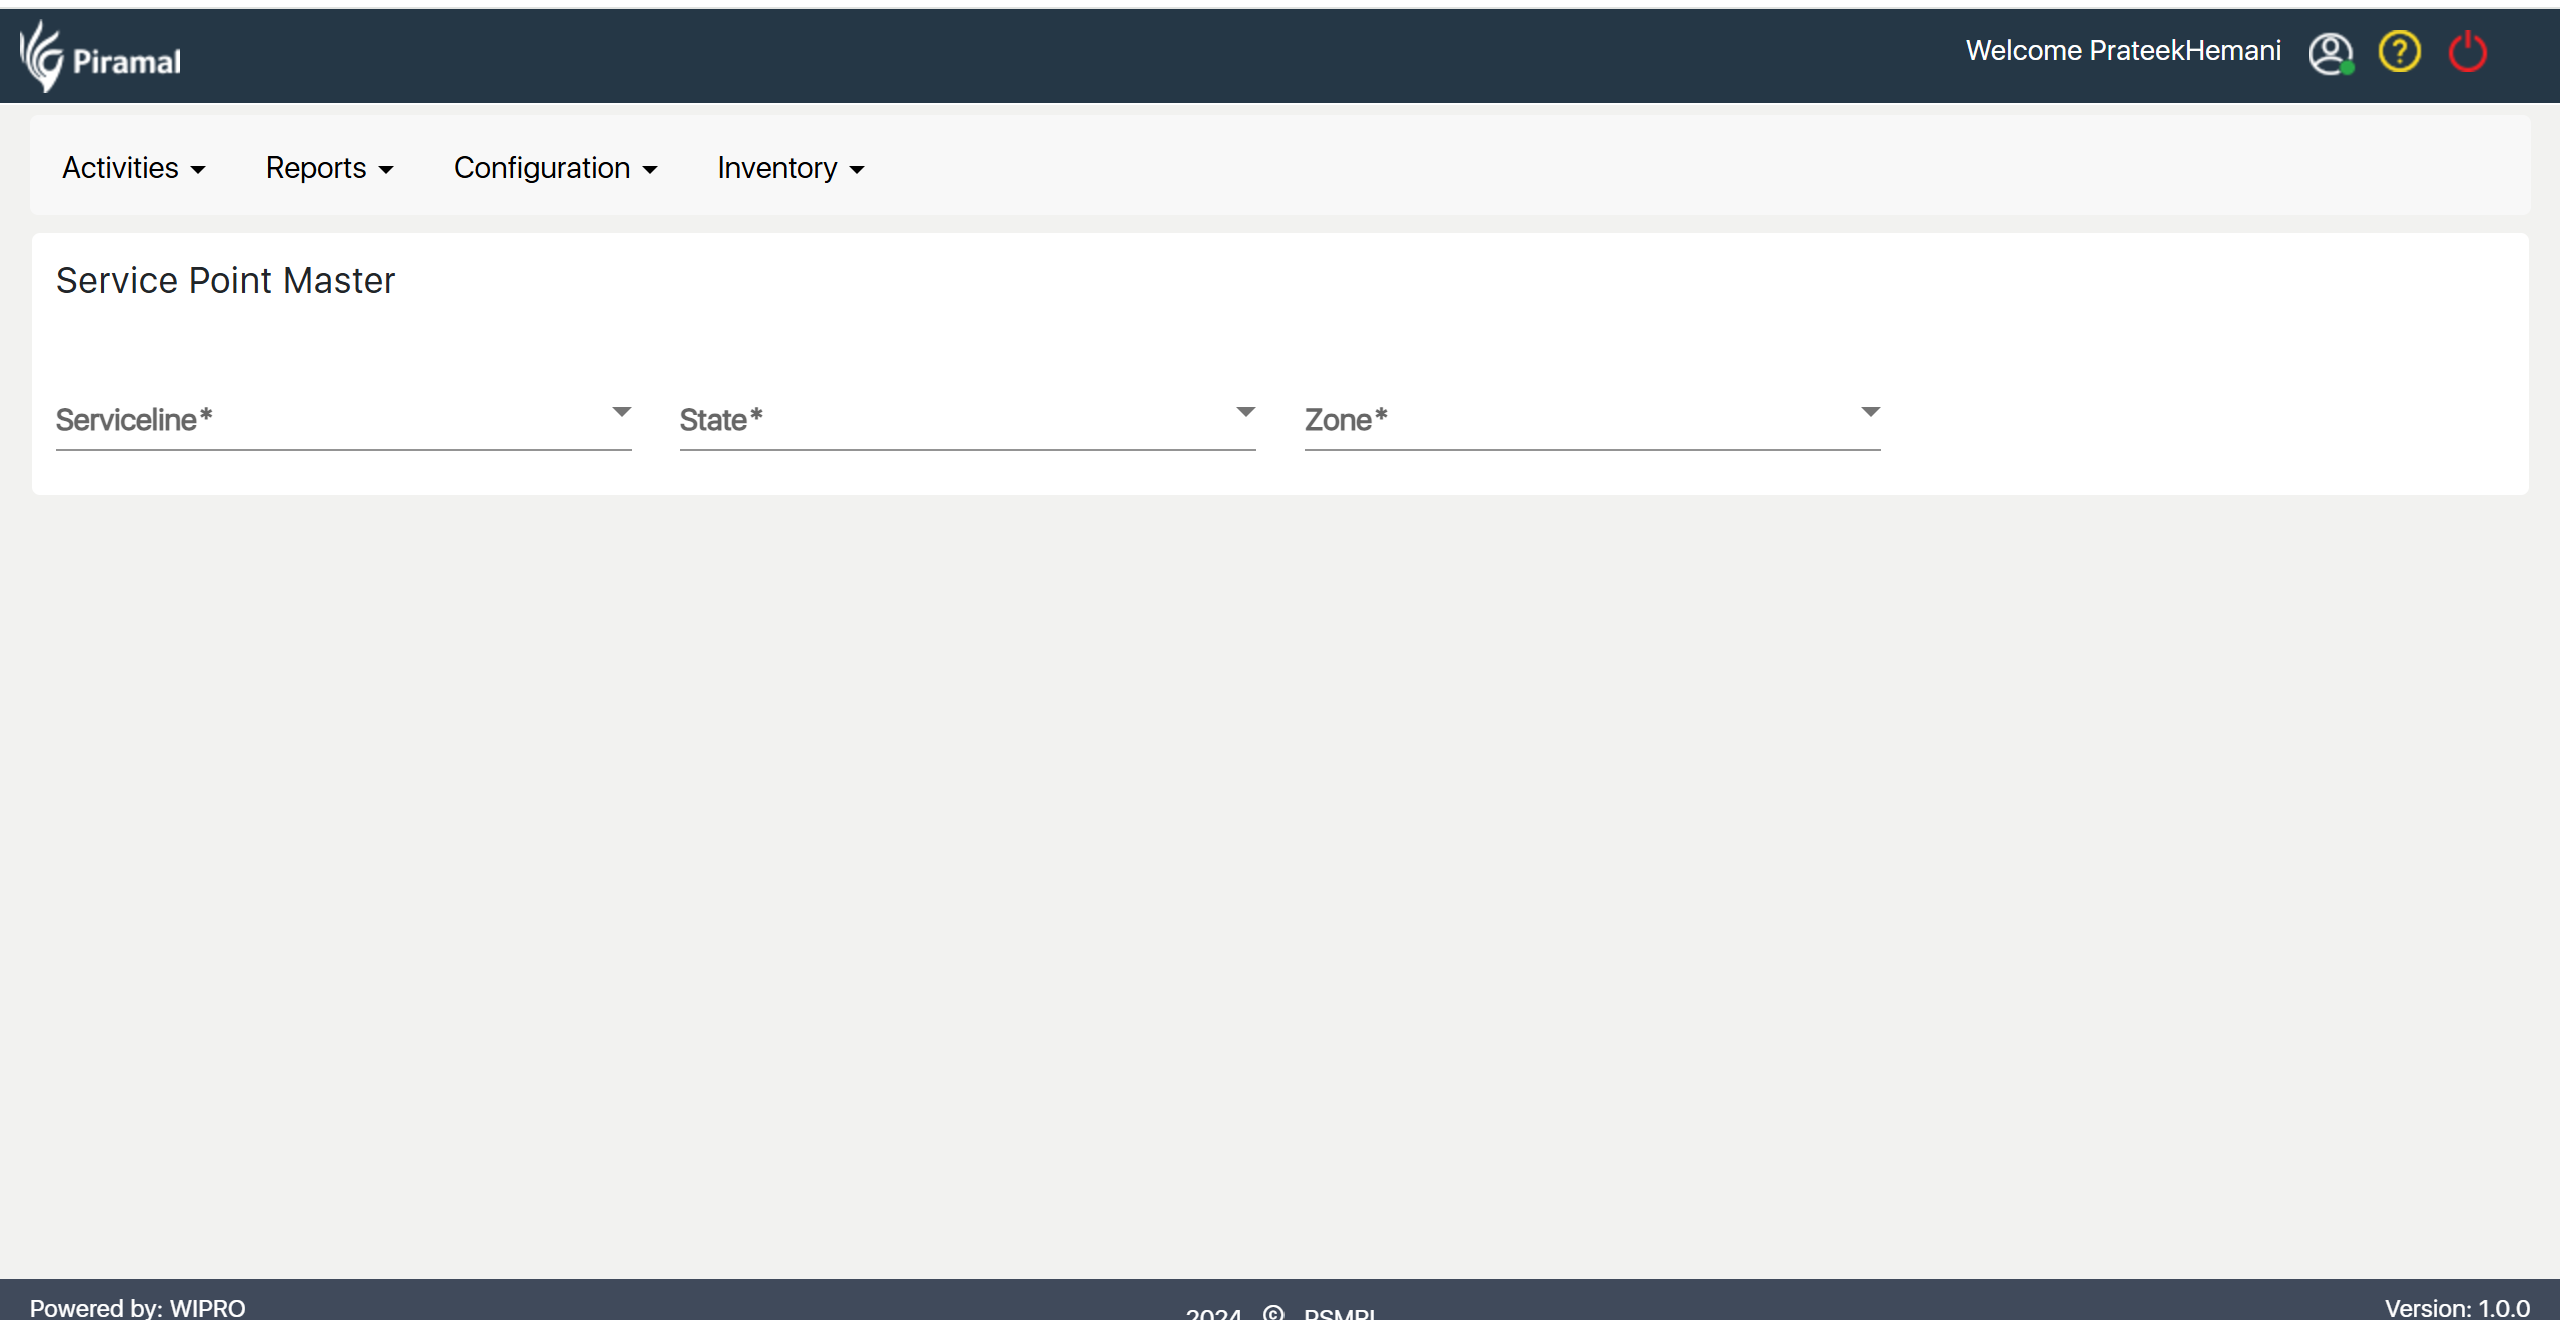
Service Point Master
- Go to Service Point Master: Navigate to "Service Point Master" under Outreach Master.
- Click on Create Service Point: Select "Create Service Point" to start the process.
- Enter Service Point Details: Fill in the required details for the service point.
- Save the Service Point: Click "Save" to store the new service point.
Van Master
- Go to Van Master: Navigate to "Van Master" under Outreach Master.
- Click on Create Van: Select "Create Van" to initiate the process.
- Enter Van Details: Fill in the required information for the van.
- Save the Van: Click "Save" to store the new van.
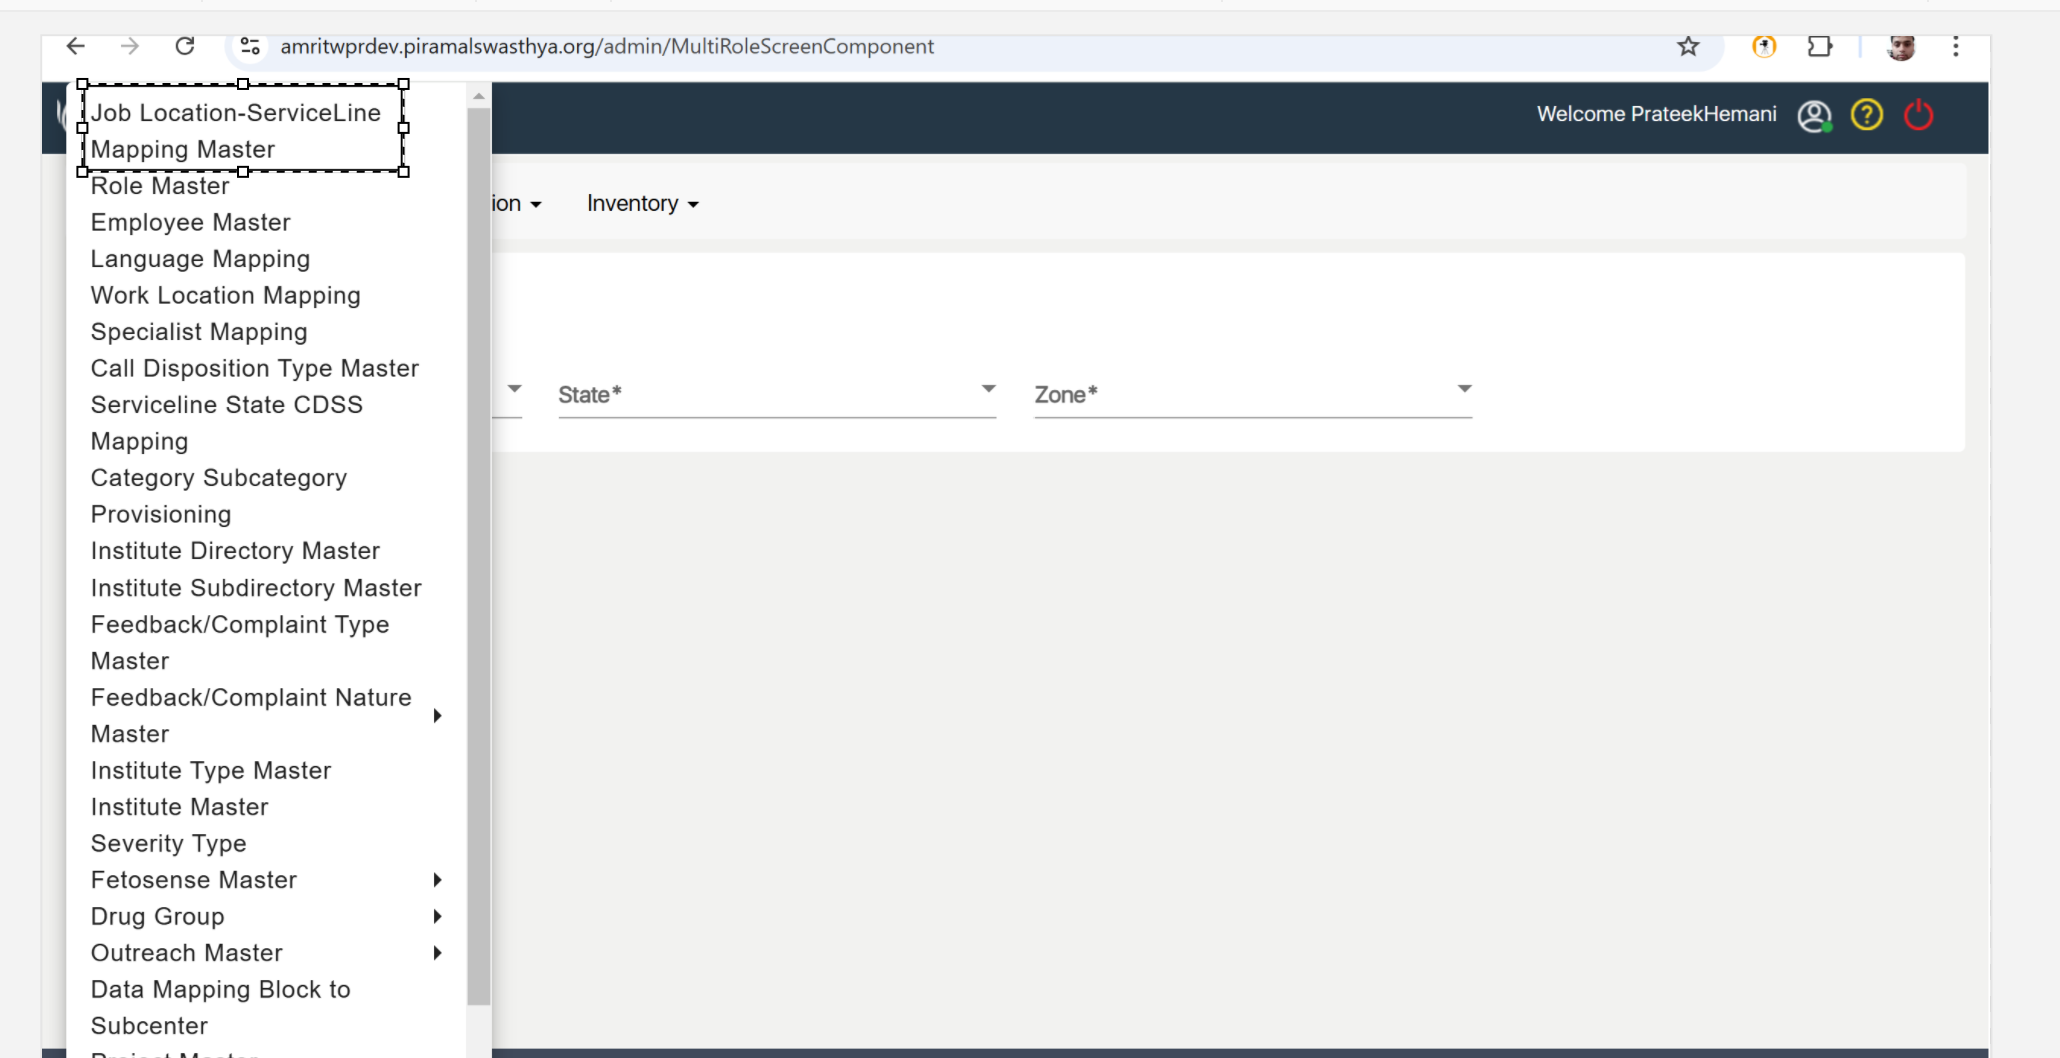
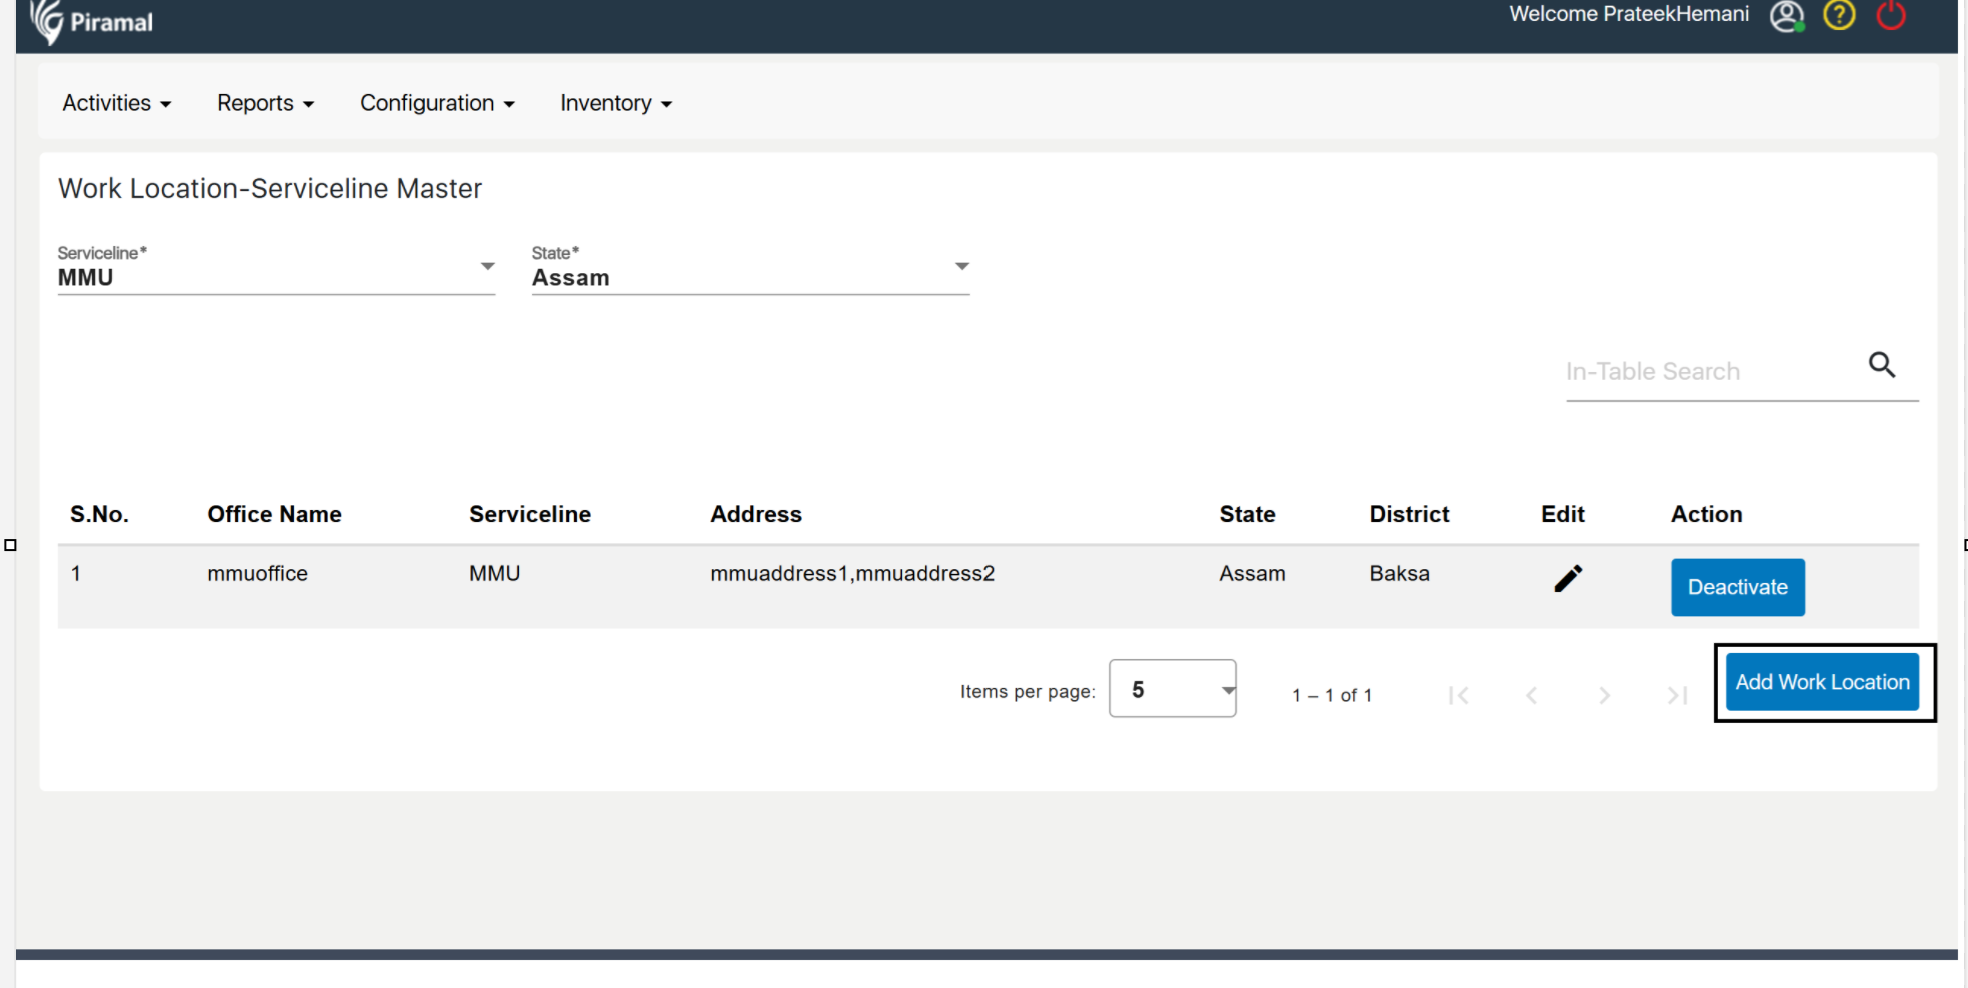
Job Location Service Line Mapping
Job Location Service Line Mapping allows users to associate a specific job location with a service line. This is essential for managing which services are provided at each location, ensuring the correct service offerings are available based on geographical needs.
- Navigate to Activities: From the main menu, go to "Activities."
- Select Job Location Service Line Mapping: Choose "work Location Service Line Mapping" under the Activities section.
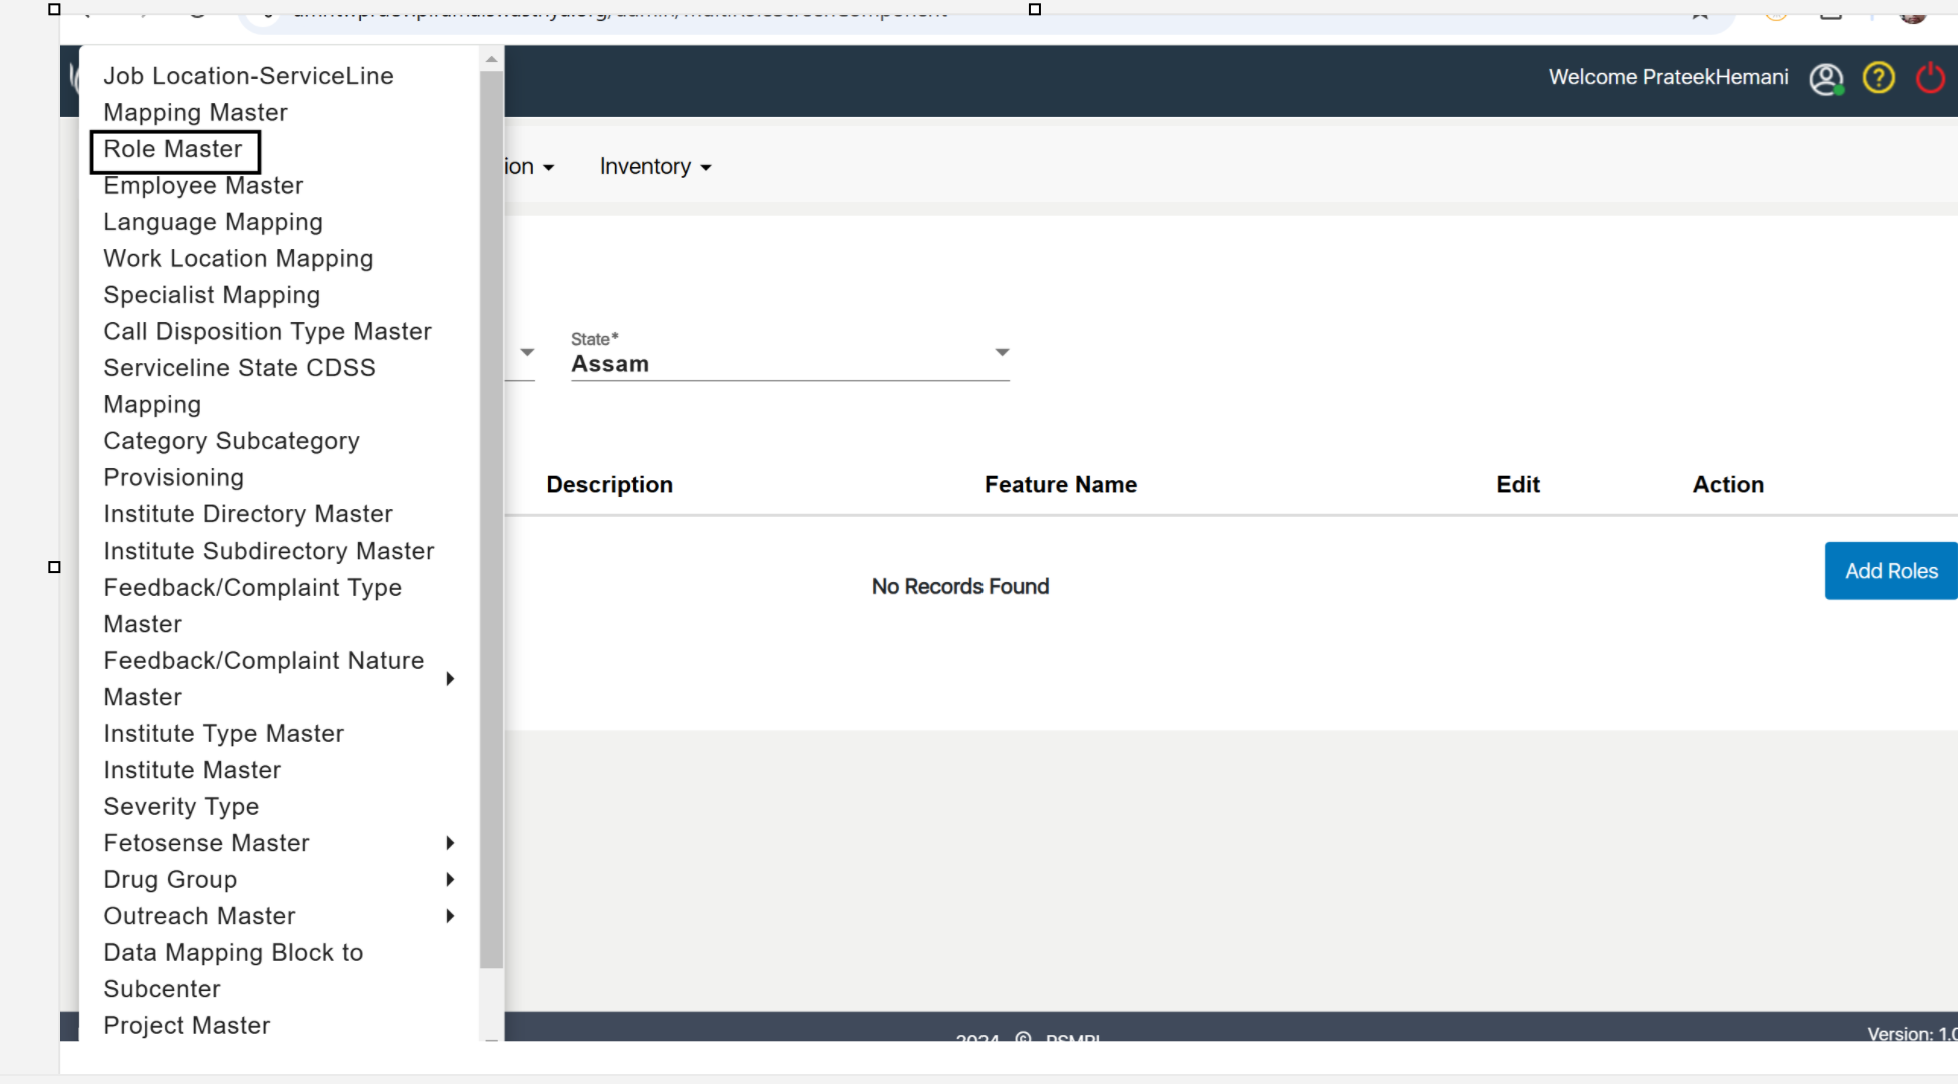
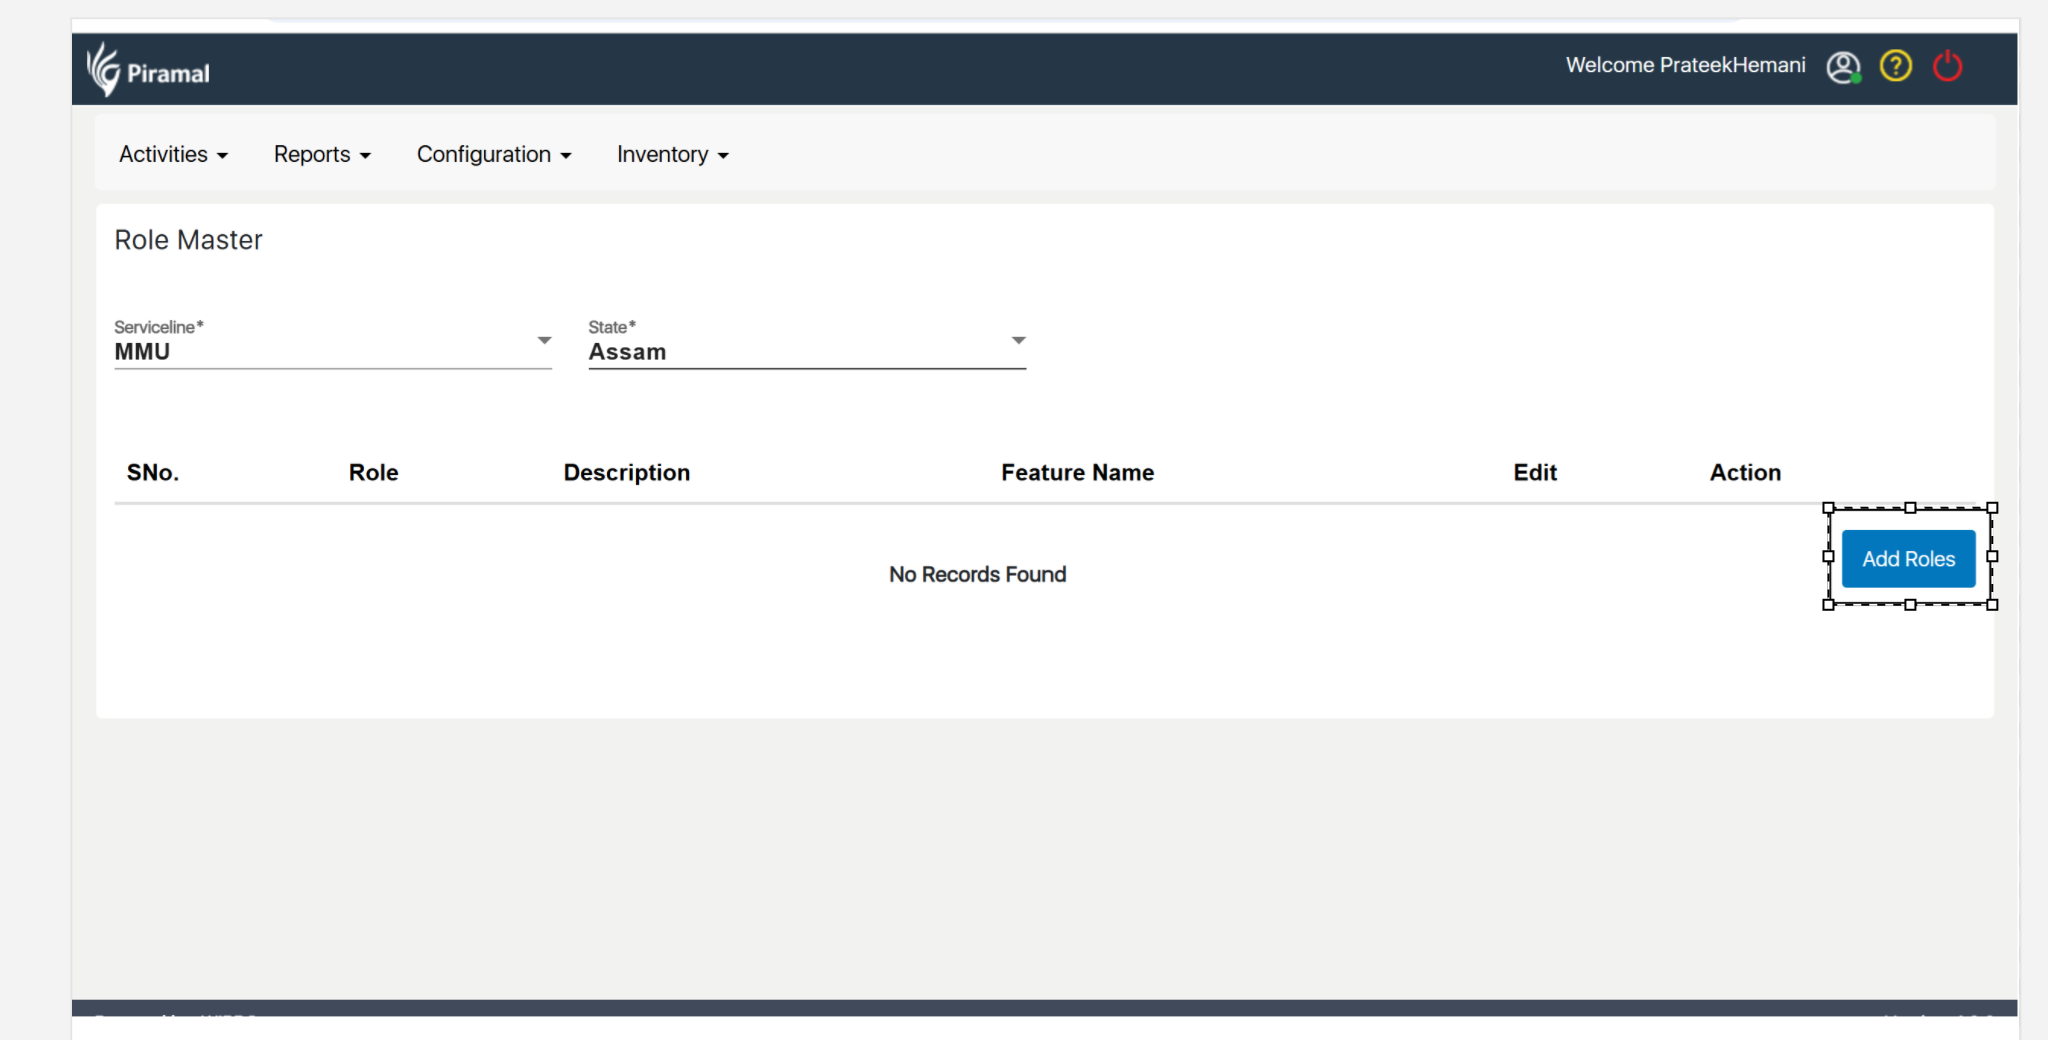
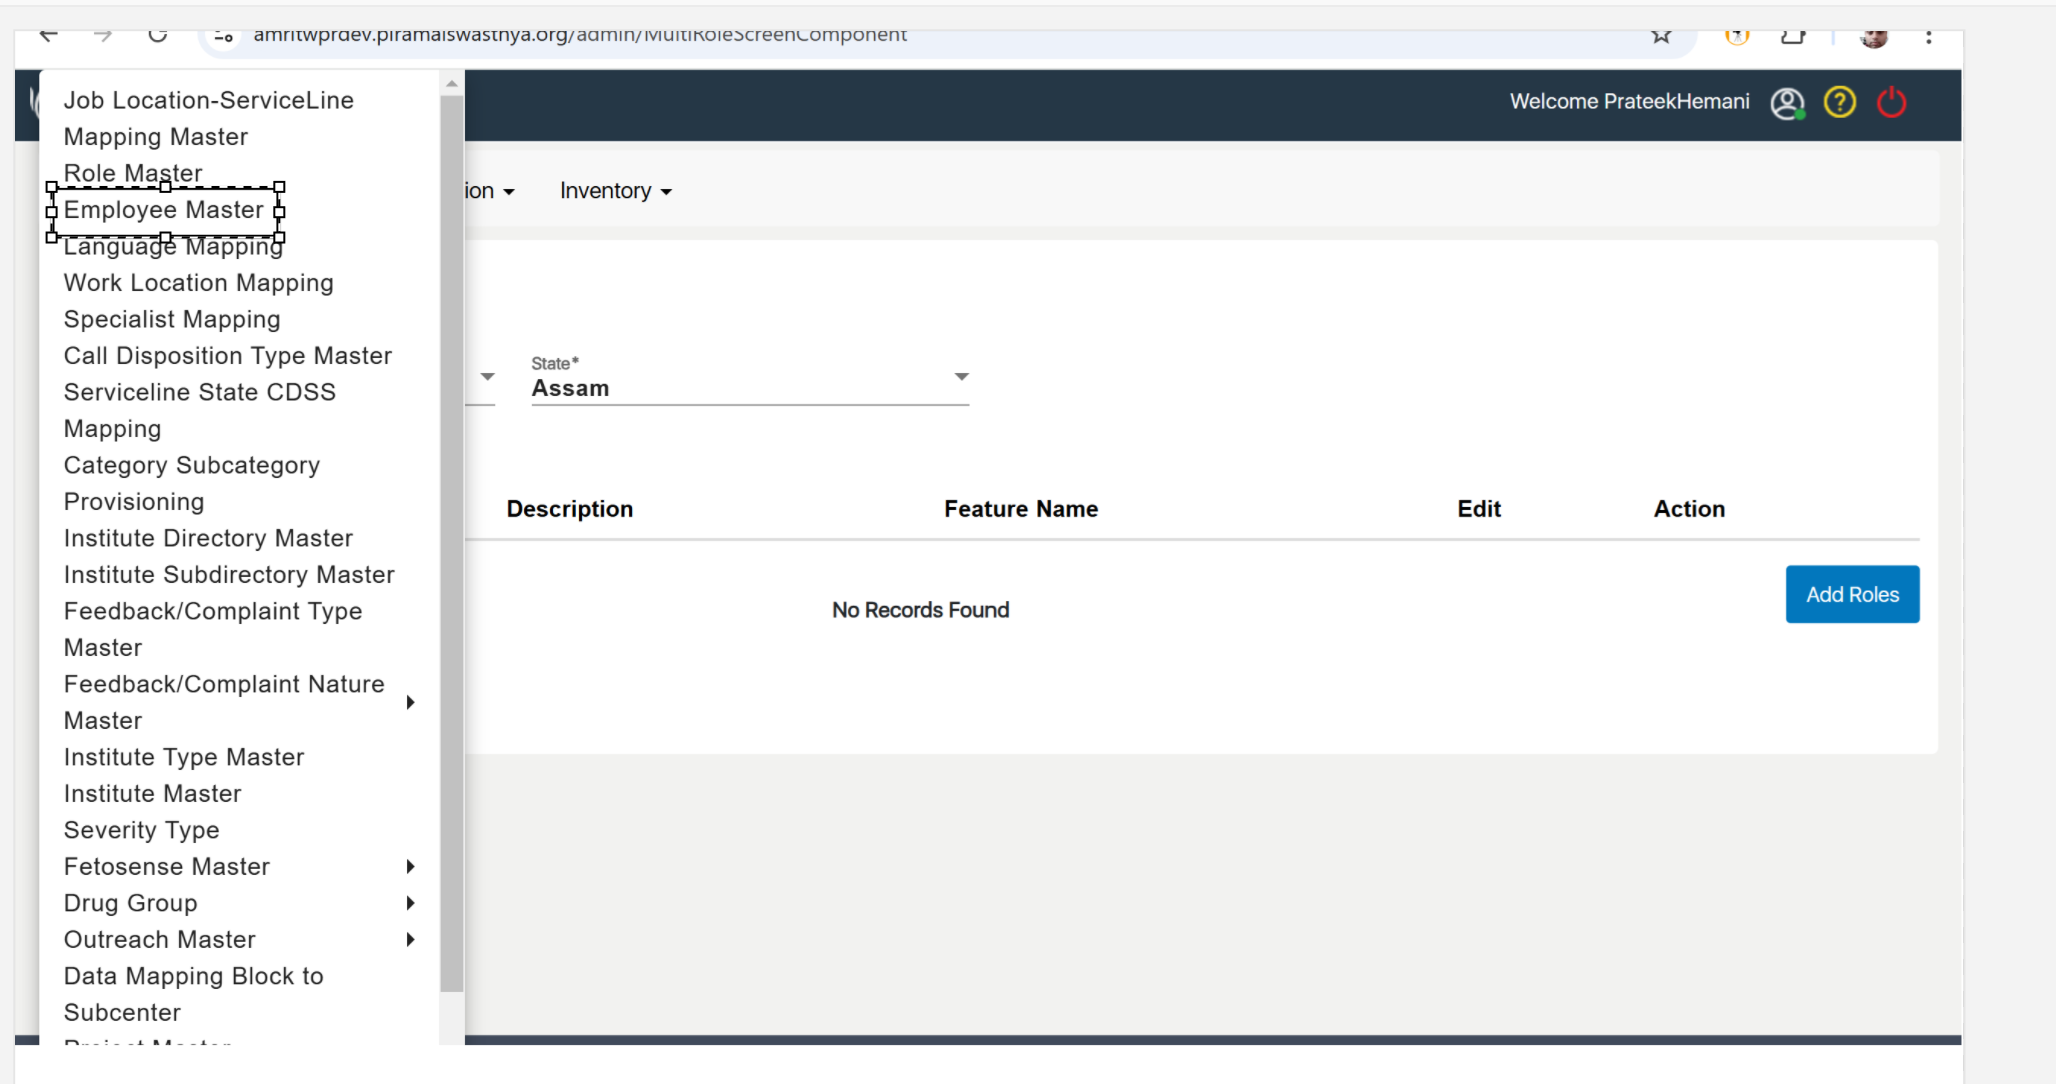
Role Master Creation
The Role Master is crucial in user management, as it defines the roles assigned to users such as Registrar, Nurse, Doctor, and Pharmacist. These roles determine the access permissions and responsibilities within the system, allowing for appropriate functionality based on user type.
- Enter Role Details: Input the name and description of the roles, such as Registrar, Nurse, Doctor, and Pharmacist.
- Save the Role: After entering the details, click "Save" to store the new role.
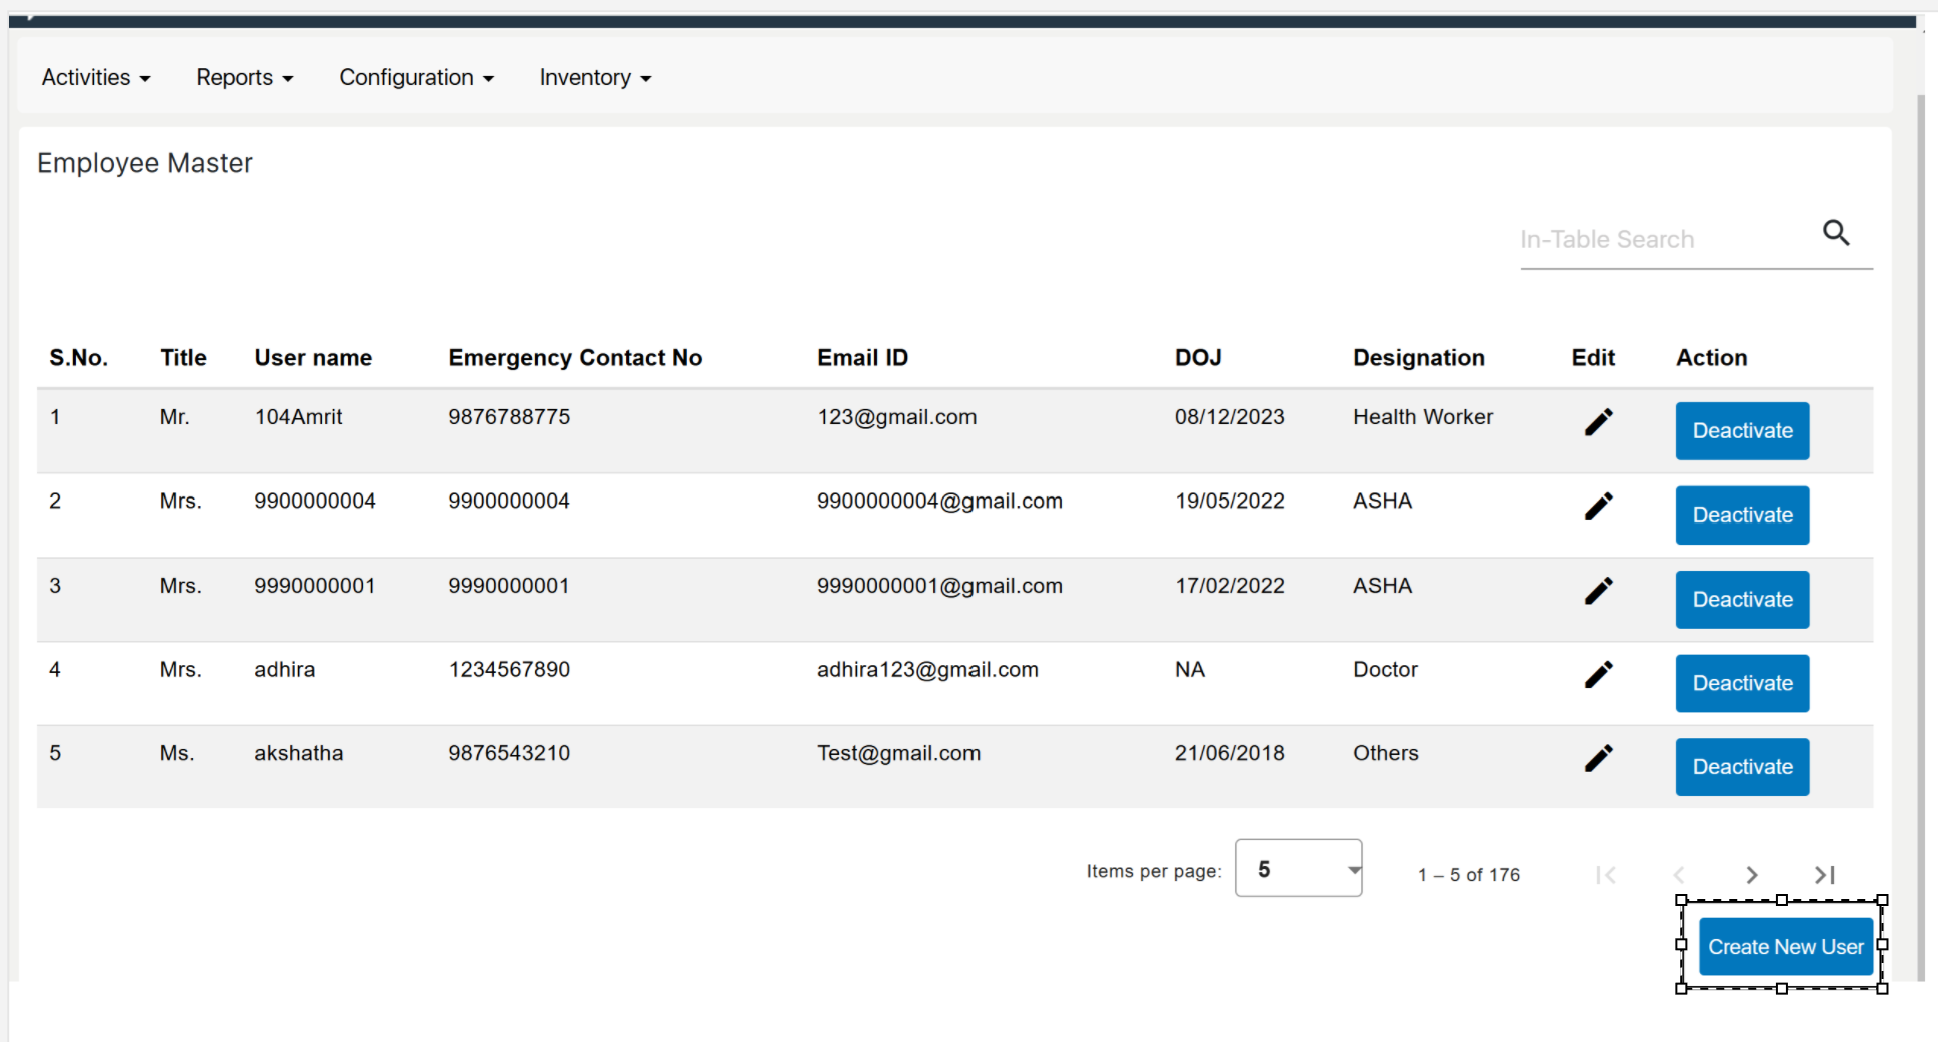
Employee Master – User Creation
The Employee Master is where new users are created and managed within the system. This includes assigning roles such as Registrar, Nurse, Doctor, and Pharmacist. Each user is linked to an employee record, ensuring accurate tracking and management.
- Enter User Details: Fill in the required user information, including name, employee ID, role, and other relevant details.
- Assign Role: Select the appropriate role (Registrar, Nurse, Doctor, Pharmacist, etc.) for the user.
- Save the User: Once all information is entered, click "Save" to create the new user in the system.
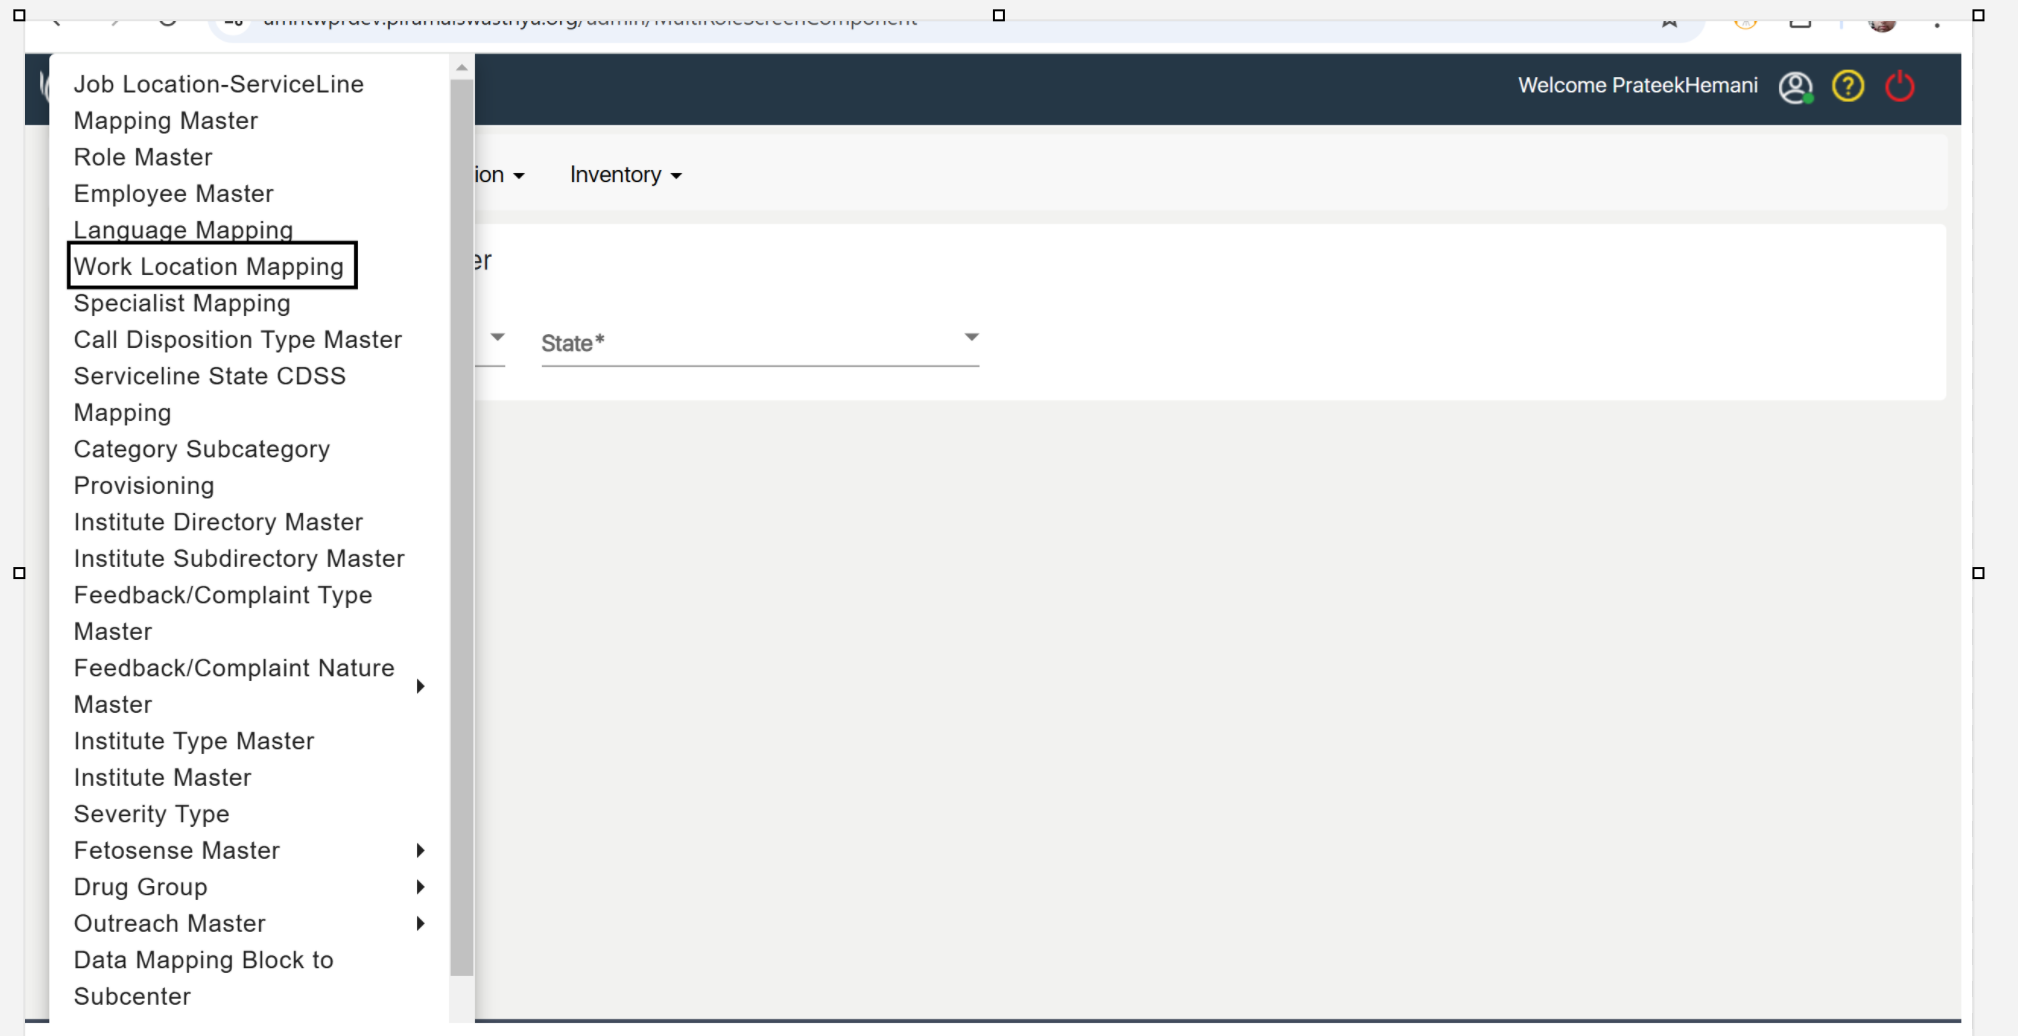
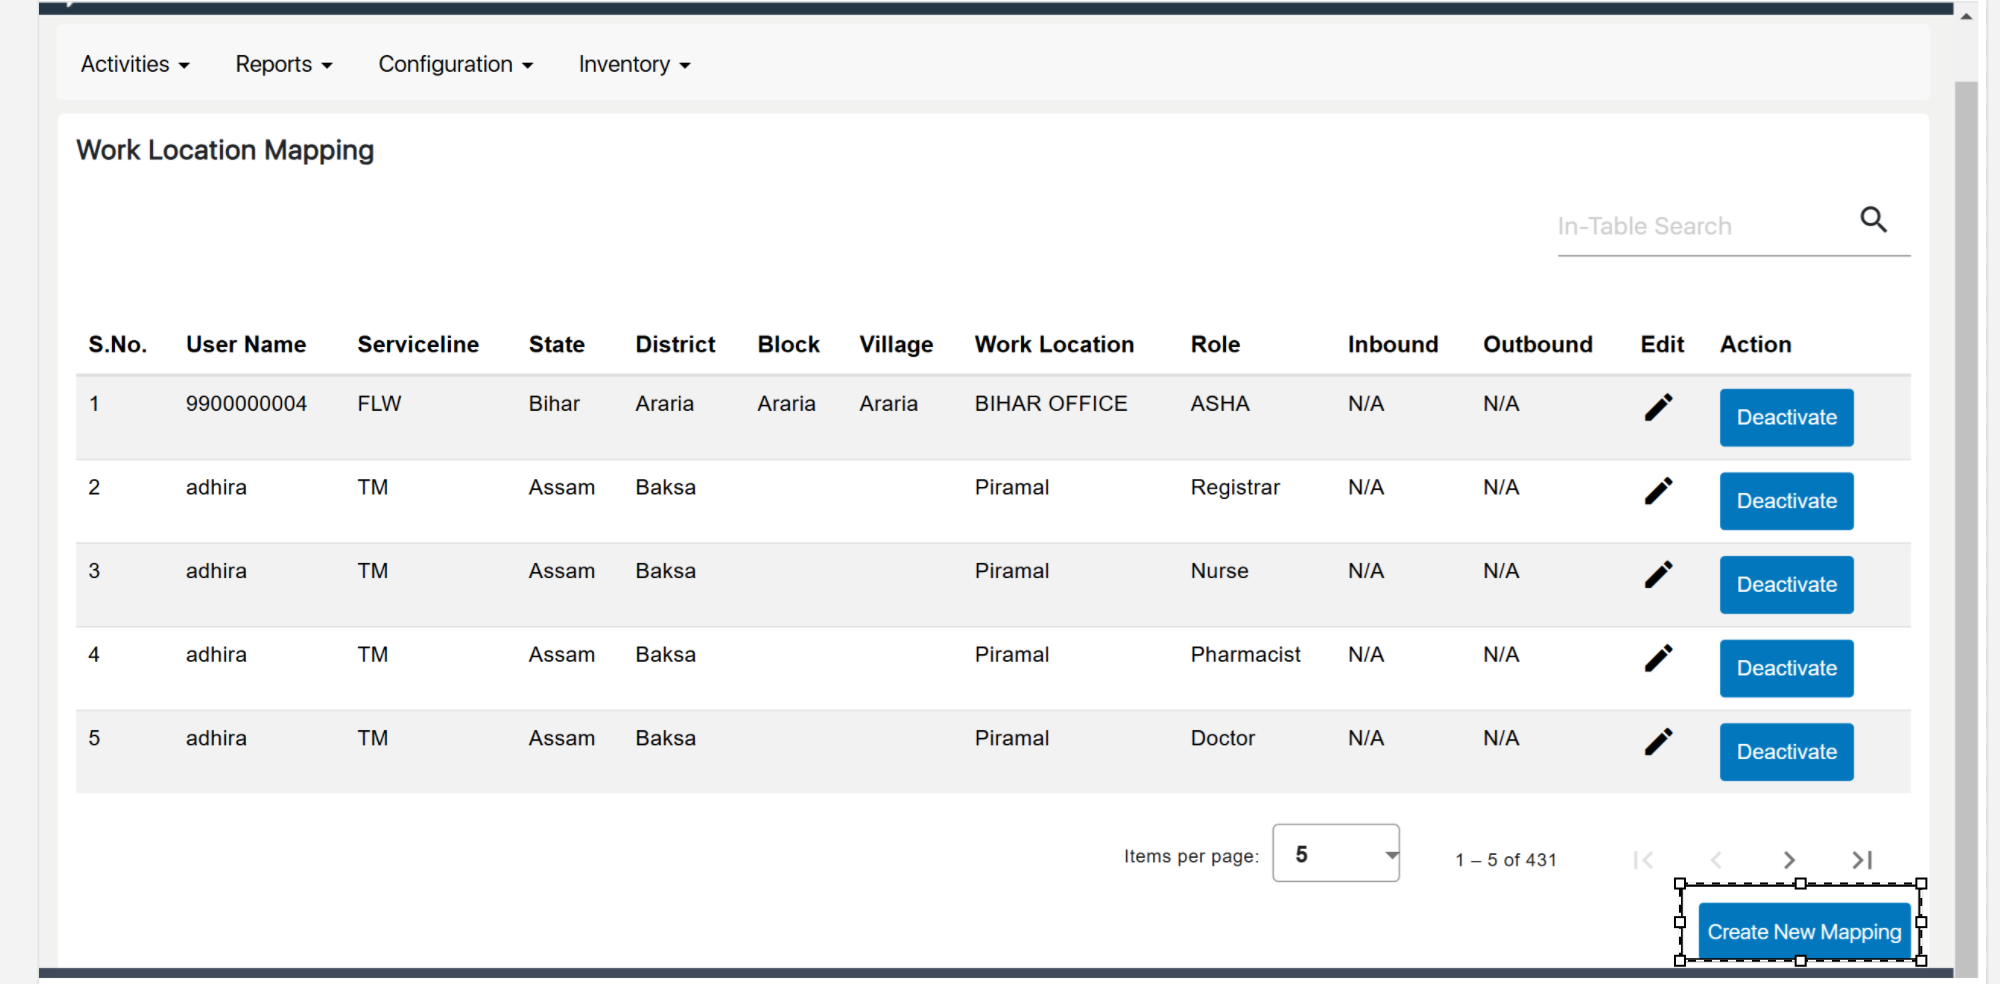
Work Location Mapping
Work Location Mapping allows users to associate employees or roles with specific work locations. This ensures that the right personnel are assigned to the correct geographical locations, improving workflow and service delivery.
- Enter Mapping Details: Choose the employee or role and the corresponding work location from the dropdown lists.
- Save the Mapping: After entering the necessary details, click "Save" to store the new work location mapping.
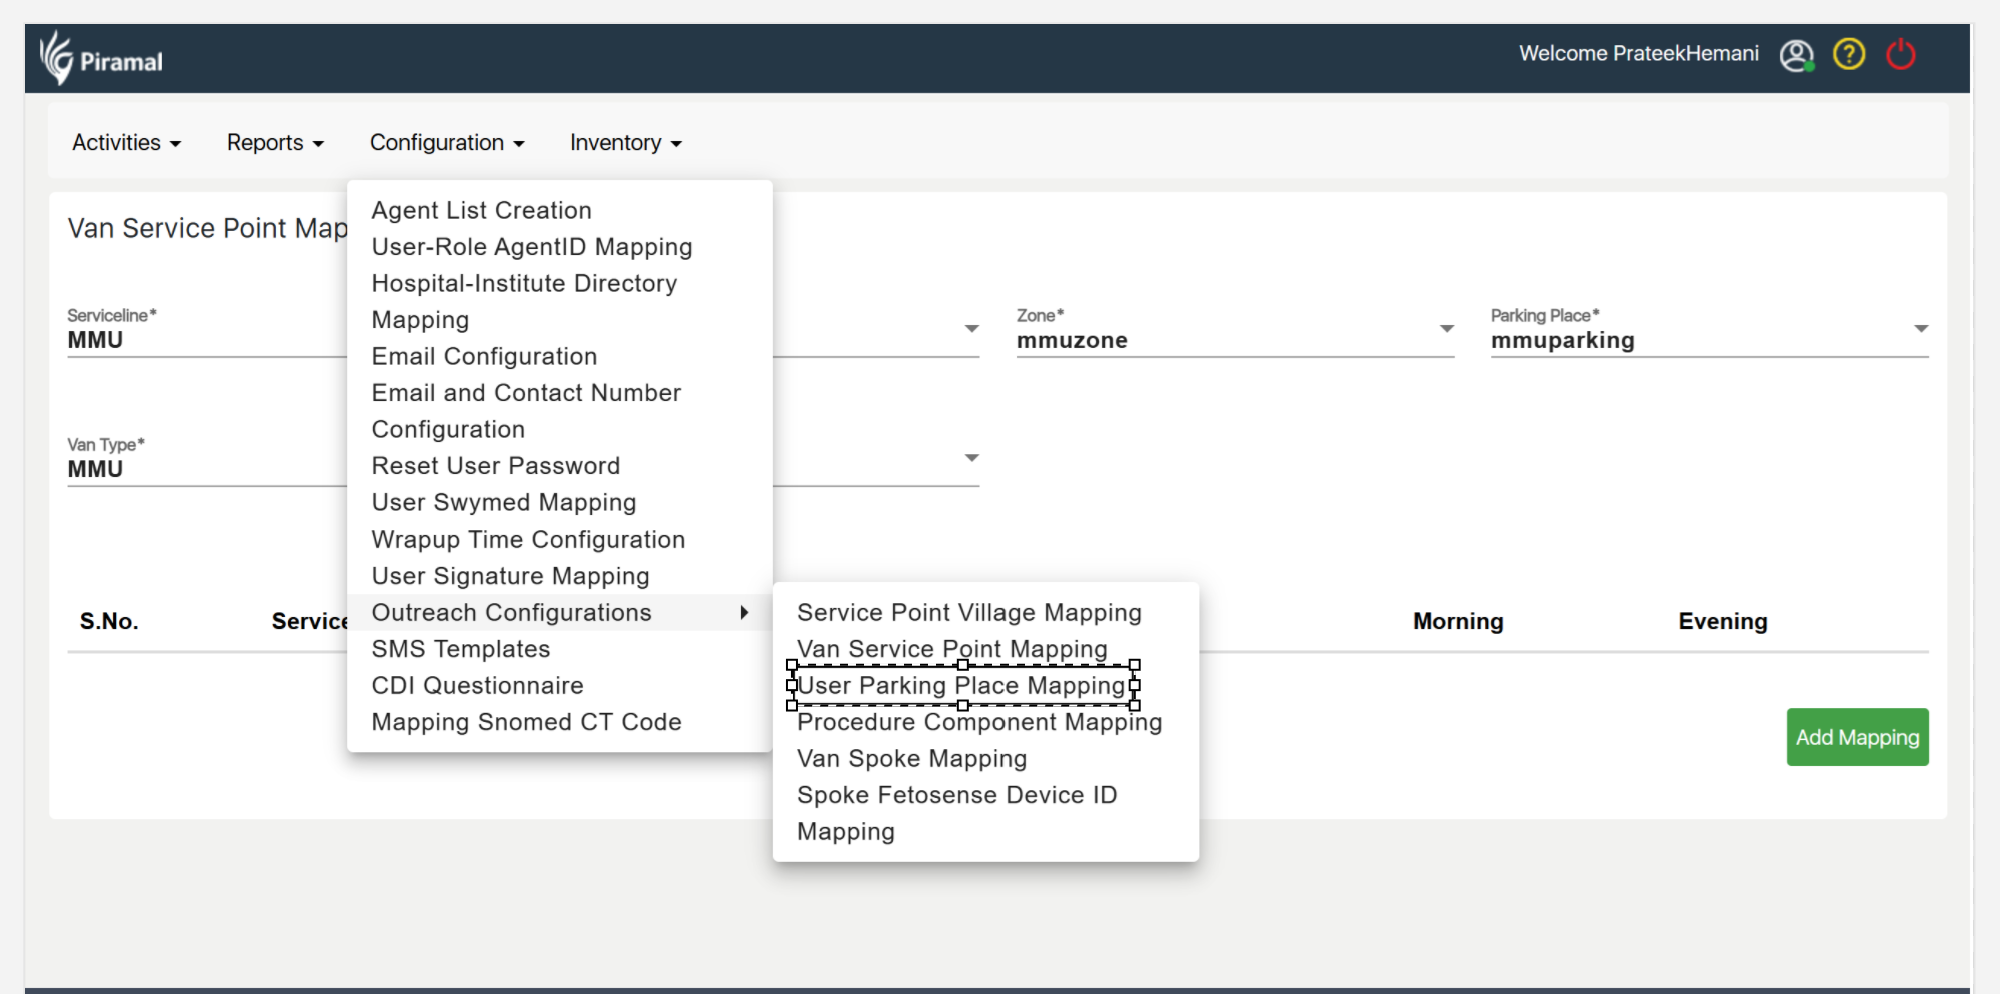
Service Point Village Mapping
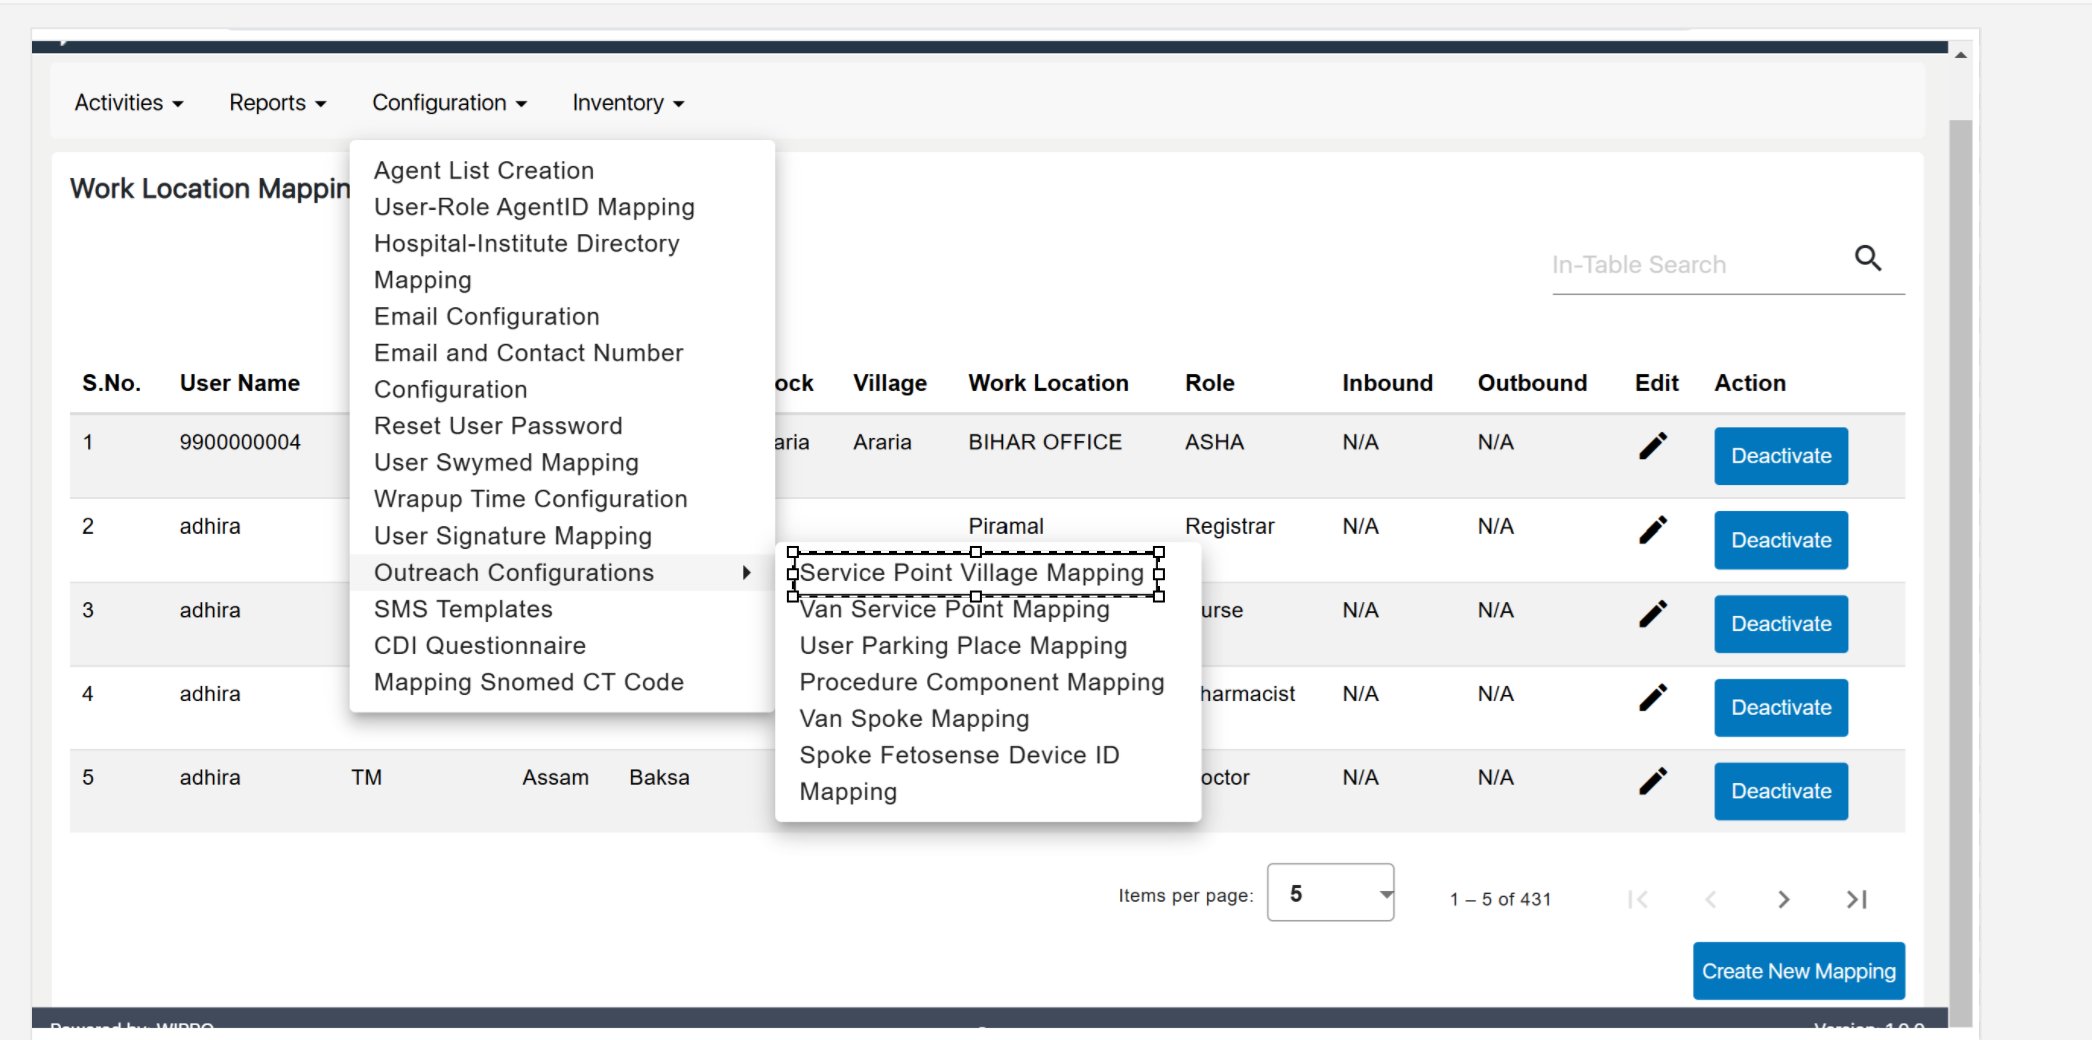
- Go to Configurations: Navigate to the "Configurations" section from the main menu.
- Select Outreach Configuration: Choose "Outreach Configuration" from the available options.
- Click on Service Point Village Mapping: Select "Service Point Village Mapping" to proceed.
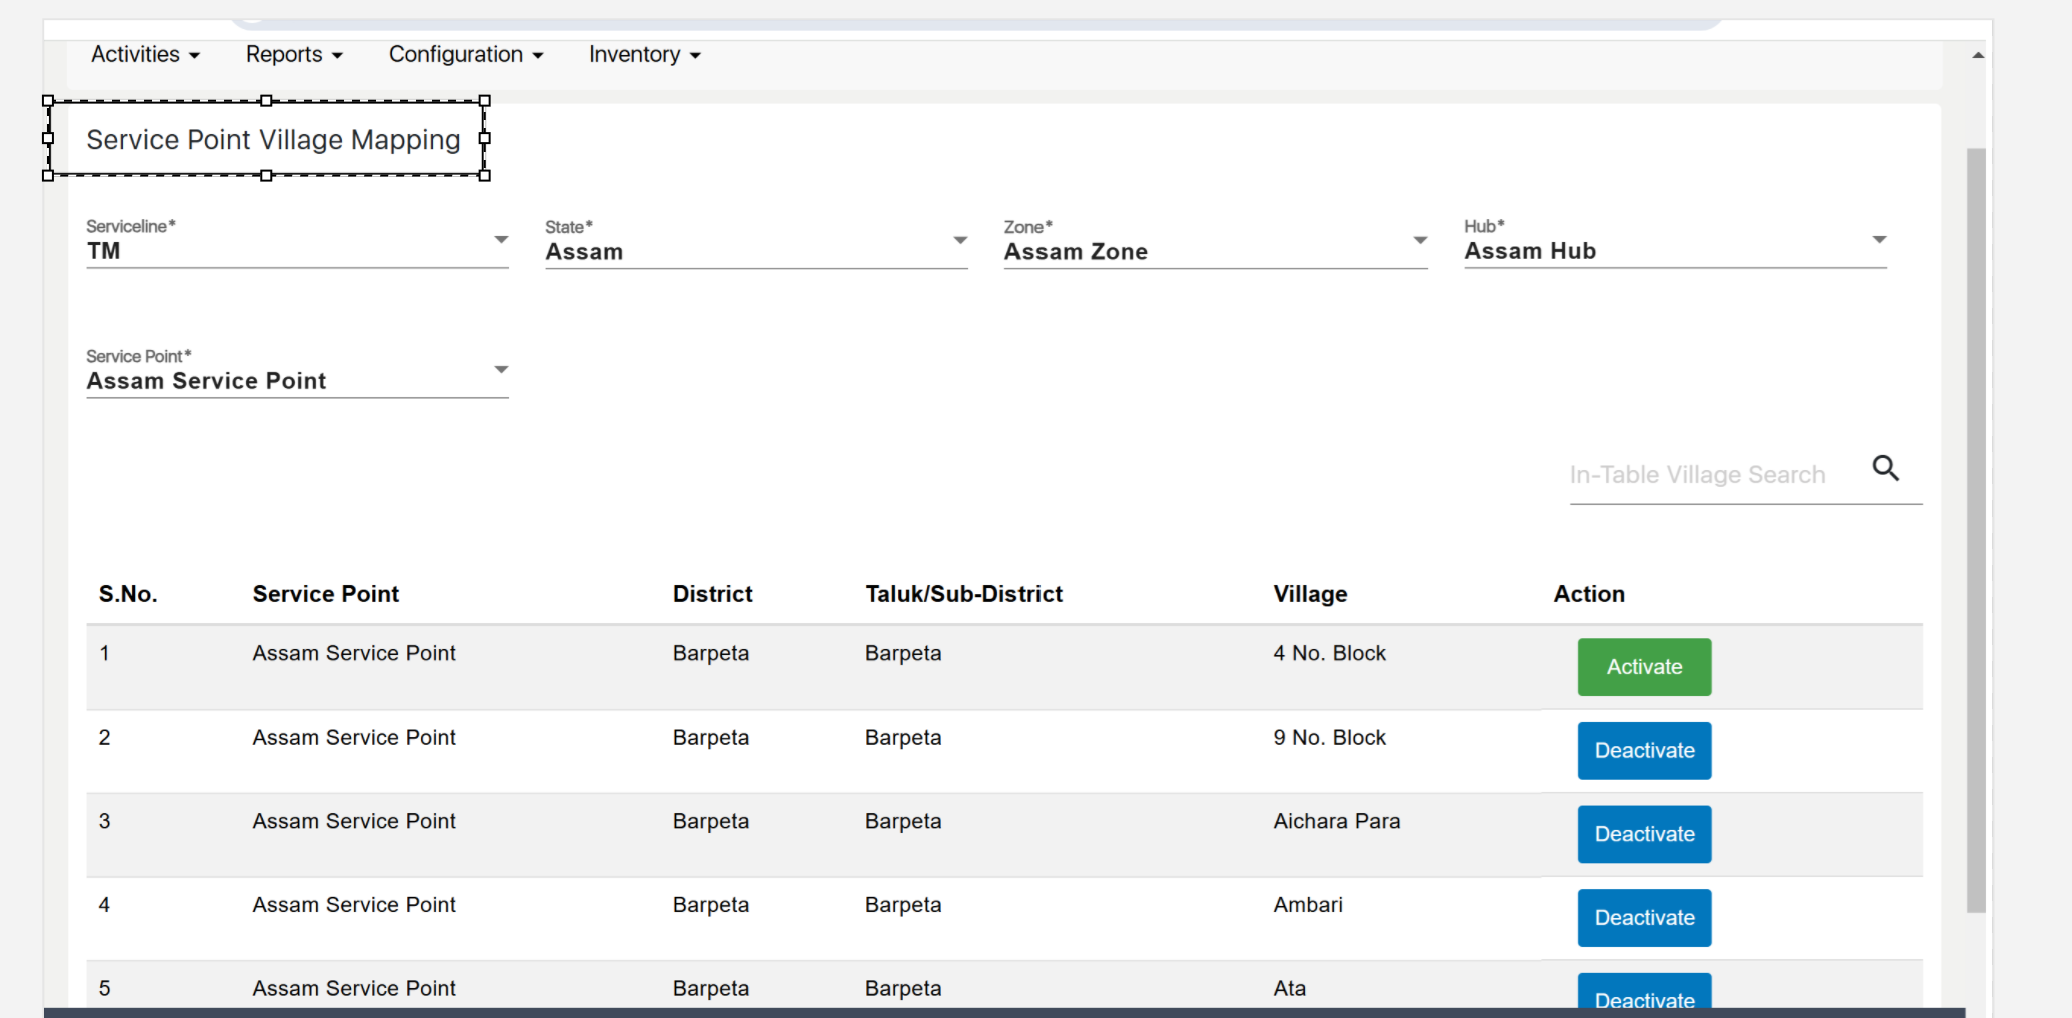
Service Point Village Mapping associates service points with specific villages. This mapping helps in organizing and managing service delivery by linking service points to their respective village locations.
- Add New Mapping: Click "Add New Mapping" to create a new service point-village association.
- Enter Mapping Details: Choose the service point and the corresponding village from the dropdown lists.
- Save the Mapping: Click "Save" to finalize and store the mapping.
Van Service Point Mapping
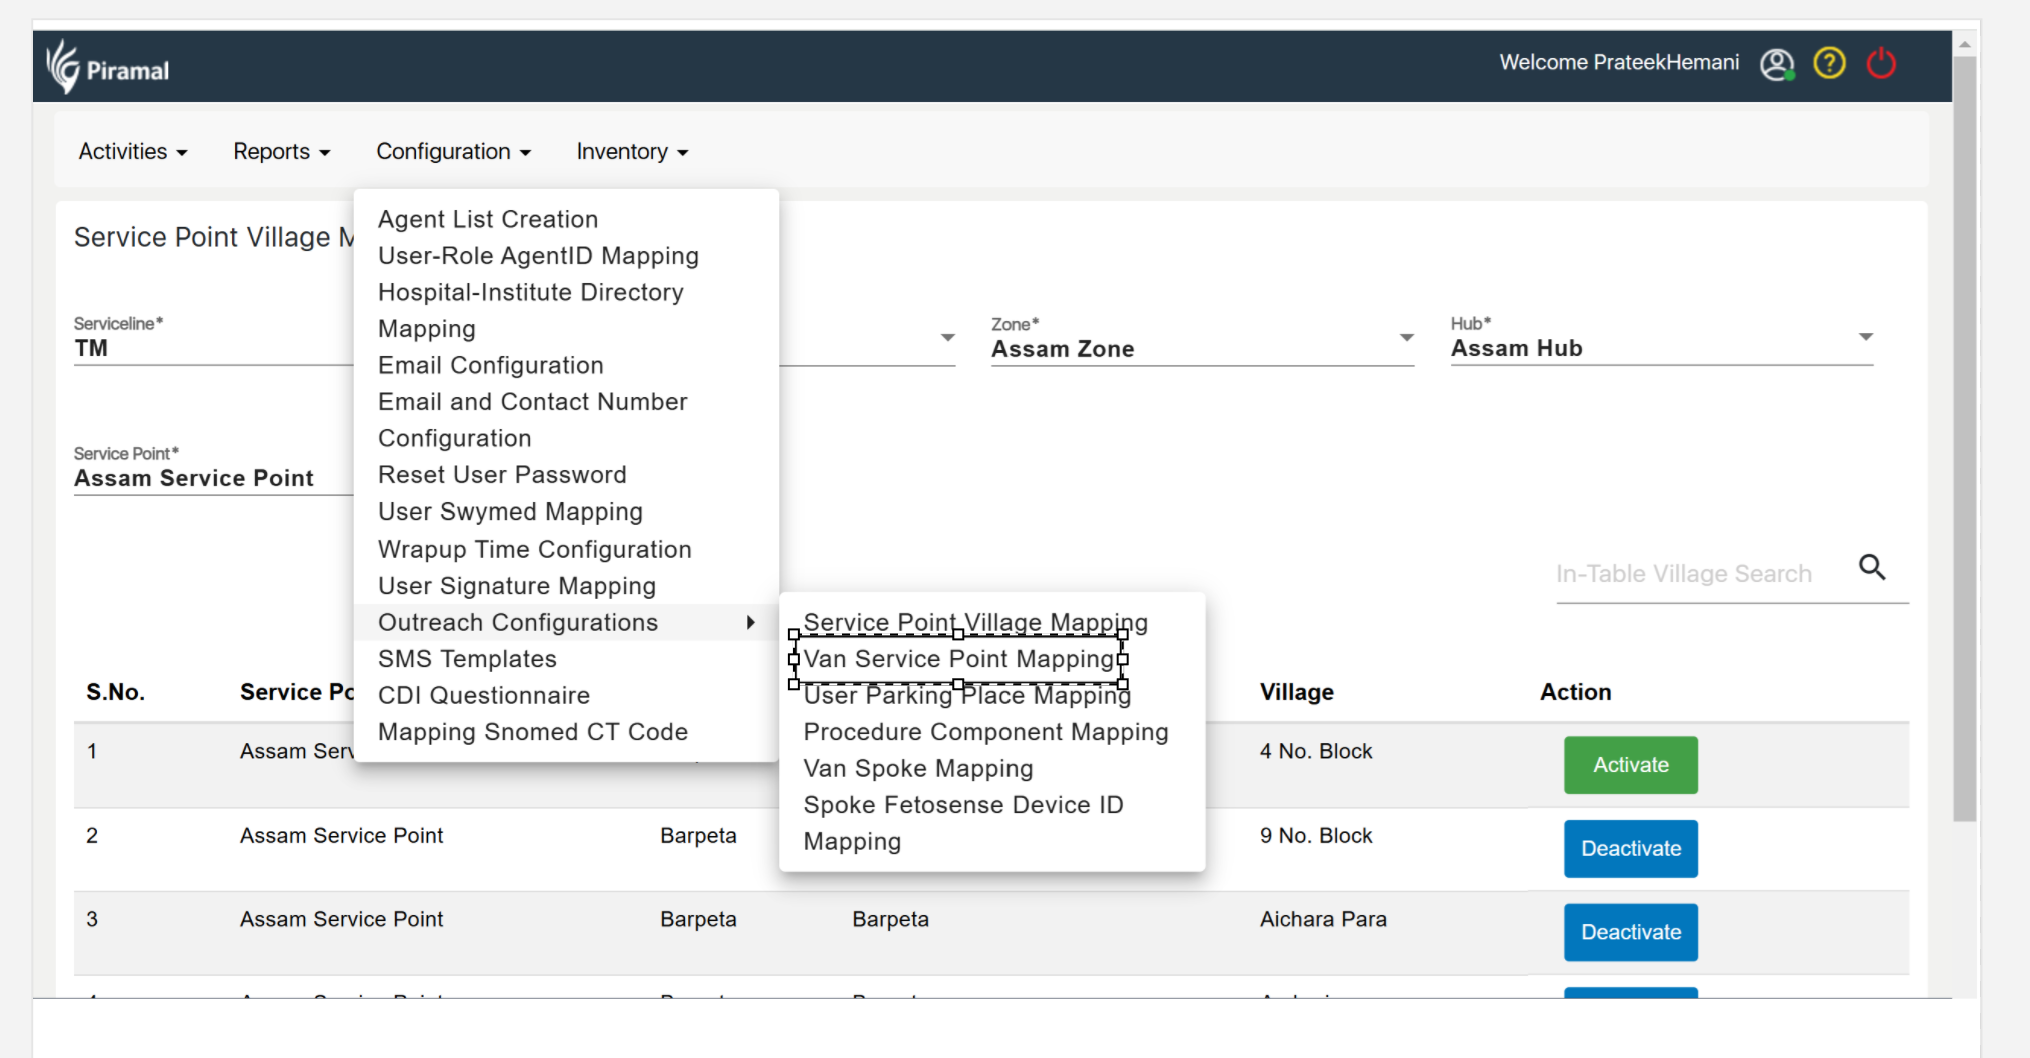
- Go to Van Service Point Mapping: Navigate to the "Van Service Point Mapping" under the relevant section.
- Click on Add New Mapping: Select "Add New Mapping" to start the process.
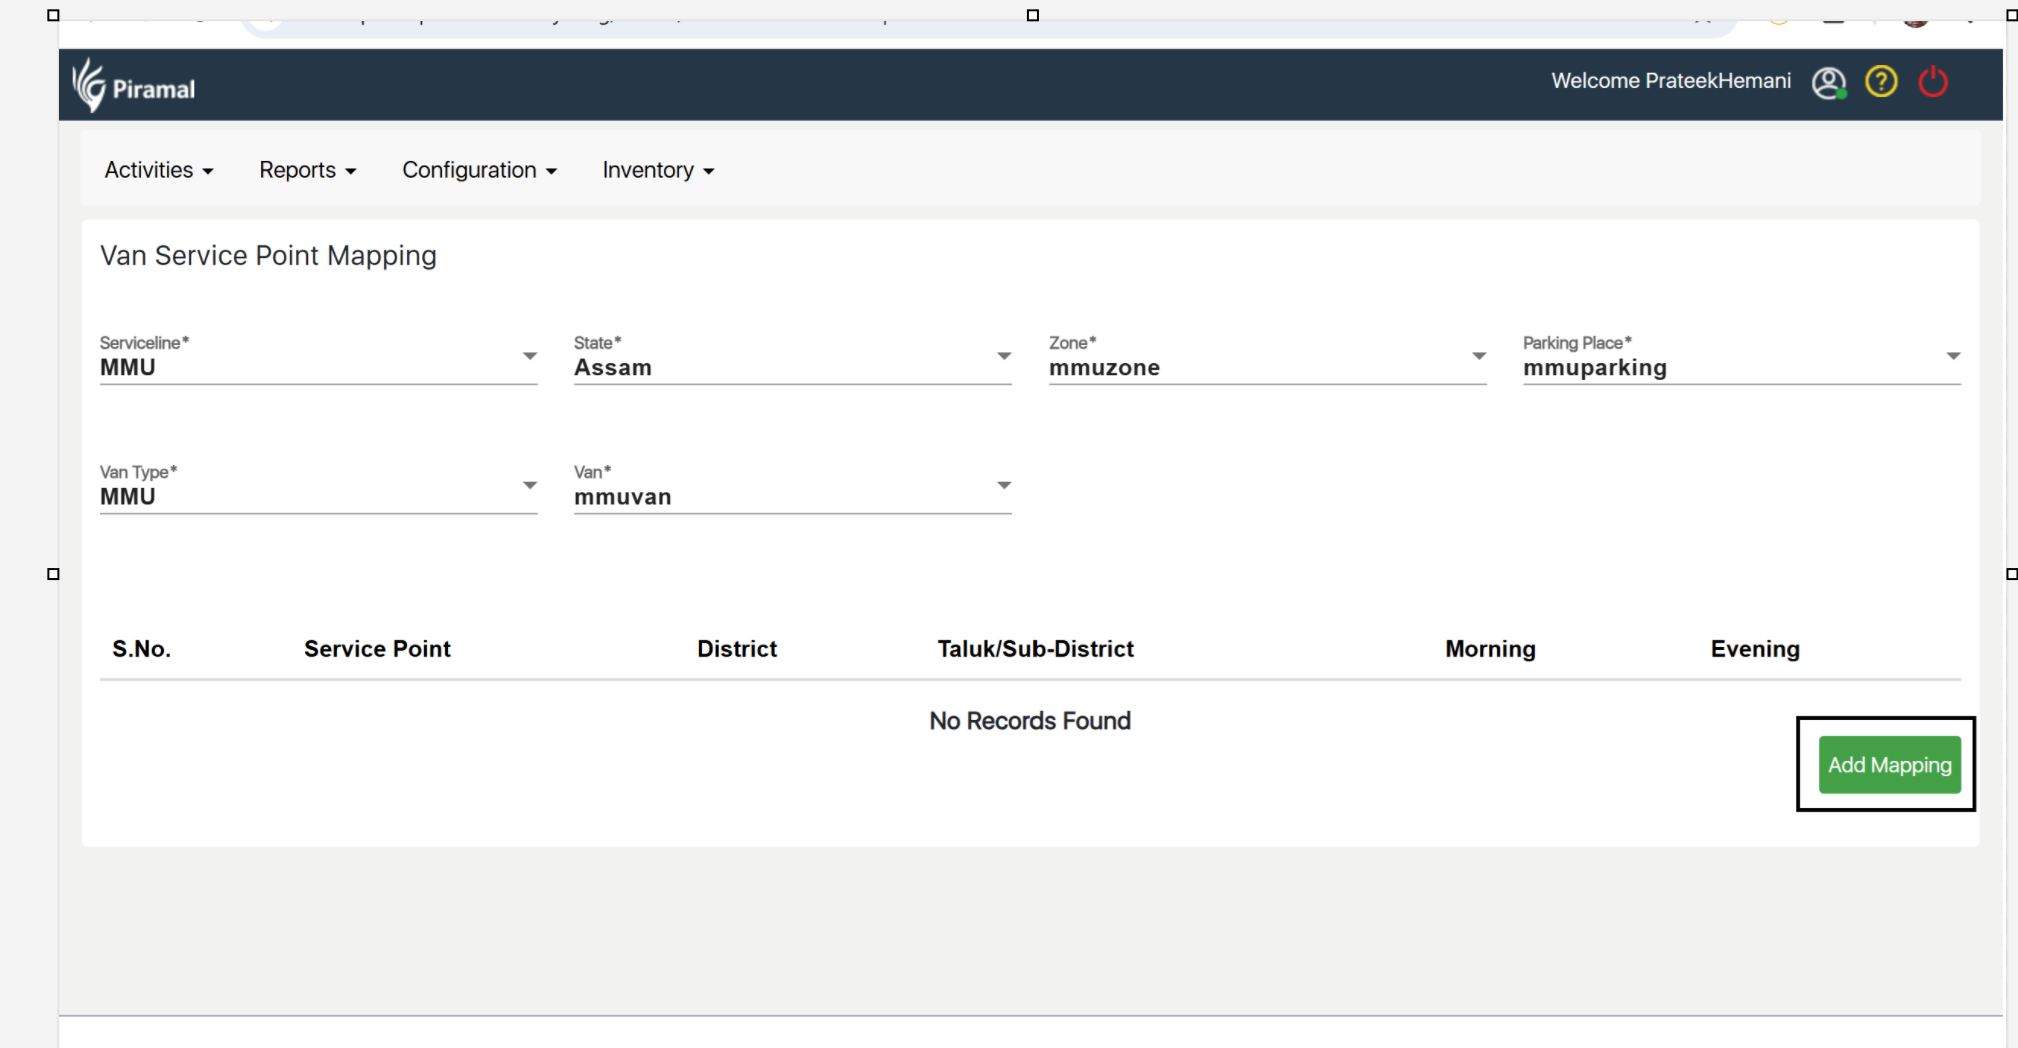
Van Service Point Mapping links specific vans to service points, ensuring that the correct van is assigned to the appropriate service location. This helps in organizing transportation and service delivery logistics efficiently.
- Enter Mapping Details: Select the van and the corresponding service point from the dropdown lists.
- Save the Mapping: After entering the details, click "Save" to store the new van-service point mapping.
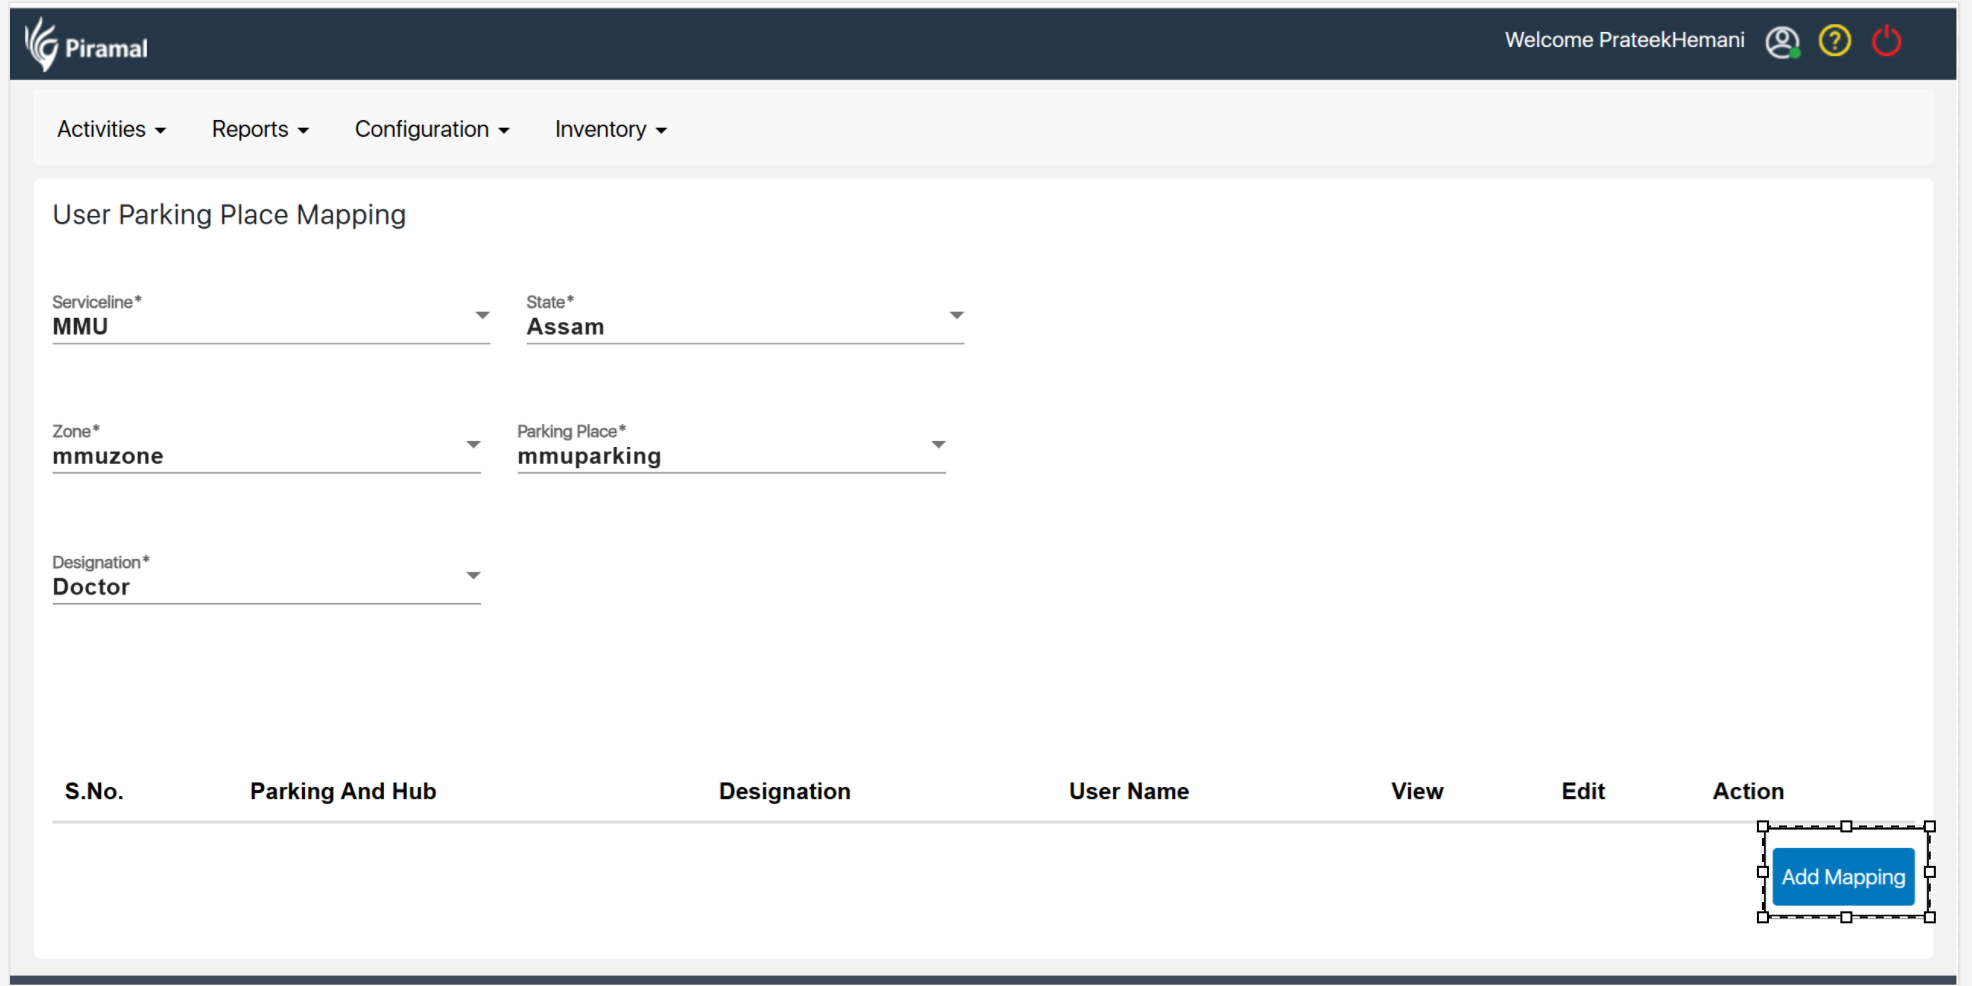
User Parking Place Mapping
- Go to User Parking Place Mapping: Navigate to the "User Parking Place Mapping" section under the relevant menu.
- Click on Add New Mapping: Select "Add New Mapping" to begin the process.
User Parking Place Mapping assigns users to specific parking places, ensuring that employees or roles have designated parking spots at particular locations. This helps manage parking resources effectively.
- Enter Mapping Details: Select the user and the corresponding parking place from the dropdown lists.
- Save the Mapping: After entering the required information, click "Save" to store the new user-parking place mapping.
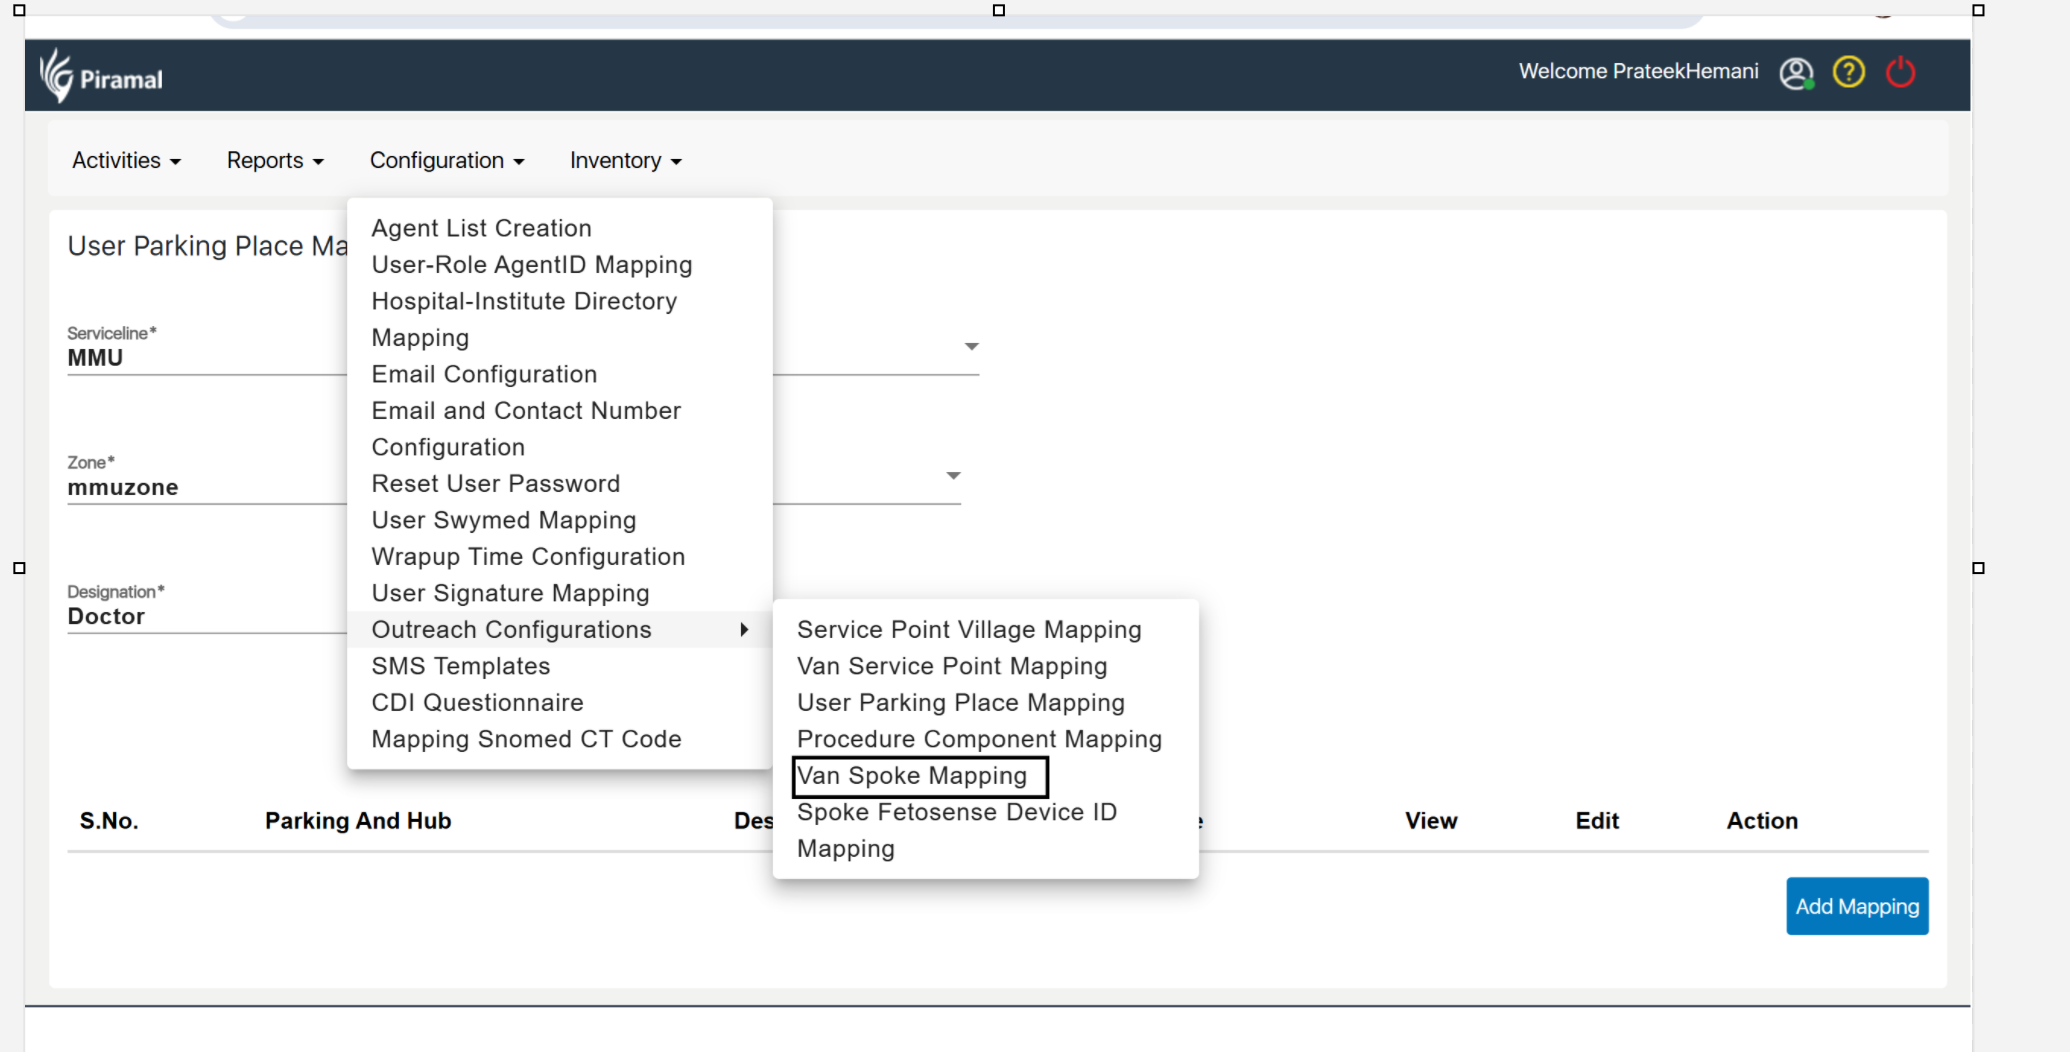
Van Spoke Mapping
- Go to Configurations: Navigate to the "Configurations" section from the main menu.
- Select Van Spoke Mapping: Click on "Van Spoke Mapping" under the Configurations section.
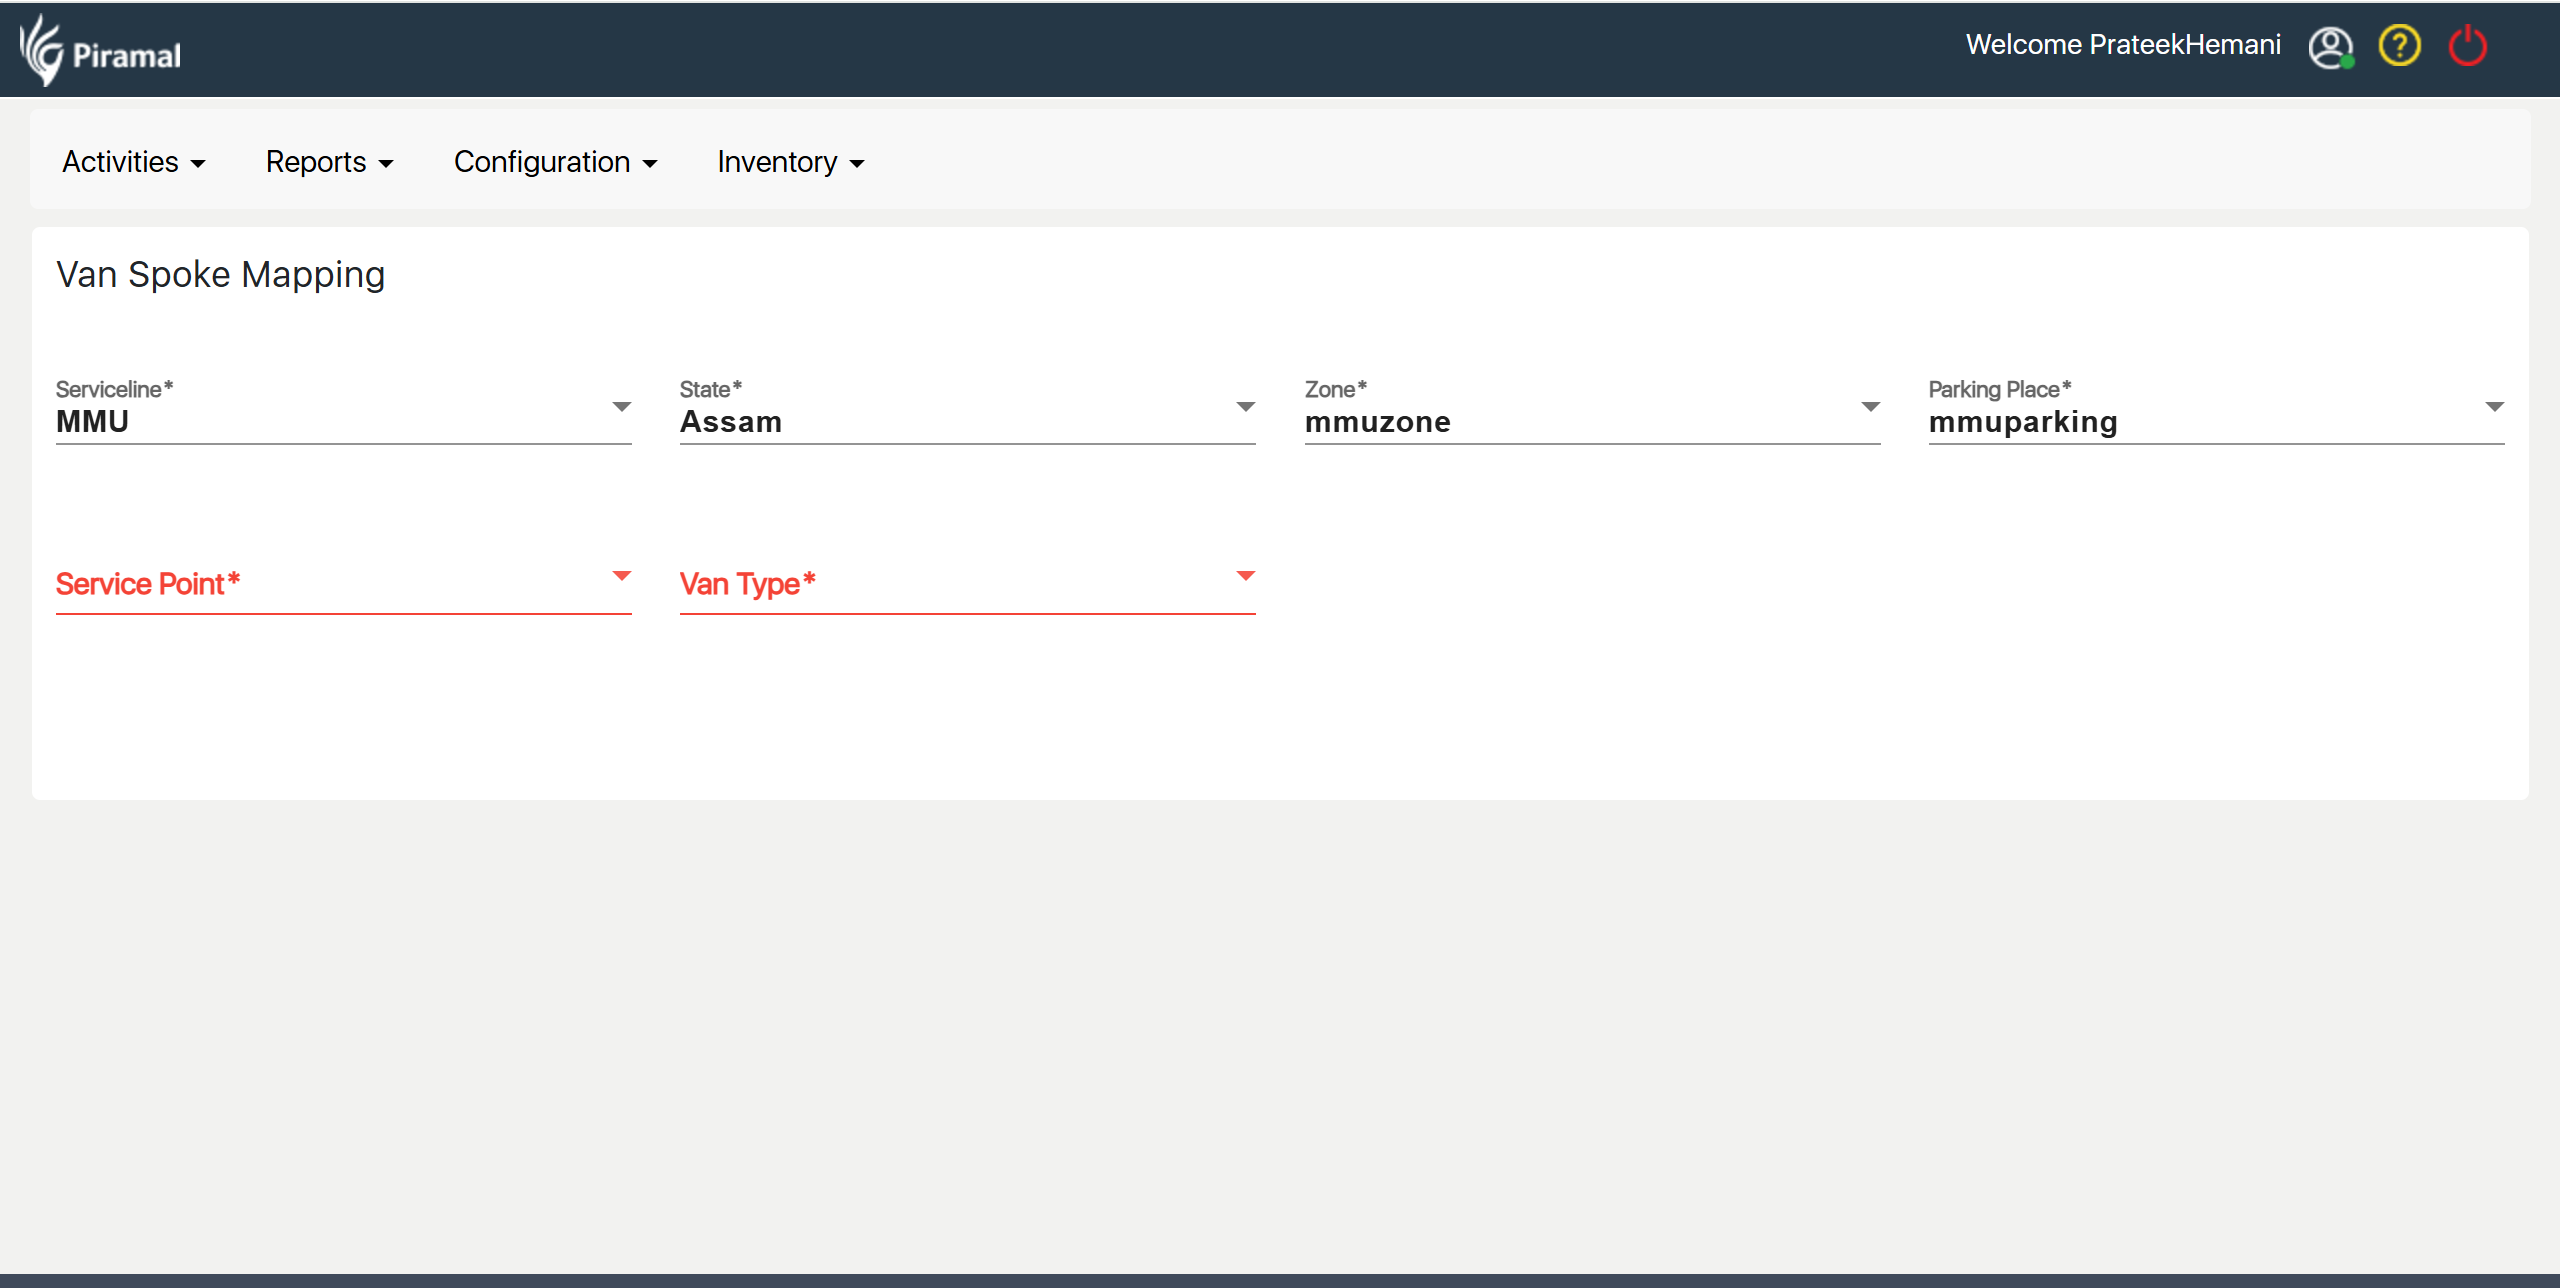
Van Spoke Mapping involves associating vans with specific spoke locations (secondary points of service), ensuring that each van is connected to the right service network. This helps in optimizing route planning and service coverage.
- Add New Mapping: Click "Add New Mapping" to create a new van-spoke association.
- Enter Mapping Details: Choose the van and the corresponding spoke location from the dropdown lists.
- Save the Mapping: Click "Save" to finalize and store the new van-spoke mapping.
Adding Lab Tests for HWC, MMU, and Telemedicine
- Go to Activities: From the main menu, navigate to the "Activities" section.
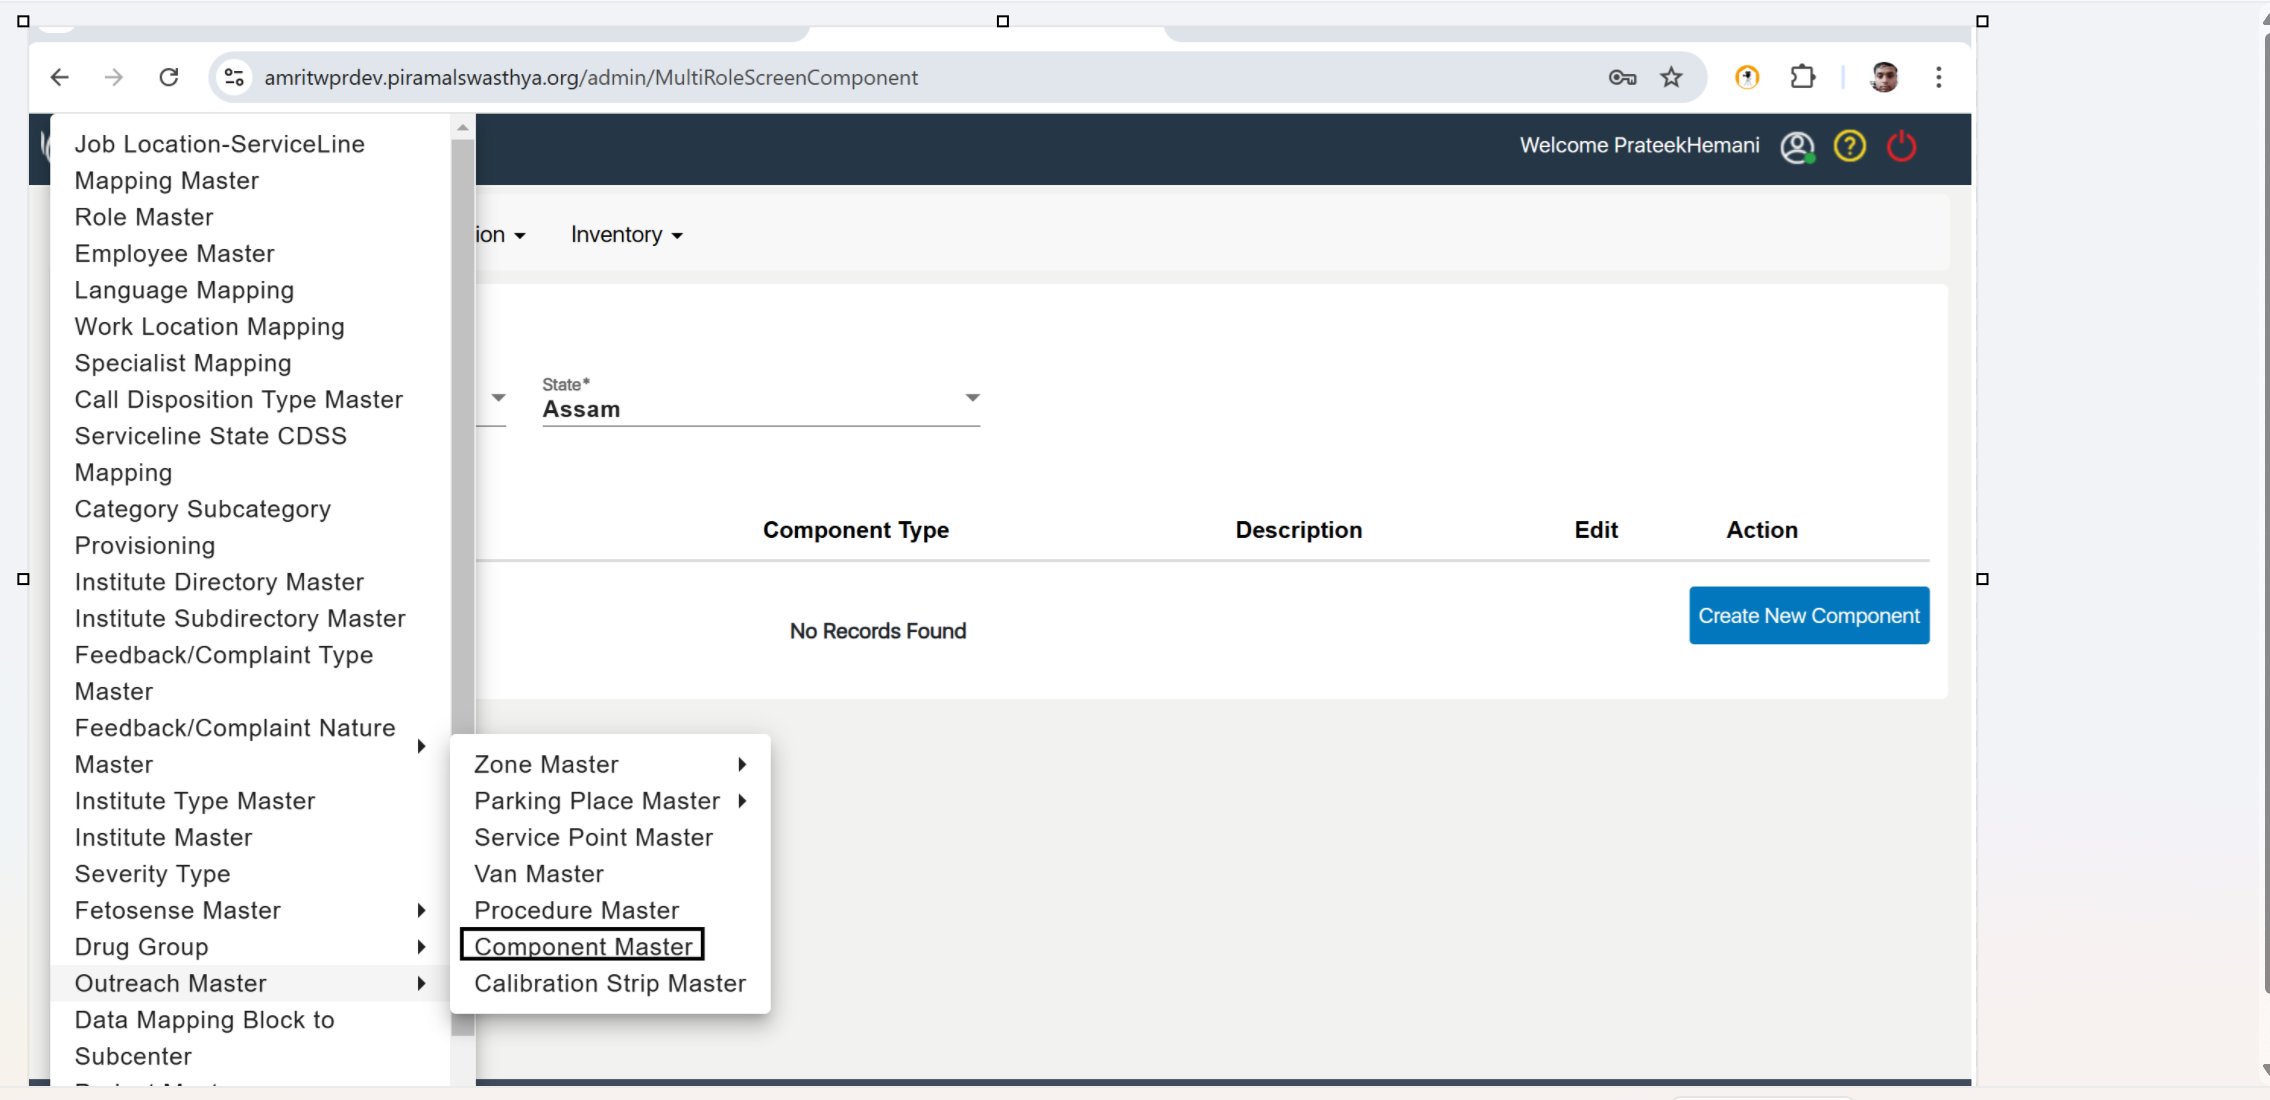
- Select Outreach Master: Under "Activities," click on "Outreach Master."
Procedure Master
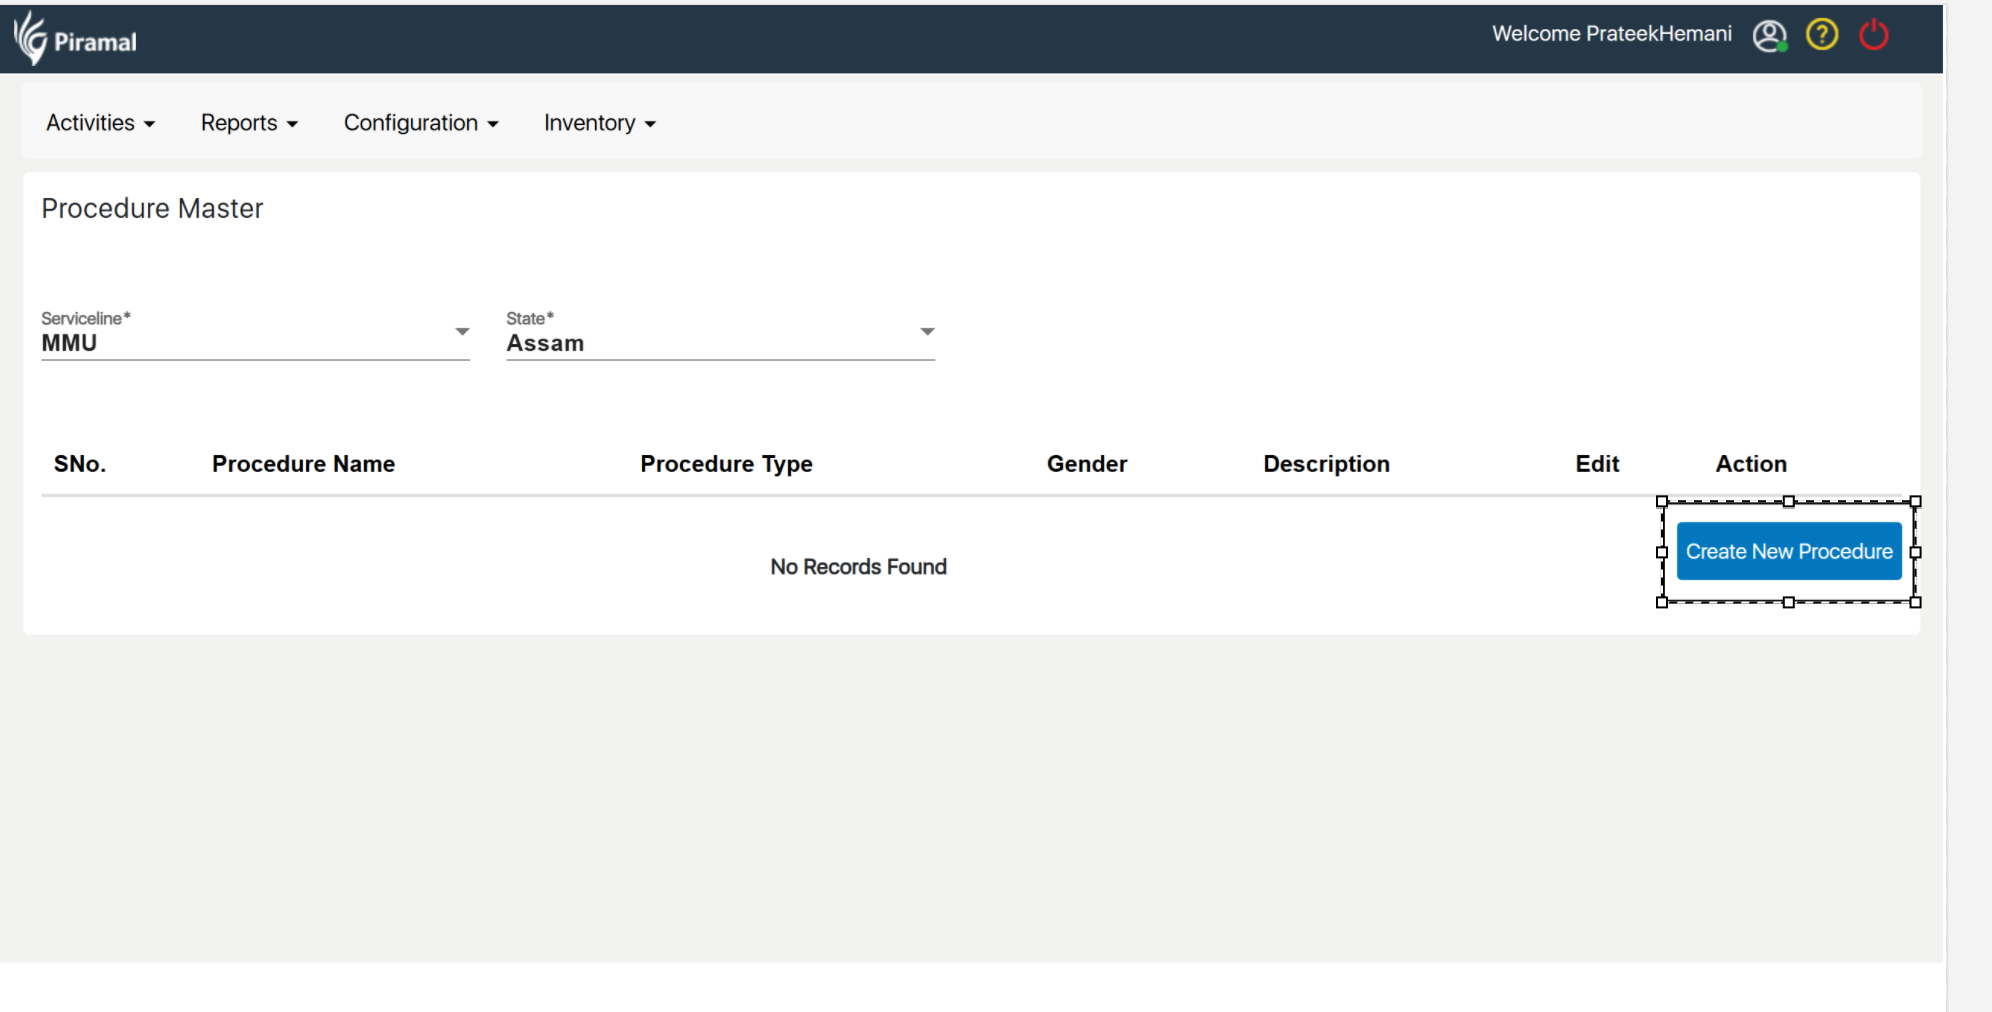
- Click on Procedure Master: Select "Procedure Master" to manage procedures.
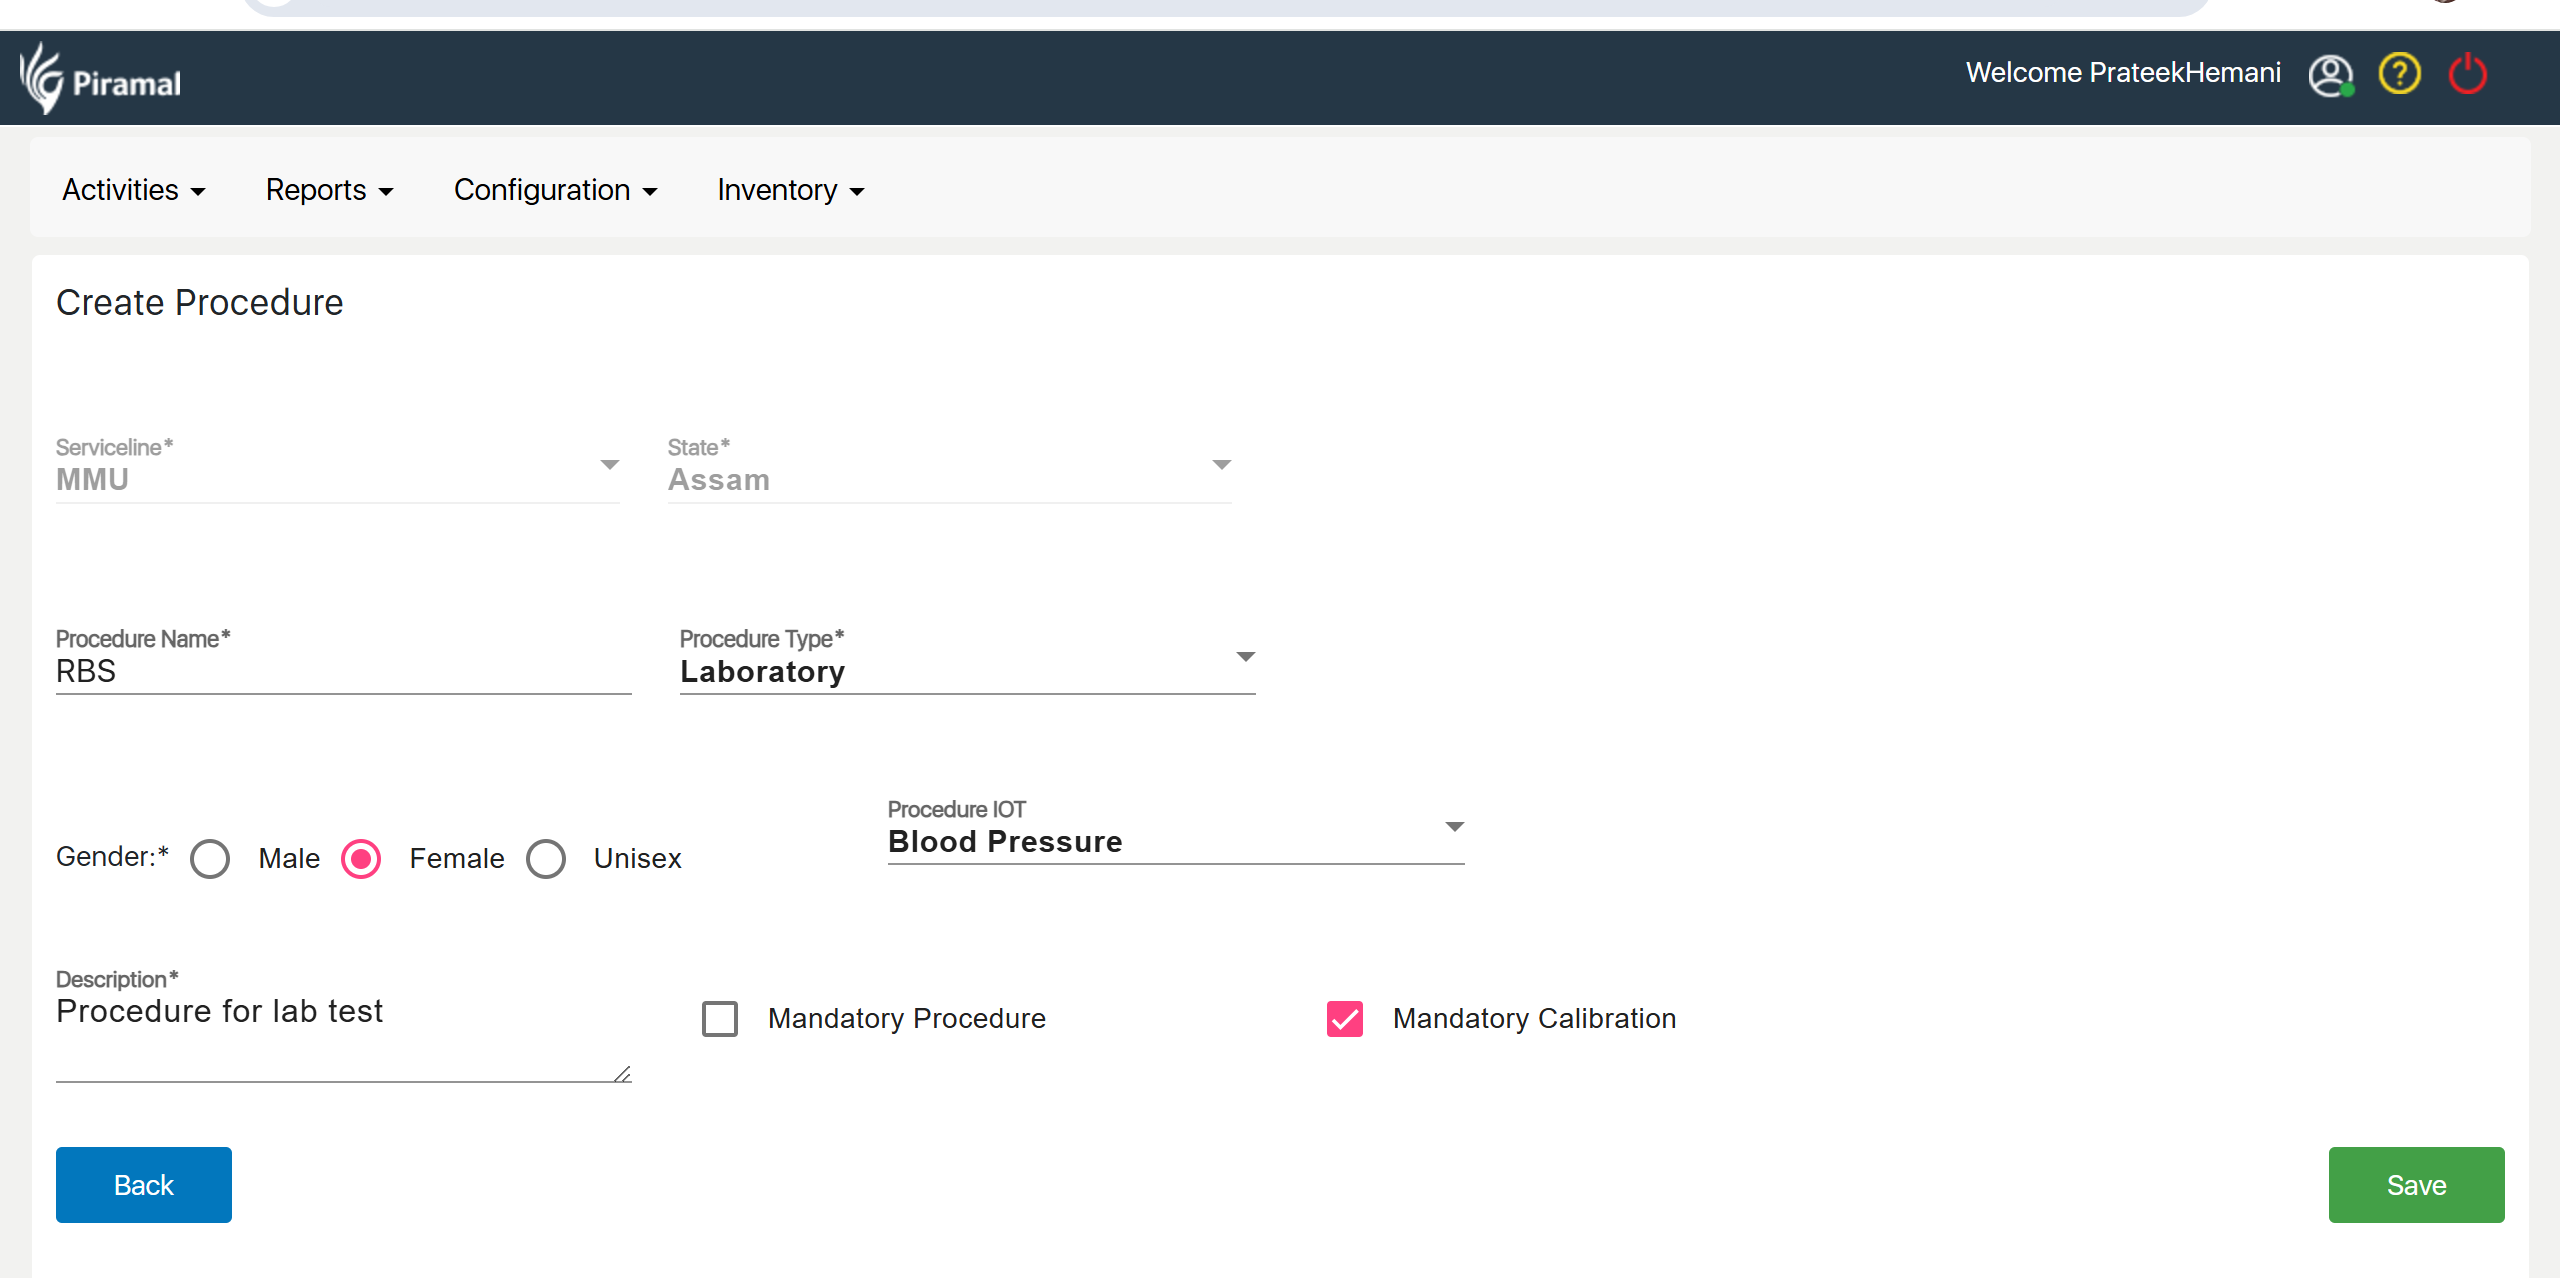
- Add New Procedure: Click "Add New Procedure" and enter the required details to create lab tests associated with HWC (Health & Wellness Centers), MMU (Mobile Medical Units), and Telemedicine service lines.
- Save Procedure: Click "Save" to store the new procedure for the respective service lines.
Procedure Component Mapping
- Go to Configurations: From the main menu, navigate to the "Configurations" section.
- Select Outreach Configuration: Click on "Outreach Configuration" under Configurations.
Procedure Component Mapping
- Click on Procedure Component Mapping: Under Outreach Configuration, select "Procedure Component Mapping."
- Add New Mapping: Click "Add New Mapping" to start the process.
- Enter Mapping Details: Choose the relevant procedure and the corresponding components for HWC, MMU, and Telemedicine service lines.
- Save the Mapping: Click "Save" to store the procedure-component association.

