FIELD USER GUIDE- STOP TB Mobile Application
Clinical Assessment & Screening: General Examination • TB Screening • General OPD • Diagnostics
(Health Screening Officer MODULE)
Table of Contents
1. Module Overview3
2. Getting Started4
3. Workflow Overview8
4. General Examination 9
5. TB Screening Form14
6. General OPD16
7. Diagnostics18
8. Tips and Best Practices21
9. Troubleshooting and FAQs22
10. Tuberculosis and Referral23
1. Module Overview
1.1 Purpose of the Health Screening Officer Module
The Health Screening Officer module of the Stop TB application lets a Health Screening Officer carry out clinical assessment and screening for beneficiaries who have already been registered by the field team. Working from a ready-made line listing of households and beneficiaries, the Health Screening Officer records vital signs and general findings, screens for tuberculosis (TB) symptoms, captures an outpatient (OPD) consultation, and records diagnostic test details.
1.2 Role and Responsibilities of the Health Screening Officer
In this role the Health Screening Officer does not register new households or beneficiaries. Instead, the Health Screening Officer:
- Opens the beneficiary line listing and finds the person to be assessed.
- Completes, for each beneficiary, up to five examination forms: Anthropometry Screen (To be filled by registrar, but access given to Health Screening Officer as well if the need arises), General Examination, TB Screening Form, General OPD and Diagnostics.
- Records measurements and findings exactly as taken, and submits each form.
- Tracks how many forms are complete for each beneficiary using the "Examine X / 5" indicator.
1.3 When and by Whom Each Module Is Used
The module is used by a Health Screening Officer during a screening camp after the field team has registered the households and beneficiaries. The five forms are normally completed together for a beneficiary, but each can be filled on its own and at different times — the line listing shows which are still pending.
1.4 Workflows Covered in This Guide
- Viewing the Household and Beneficiary line listing.
- Searching for and selecting a beneficiary.
- General Examination (vital signs and general clinical findings).
- TB Screening Form (verbal symptom screening).
- General OPD assessment (complaint, medication, advice).
- Diagnostics (chest X-ray, sputum collection and NAAT details).
2. Getting Started
2.1 Logging In
- Open the Stop TB application and choose your language — English or हिंदी.
- If your camp uses a hub, Camp Mode is used to connect to it.
- Enter your Username and Password (tap the eye icon to check it), optionally tick Remember me, then tap Login.
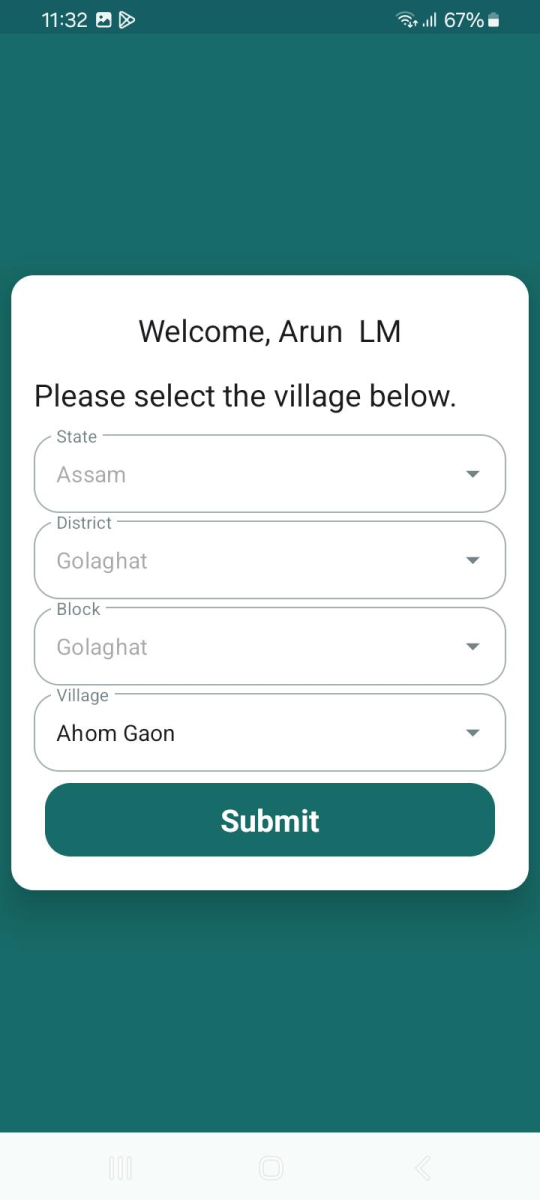
- On the "Welcome" screen, select your State, District, Block and Village, then tap Submit.
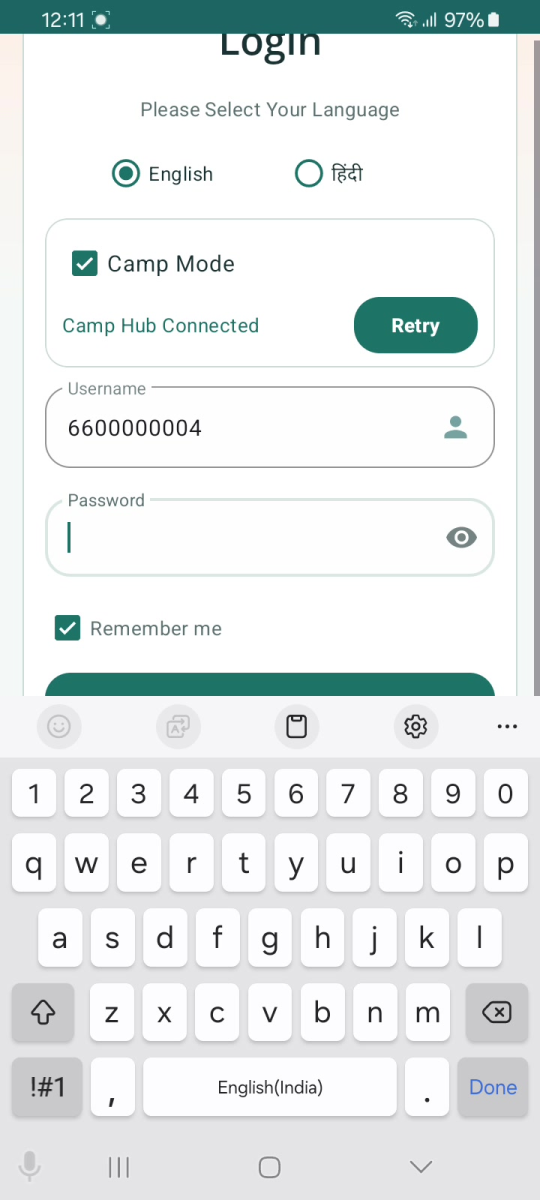
Login — language, Camp Mode, username and password.
| |
2.2 The Home Dashboard
After selecting the village, the Dashboard appears. It shows cards for All Household and All Beneficiaries (with counts) and a Tuberculosis card. The side menu (top-left) holds Home, Sync Records, Connect Camp Hub, Create ABHA Number, Support, Request to delete my account and Logout, and shows the app version.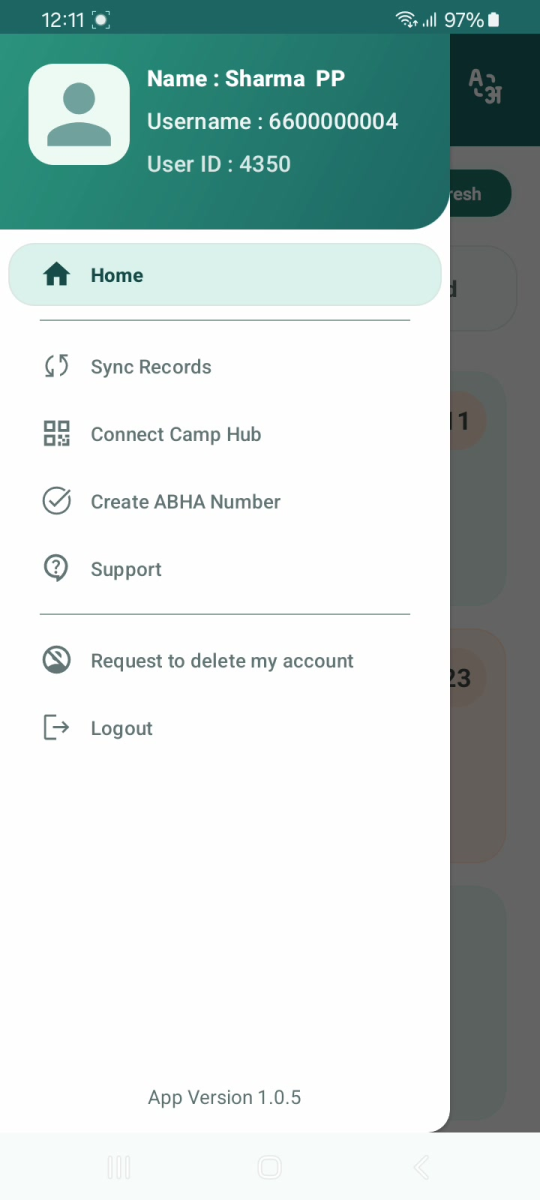
Side menu- user details and navigation options.
| 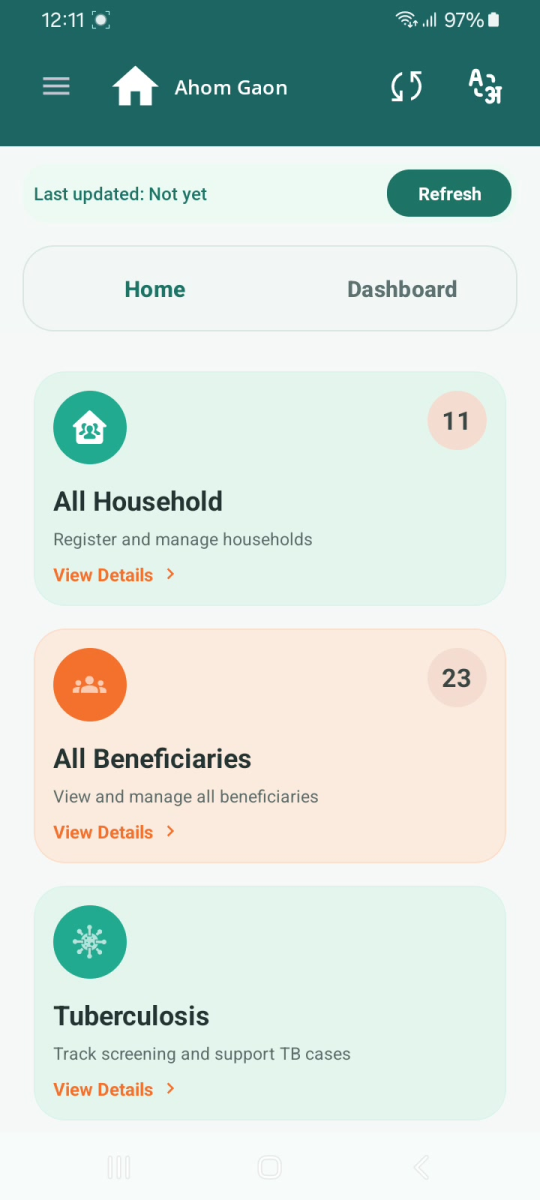
Home Dashboard- All Household, All Beneficiaries Tuberculosis and Referrals cards
|
2.3 Beneficiary Line Listing and Search
Open All Beneficiaries to see the line listing. Each beneficiary card shows the Father Name, Age, Gender, Registration Date, Beneficiary ID, Mobile Number and Nikshay ID, with two buttons: "Examine X / 5" and "ABHA". - Use the Search bar at the top to find a beneficiary by name.
- Read the Examine X / 5 button to see how many of the five examination forms are done (for example, "Examine 4 / 5" means four are complete).
- Tap Examine X / 5 to open the Examination Forms for that beneficiary.
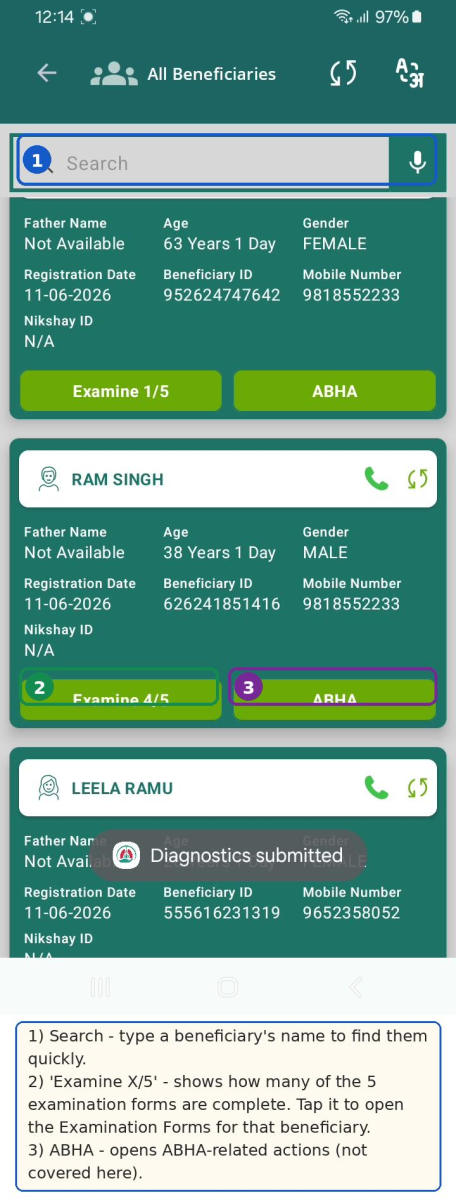
Beneficiary line listing — Search, the "Examine X / 5" button and ABHA.
2.4 The Examination Forms Screen
Tapping "Examine X / 5" opens the Examination Forms panel for the beneficiary. It lists the five forms, each with a button:
- Green "View" — the form is already completed; tap to view or edit it.
- Red "Fill" — the form is not done yet; tap to complete it.
The five forms are: Anthropometry Screen, General Examination, TB Screening Form, General OPD and Diagnostics.
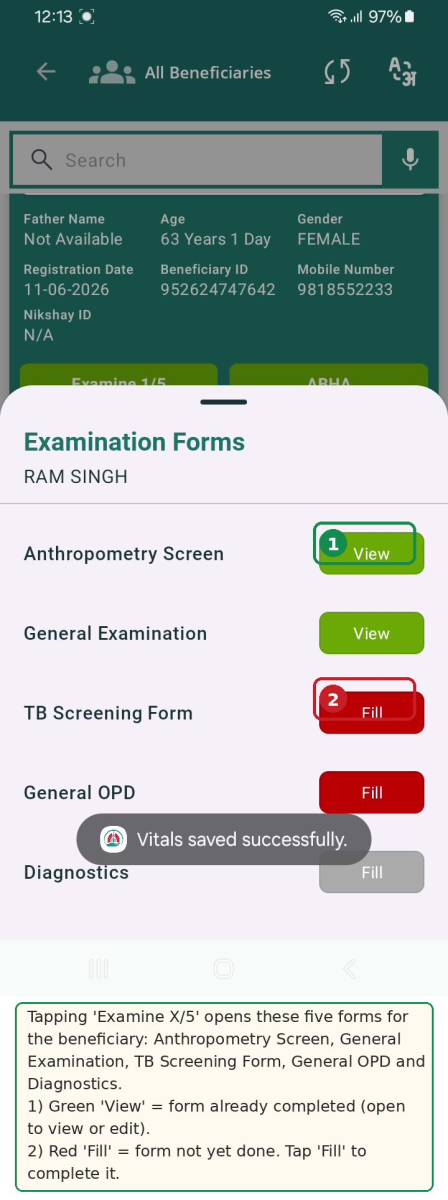
Examination Forms — five forms, each showing Fill (pending) or View (done).
3. Workflow Overview
The diagram below depicts the Health Screening Officer's clinical assessment journey, from opening the beneficiary line listing through General Examination, TB Screening, General OPD and Diagnostics. Each colour is one form; diamonds mark decision points, and the final boxes show the confirmation message and how the "Examine X / 5" status updates.
Order of work: For each beneficiary, the forms are normally completed in this order: General Examination → TB Screening Form → General OPD → Diagnostics. Each form is saved on its own, so you can also do them individually. |
!worddav8d9f8c58dc1c1cb51f72c507f4220db0.png|height=272,width=709!h1.4. General Examination
4.1 Overview
The General Examination form records the beneficiary's vital signs and basic clinical findings. A green banner at the top shows the beneficiary's name, age and gender so you can confirm you are examining the right person.
4.2 Step-by-Step
- From the Examination Forms screen, tap Fill (or View) next to General Examination.
- Enter the Pulse Rate (beats per minute).
- Enter the Systolic and Diastolic blood pressure (mm Hg). Values for Systolic must be between 40 and 320; Values for Diastolic must be between 10 and 180.
- Enter the RBS (random blood sugar, mg/dl). Values for RBS must be between 20 and 600
- For each clinical sign — Pallor, Icterus, Cyanosis, Clubbing, Lymphadenopathy, Oedema — select Present or Absent.
- Open Key Population / Risk Factors and tick all that apply, then tap OK. This is a mandatory selection.
- Select the HIV Status (Positive, Reactive, Negative or Unknown). This is a mandatory selection.
- Tap Submit.
- A "Refer to Health and Wellness Centre" message appears -tap OK.
- The app then shows "Vitals saved successfully" and the form changes to View.
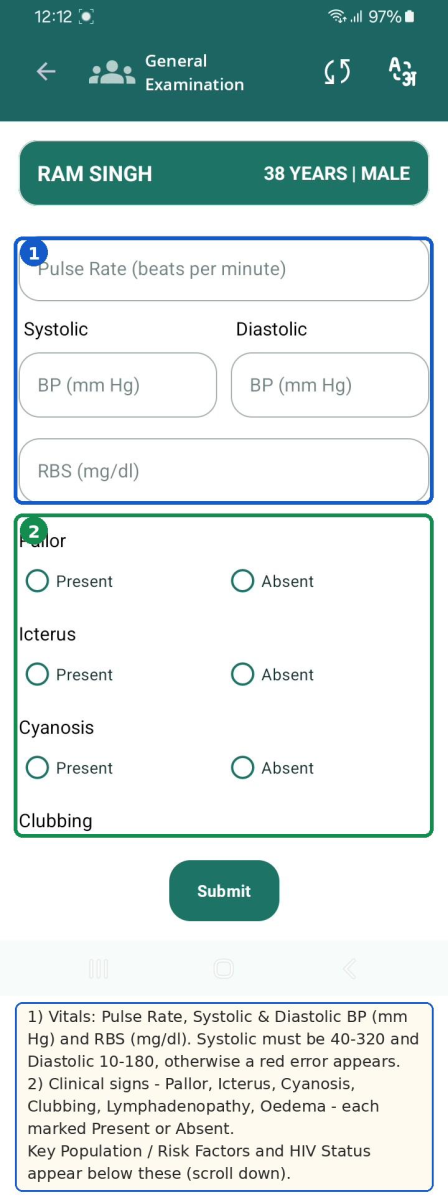
General Examination — vitals and clinical signs.
4.3 Validations and Messages
Blood pressure ranges are enforced. If the Systolic value is outside 40–320, the field turns red with "Enter Systolic BP between 40 and 320". If the Diastolic value is outside 10–180, it shows "Enter Diastolic BP between 10 and 180". Correct the value before submitting. |
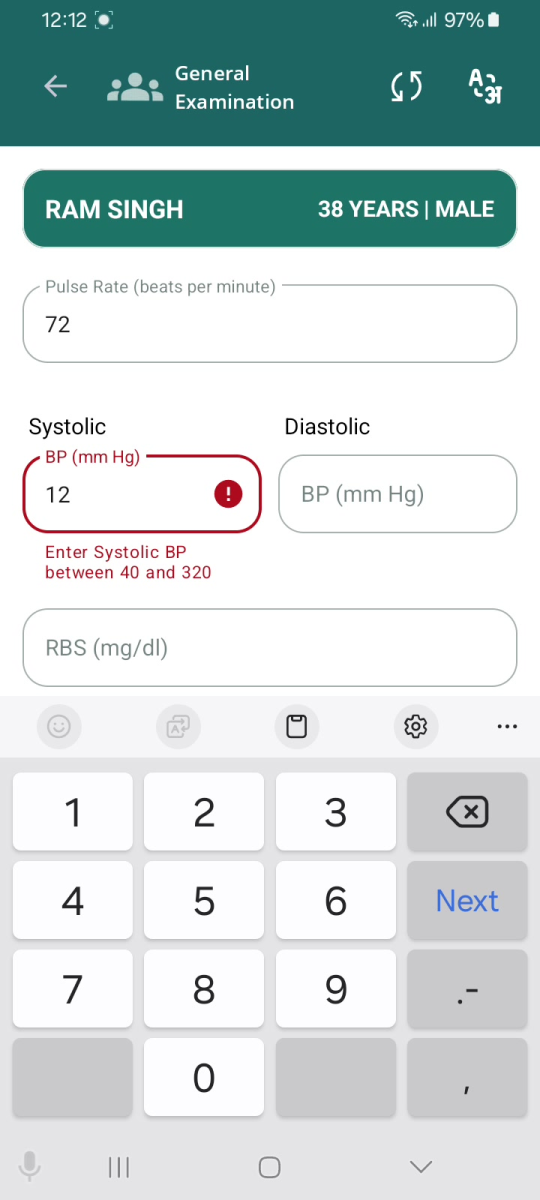
Systolic BP validation (40–320).
| 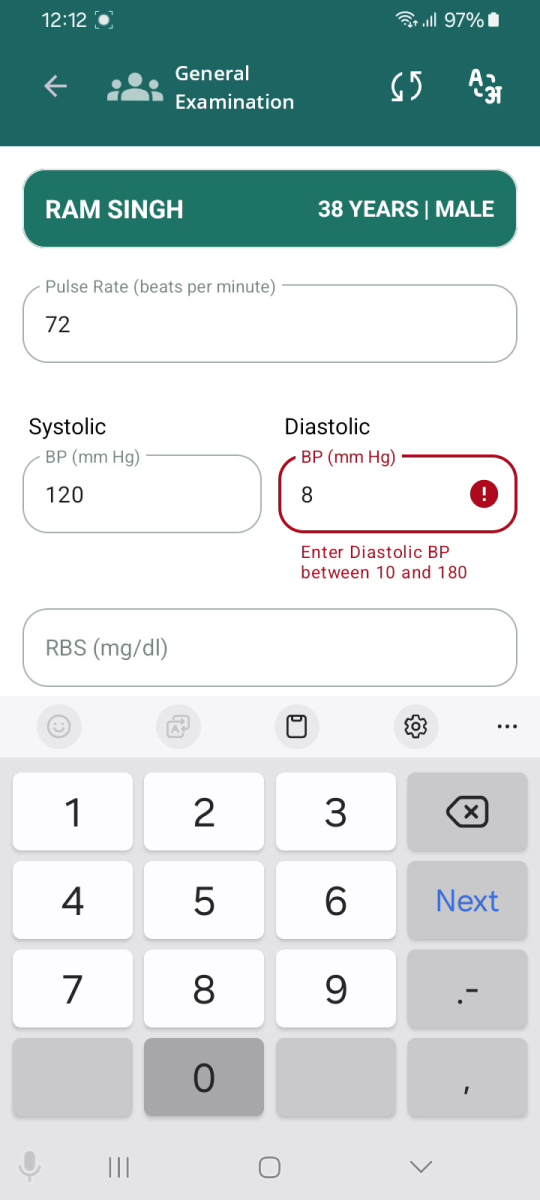
Diastolic BP validation (10–180).
|
Key Population / Risk Factors
- This is a multi-select checklist.
- The options include: Anti-TNF treatment, Bronchial Asthma, Cancer, Cardiovascular Disorder, Contact of Known TB Patients, COPD, COVID recovered patients, Diabetes, Dialysis, Health Care Worker, Hypertensive, Liver Impairment, Migrant, Miner, Palliative Care, Patient on immunosuppressants, Prison, Illegal Immigrant, Renal Impairment, Transplantation, Urban Slum, H/o Adult BCG Vaccination, Undernourished / Malnourished (BMI <18.5 kg/m²), Elderly (age >60 years), Workplace settings (coal/sandblasting/brick kiln), Tea garden worker, Construction site worker, Congregate settings, Attendees of de-addiction centers, Person exposed to indoor air pollution, Marginalized populations at risk of HIV, LGBTQAI++, Substance abuse (alcoholic/intravenous drug users), Tobacco/smoker, Silica exposure/silicosis, Other and Not Applicable.
Conditional options for females: When the beneficiary is female, the list also shows "Pregnancy" and "Lactating mother" at the top. |
|
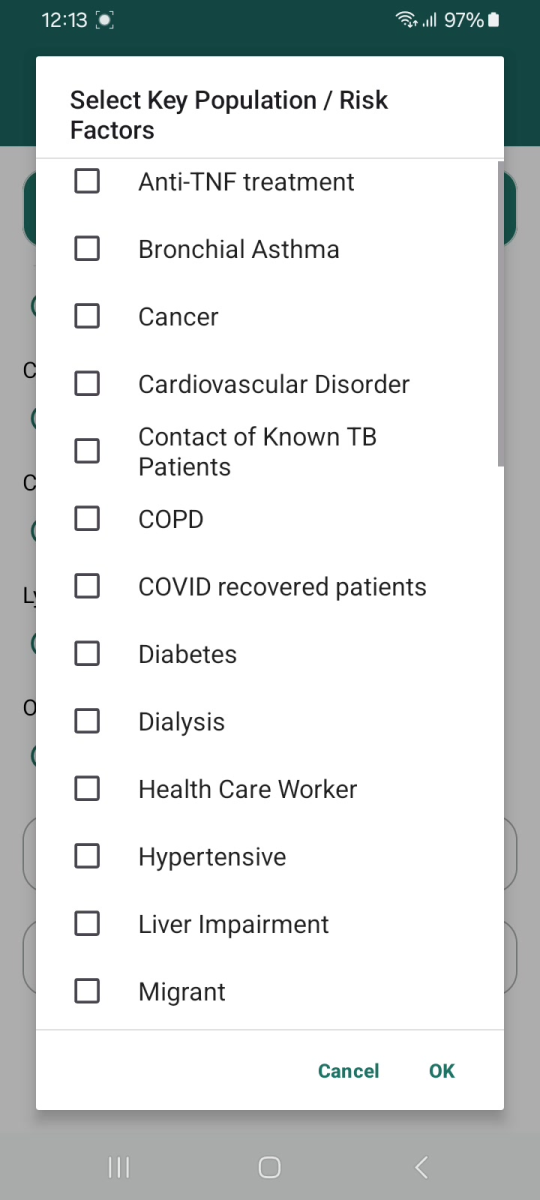
Key Population / Risk Factors checklist.
| 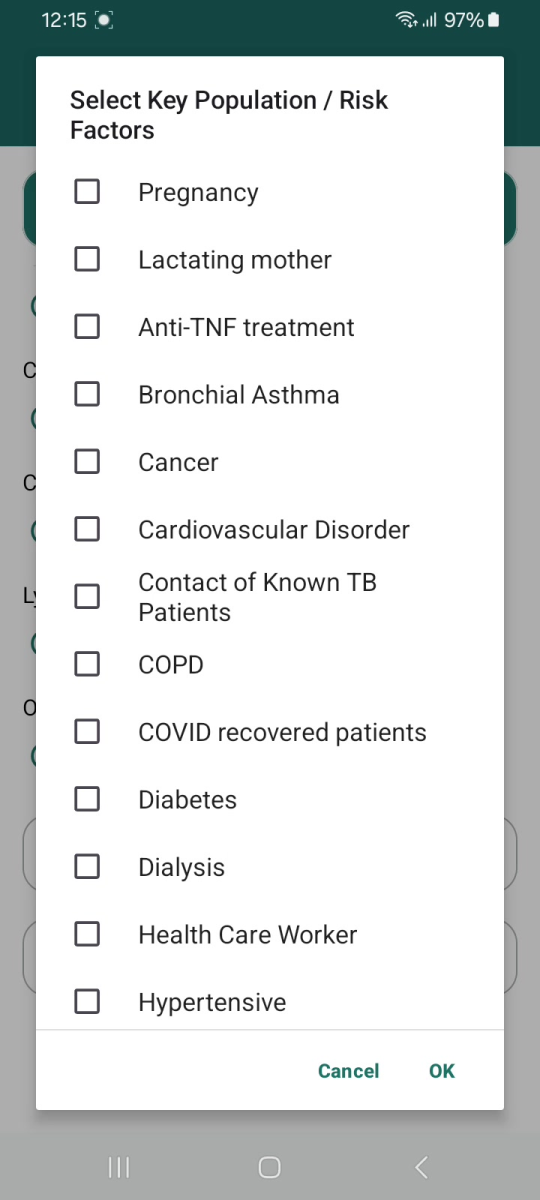
For a female, "Pregnancy" and "Lactating mother" appear at the top.
|
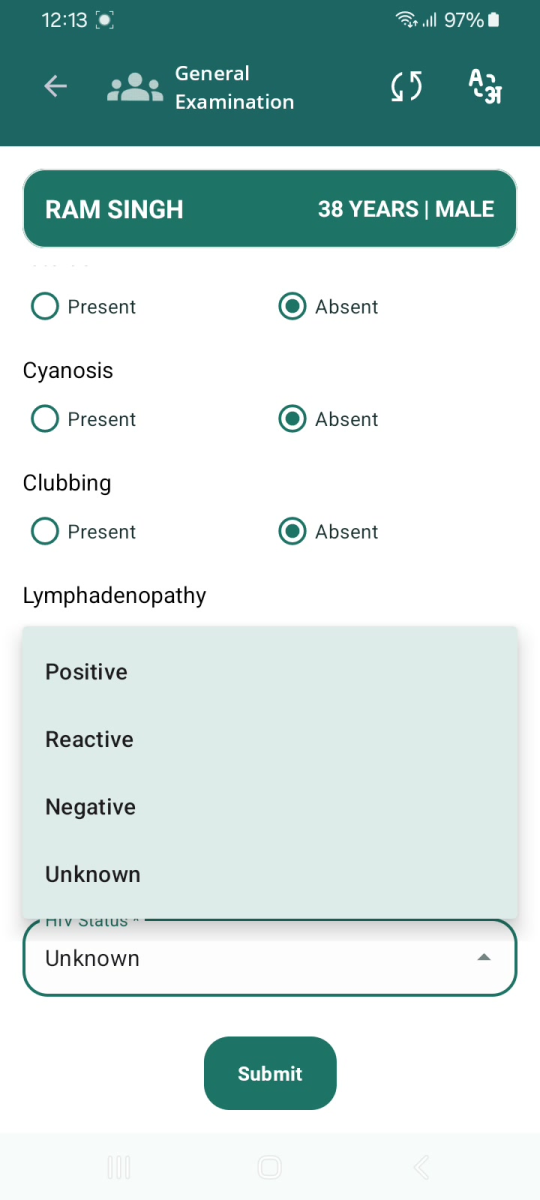
HIV Status options: Positive, Reactive, Negative, Unknown.
| 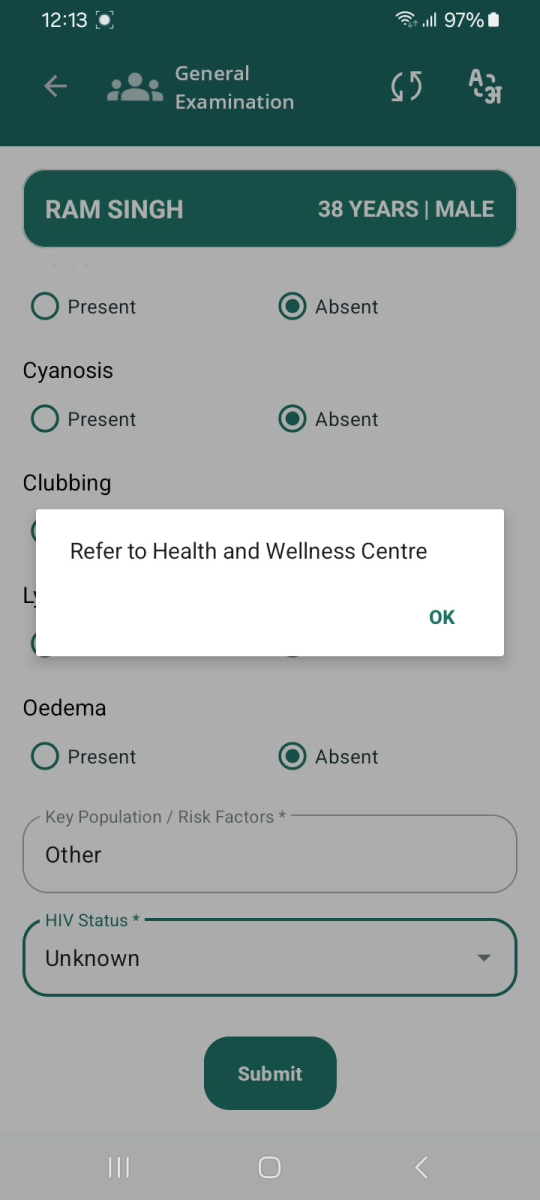
On Submit: "Refer to Health and Wellness Centre" — tap OK.
|
4.4 Field Descriptions
Field | Input type | Required? | Notes / values / validation |
|---|
Pulse Rate (beats per minute) | Numeric | Optional | Heart rate in beats per minute. |
Systolic (BP mm Hg) | Numeric | Optional | Must be between 40 and 320; else error. |
Diastolic (BP mm Hg) | Numeric | Optional | Must be between 10 and 180; else error. |
RBS (mg/dl) | Numeric | Optional | Random blood sugar in mg/dl. |
Pallor | Radio | Optional | Present / Absent. |
Icterus | Radio | Optional | Present / Absent. |
Cyanosis | Radio | Optional | Present / Absent. |
Clubbing | Radio | Optional | Present / Absent. |
Lymphadenopathy | Radio | Optional | Present / Absent. |
Oedema | Radio | Optional | Present / Absent. |
Key Population / Risk Factors | Multi-select | Yes * | Tick all that apply (see list above) |
HIV Status | Dropdown | Yes * | Positive, Reactive, Negative, Unknown. |
5. TB Screening Form
5.1 Overview
The TB Screening Form records whether the beneficiary has any tuberculosis symptoms and a past TB history. A note at the top reminds you that a single asterisk  symptom means "Refer for Digital Chest X-Ray or for Sputum Collection", and a double asterisk (**) item means "Advise for screening of all family members".
5.2 Step-by-Step
- From the Examination Forms screen, tap Fill next to TB Screening Form.
- Set the Date of visit using the date picker.
- Answer each symptom question with Yes or No: coughing more than 2 weeks, blood in sputum, fever for > 2 weeks, rise of fever in evening, loss of appetite, loss of weight, night sweats, history of TB.
- Answer the family/treatment questions: Are you currently taking anti-TB drugs, Anyone in family currently suffering from TB.
- Response for "Is beneficiary asymptomatic" is auto selected if response to every question is "No".
- Tap Submit. The app shows "TB Screening submitted" and the form changes to View.
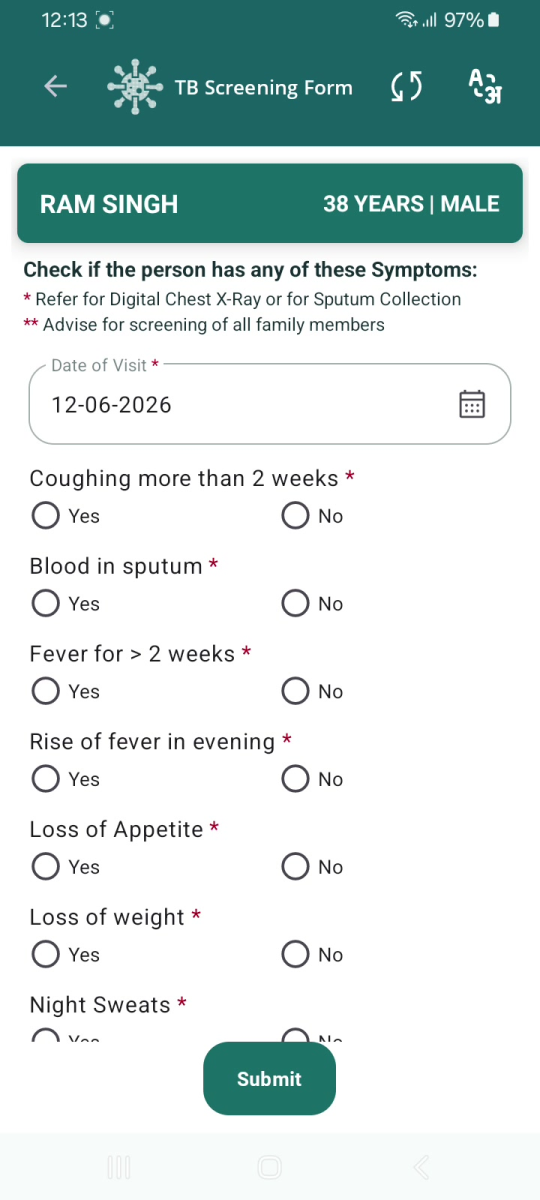
TB Screening Form — note, Date of visit and first symptoms.
| 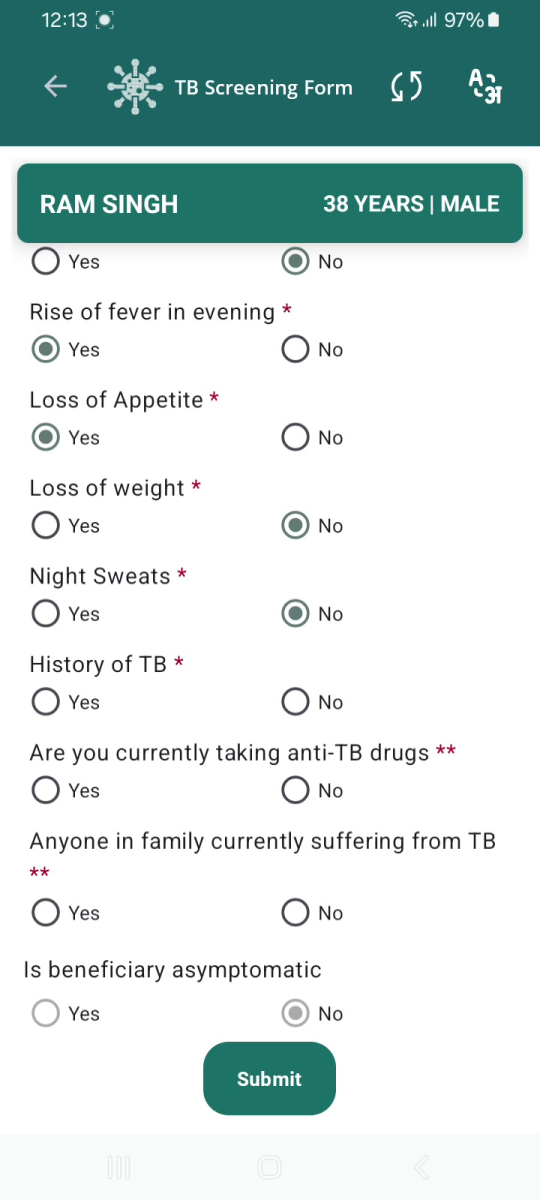
Remaining questions and Submit.
|
5.3 Field Descriptions
Field | Input type | Required? | Notes |
|---|
Date of visit | Date picker | Yes * | Date of the screening visit. |
Coughing more than 2 weeks | Radio (Yes/No) | Yes * | Symptom . |
Blood in sputum | Radio (Yes/No) | Yes * | Symptom . |
Fever for > 2 weeks | Radio (Yes/No) | Yes * | Symptom . |
Rise of fever in evening | Radio (Yes/No) | Yes * | Symptom . |
Loss of Appetite | Radio (Yes/No) | Yes * | Symptom . |
Loss of weight | Radio (Yes/No) | Yes * | Symptom . |
Night Sweats | Radio (Yes/No) | Yes * | Symptom . |
History of TB | Radio (Yes/No) | Yes * | Past TB history . |
Are you currently taking anti-TB drugs | Radio (Yes/No) | Yes (**) | Advise family screening (**). |
Anyone in family currently suffering from TB | Radio (Yes/No) | Yes (**) | Advise family screening (**). |
Is beneficiary asymptomatic | Radio (Yes/No) | Autoselected | Auto selected based on the response.
Marks the beneficiary as symptom-free. |
6. General OPD
6.1 Overview
The General OPD form captures a brief outpatient consultation: the beneficiary's chief complaint, any medication advised, its frequency and duration, and free-text remarks.
This form has a "Skip" button as well as "Submit". If you skip it, it stays as "Fill" in the Examination Forms list and the beneficiary's "Examine X / 5" count does not increase for this form.6.2 Step-by-Step
- From the Examination Forms screen, tap Fill next to General OPD.
- Open Chief Complaint, tick the relevant complaint(s) from the list and tap OK.
- Open Medication, tick the medicine(s) advised and tap OK.
- Choose the Frequency (Once daily, Twice daily, Thrice daily, SoS) and Duration (1, 2, 3, 5 or 7 days).
- Add any Notes / Remarks.
- Tap Submit to save, or Skip to leave this form for now. After submitting, the form changes to View.
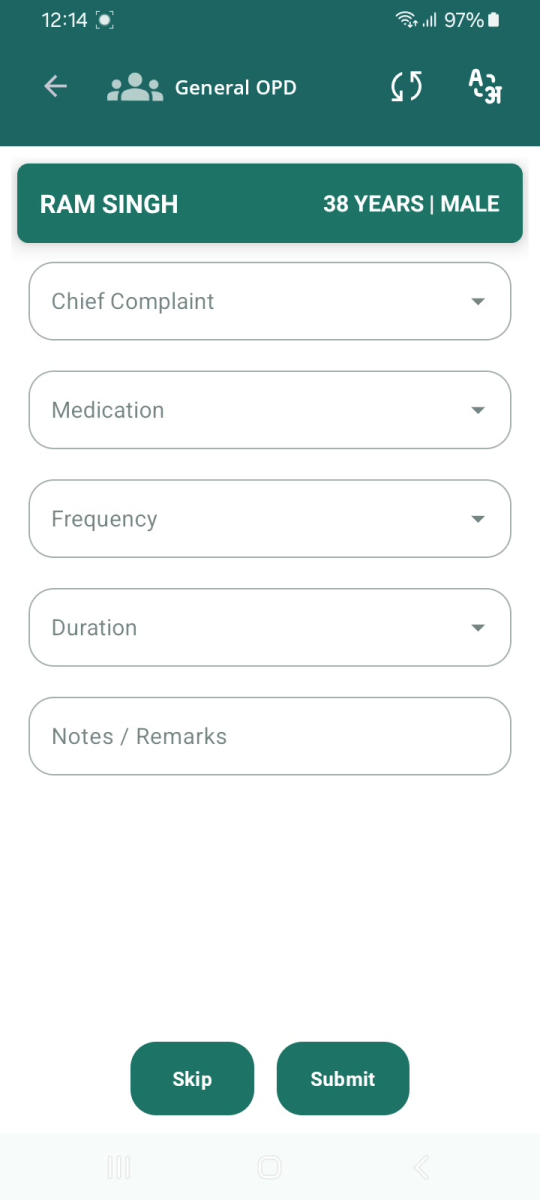
General OPD — Chief Complaint, Medication, Frequency, Duration, Notes.
| 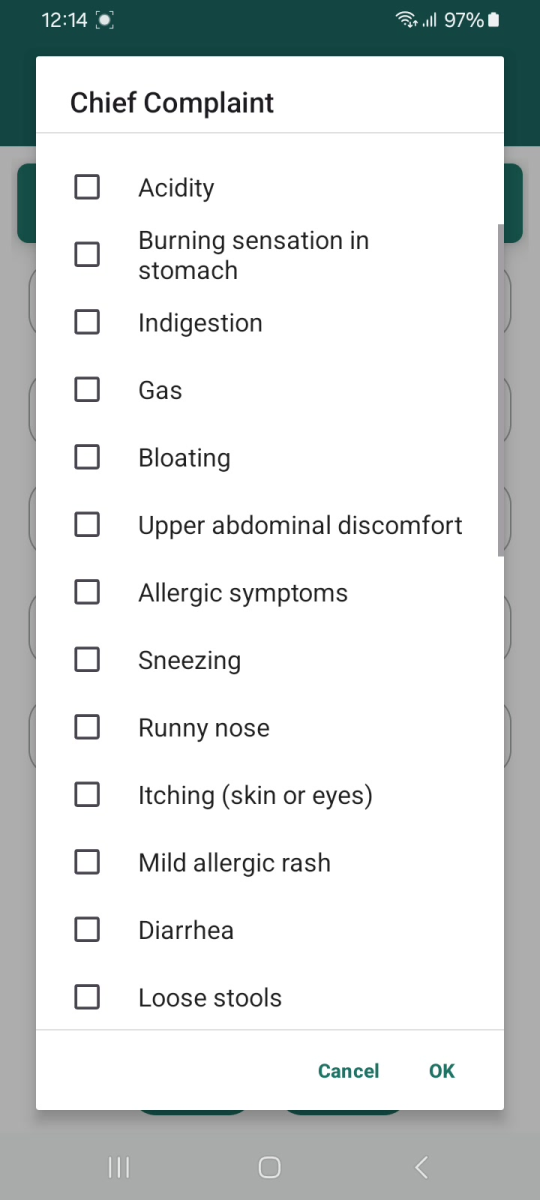
Chief Complaint — multi-select checklist.
|
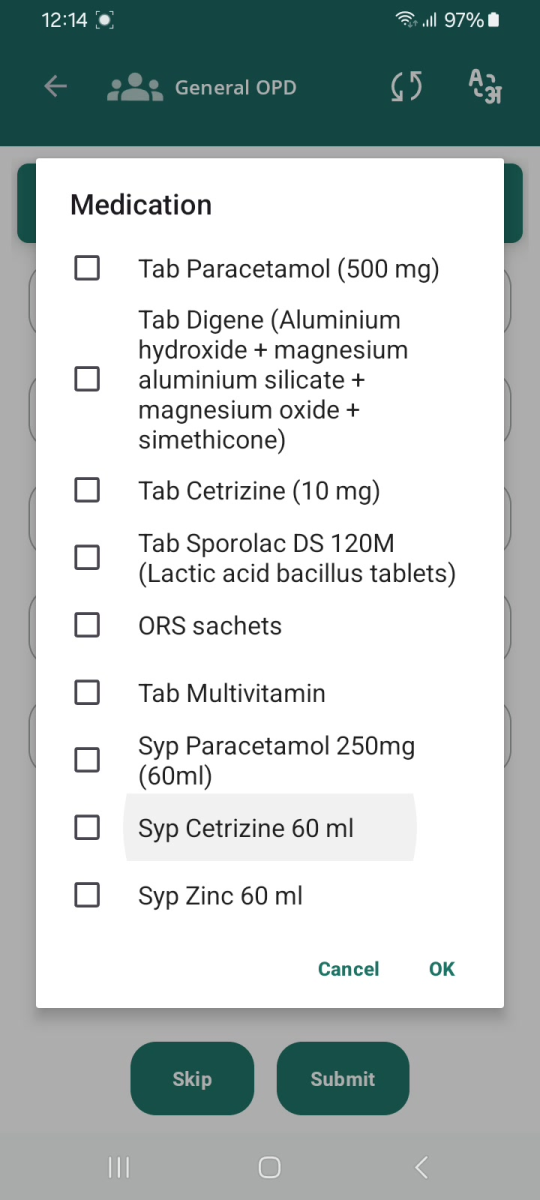
Medication — multi-select checklist.
| 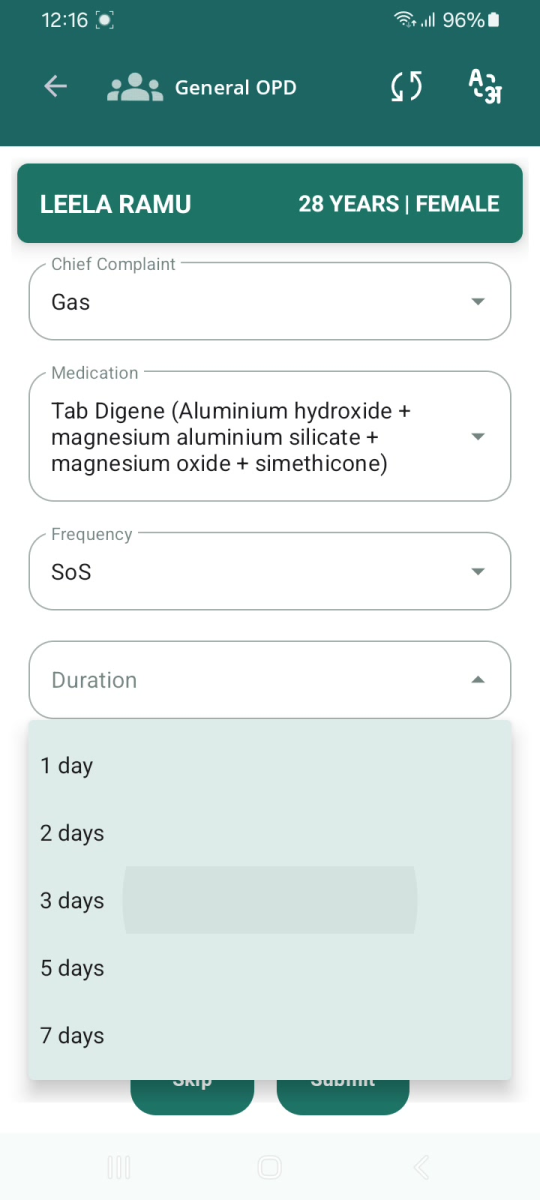
A completed General OPD form.
|
6.3 Field Descriptions and Values
Field | Input type | Required? | Values observed |
|---|
Chief Complaint | Multi-select | Optional | Long checklist, e.g. Fever, Headache, Acidity, Indigestion, Gas, Bloating, Diarrhea, Loose stools, Allergic symptoms, Sneezing, Runny nose, plus child-specific items (Fever in children, Body ache in children, etc.). |
Medication | Multi-select | Optional | Tab Paracetamol (500 mg), Tab Digene, Tab Cetrizine (10 mg), Tab Sporolac DS 120M, ORS sachets, Tab Multivitamin, Syp Paracetamol 250mg (60ml), Syp Cetrizine 60 ml, Syp Zinc 60 ml. |
Frequency | Dropdown | Optional | Once daily, Twice daily, Thrice daily, SoS. |
Duration | Dropdown | Optional | 1 day, 2 days, 3 days, 5 days, 7 days. |
Notes / Remarks | Text | Optional | Free text. |
7. Diagnostics7.1 Overview
The Diagnostics form records TB diagnostic activity: digital chest X-ray referral and result, and (where applicable) sputum collection and NAAT test details. The Nikshay ID is shown read-only at the top.7.2 Step-by-Step
- From the Examination Forms screen, tap Fill next to Diagnostics.
- Answer Referred for Digital Chest X-Ray? (Yes/No) and Is Digital chest x-ray conducted? (Yes/No).
- If a chest X-ray was conducted, select the Digital Chest X-Ray Test Result (Positive/Negative).
- Answer Referred for Sputum Collection? (Yes/No). If Yes, choose where the Sputum sample submitted at (e.g., TB Screening Camp), then answer True NAT conducted? and, if conducted, the True NAT result (Positive/Negative).
- Tap Submit. The app shows "Diagnostics submitted", and the beneficiary's "Examine X / 5" count updates on the line listing.
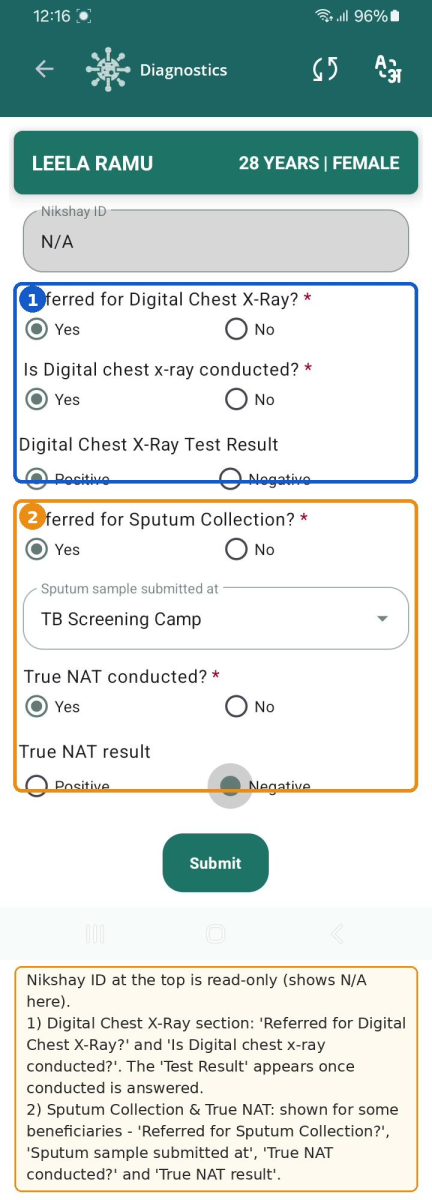
Diagnostics — Chest X-Ray section and the Sputum/True NAT section.
7.3 Conditional Fields
Some fields appear only when relevant: The "Digital Chest X-Ray Test Result" appears once "Is Digital chest x-ray conducted?" has been answered. If "Digital Chest X-Ray Test Result" is positive, then fields "Referred for Sputum Collection" and "True NAT conducted" are enabled. |
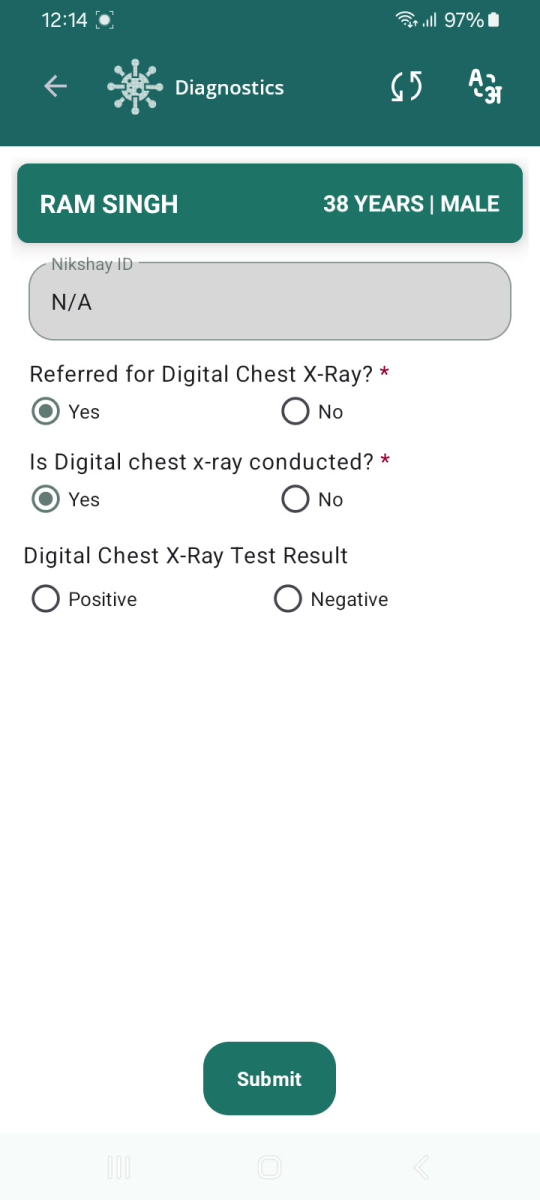
Digital Chest X-Ray field
| 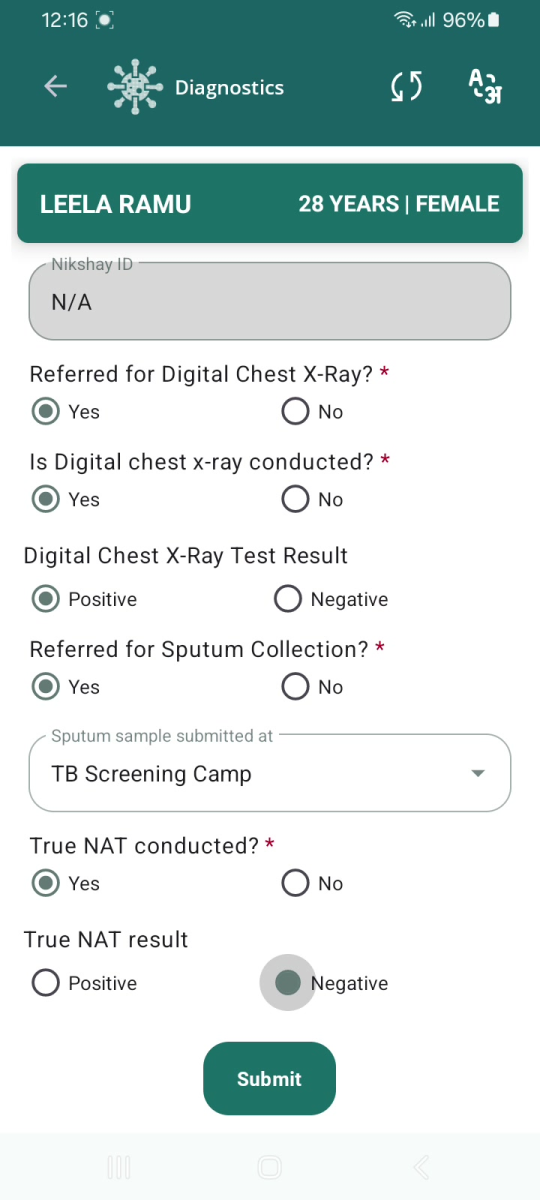
Sputum Collection and True NAT fields
|
7.4 Field Descriptions and Values
Field | Input type | Required? | Notes / values |
|---|
Nikshay ID | Read-only | — | Display only; shows "N/A" in the recording. |
Referred for Digital Chest X-Ray? | Radio (Yes/No) | Yes * |
|
Is Digital chest x-ray conducted? | Radio (Yes/No) | Yes * |
|
Digital Chest X-Ray Test Result | Radio | Yes * | Positive / Negative. Appears after the above is answered. |
Referred for Sputum Collection? | Radio (Yes/No) | Yes * | Shown for some beneficiaries (see note above). |
Sputum sample submitted at | Dropdown | Optional | Default value: "TB Screening Camp". |
True NAT conducted? | Radio (Yes/No) | Yes * | Part of the sputum section. |
True NAT result | Radio | Yes * | Positive / Negative. |
8. Tips and Best Practices
8.1 Correct data entry
- Check the green banner (name, age, gender) before entering anything, so readings go to the right beneficiary.
- Enter blood pressure within range- Systolic (40–320) and Diastolic (10–180) or the form will not accept it.
- Record measurements exactly as taken; do not round or guess.
- Use the Notes / Remarks box in General OPD for anything the fixed fields do not capture.
8.2 Handling multiple beneficiaries
- Work from the line listing and use Search to jump straight to the person.
- Use the "Examine X / 5" number to see at a glance who still needs forms completed.
- Finish all five forms for one beneficiary before moving on, where possible, so none are missed.
8.3 Avoiding duplicates and incomplete work
- Do not register or re-enter beneficiaries — the Health Screening Officer works only from the existing line listing.
- A form already marked "View" is done; open it to review rather than creating a new entry.
- If you must leave a form for later, remember "Skip" (General OPD) leaves it pending — come back to it.
8.4 Before you submit
- Re-check vitals and Yes/No answers — once submitted, a form shows as "View".
- On General Examination, complete Key Population / Risk Factors and HIV Status (both mandatory) before Submit.
- After Diagnostics, confirm the "Diagnostics submitted" message and that "Examine X / 5" has gone up.
Watch for the confirmation: Each form shows a short message when saved — "Vitals saved successfully", "TB Screening submitted" or "Diagnostics submitted". If you do not see it, the form may not have saved; reopen the beneficiary and check. |
9. Troubleshooting and FAQs
Problem | What to do |
|---|
Beneficiary not visible in the line listing | Use the Search bar with the correct name spelling. Tap the refresh icon. Confirm you selected the correct State / District / Block / Village at login. (Beneficiaries are registered by the field team, not the Health Screening Officer.) |
Cannot open a form / module | From the beneficiary card, tap "Examine X / 5" first to open the Examination Forms, then tap "Fill" or "View" beside the form you want. | |
Form will not submit | A mandatory field is missing or invalid. On General Examination, check Key Population / Risk Factors and HIV Status, and that BP is in range (Systolic 40–320, Diastolic 10–180). |
"Enter Systolic/Diastolic BP between ..." error | The BP value is out of range. Re-enter Systolic within 40–320 or Diastolic within 10–180. |
Diagnostics fields seem to be missing | Some fields (Test Result; Sputum/True NAT) appear only after certain answers or for certain beneficiaries. Enter the answers shown on your screen; do not expect fields that are not displayed. |
Incorrect entry already submitted | Open the form again from the Examination Forms list using its "View" button to review/edit, as observed (the button changes from "Fill" to "View" after submission). |
Lost track of what is done | Read the "Examine X / 5" count and the Fill/View buttons — green "View" means completed, red "Fill" means pending. |
Connectivity / synchronization: The side menu includes "Sync Records" and "Connect Camp Hub", and the login screen shows Camp Mode / "Camp Hub Connected". |
10. Tuberculosis and Referral
10.1 Tuberculosis and Referrals Sections
On clicking "Tuberculosis"- 3 cards are opewith counts and "View Details": TB Screening, Suspected TB cases, and Confirmed TB cases. Suspected and confirmed lists show beneficiaries with "TRACK", "VIEW" or "FOLLOW UP" buttons.
On clicking "Referrals"- Digital Chest X-ray, True NAT, Health and Wellness Centre and Liquid Culture.
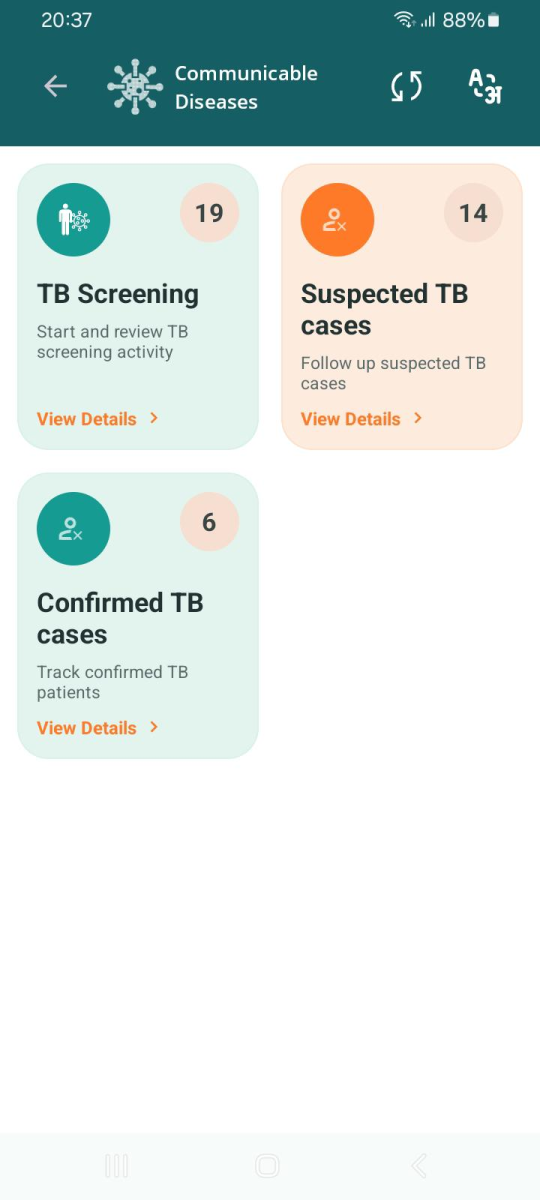
Tuberculosis- Screening, Suspected, Confirmed Cases
| 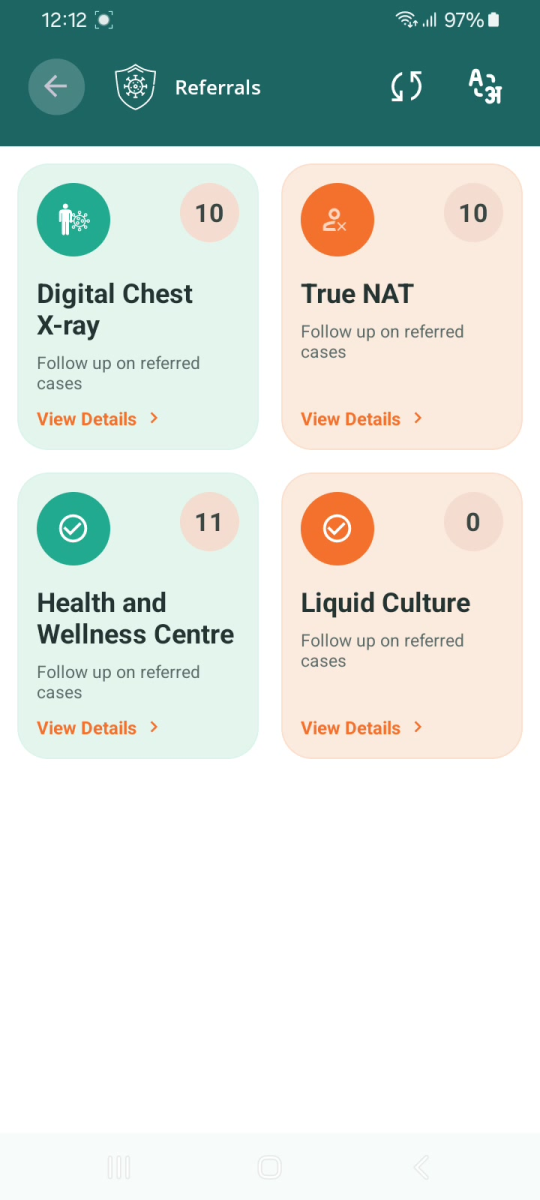
Referrals — follow-up categories.
|
10.2 TB Confirmed Form (follow-up)
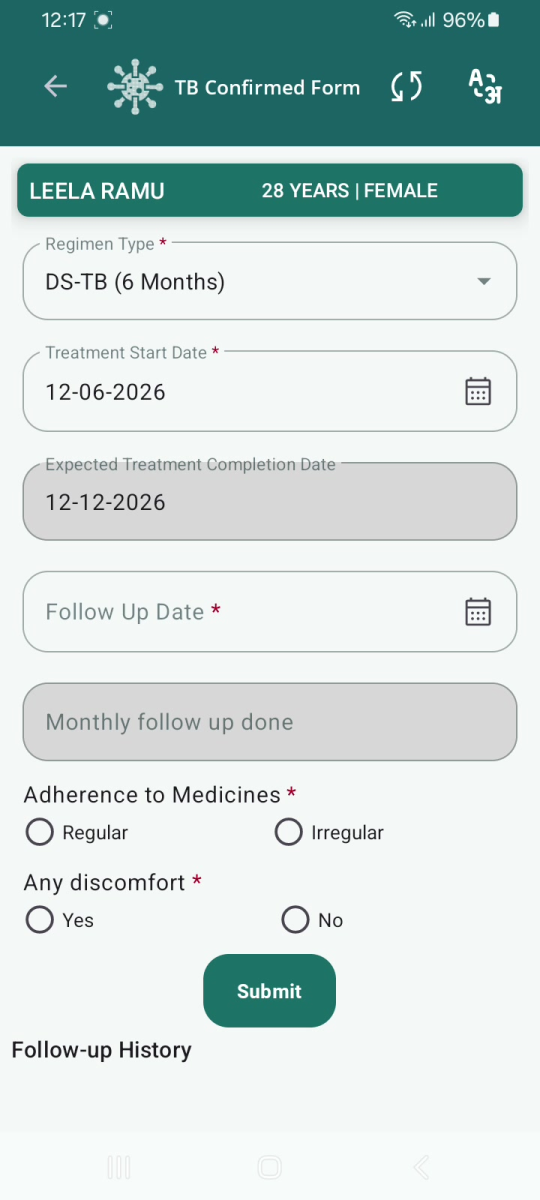
Opening a confirmed TB case ("FOLLOW UP") shows a TB Confirmed Form for treatment follow-up. Fields observed:
Field | Type | Mandatory | Notes / values |
|---|
Regimen Type | Dropdown | Yes * | Observed value: "DS-TB (6 Months)". |
Treatment Start Date | Date picker | Yes * | Start of treatment. |
Expected Treatment Completion Date | Display | — | Shown read-only (e.g., 6 months after start). |
Follow Up Date | Date picker | Yes * | Next follow-up date. |
Monthly follow up done | Dropdown | Observed | Observed value: "Month-1". |
Adherence to Medicines | Radio | Yes * | Regular / Irregular. |
Any discomfort | Radio (Yes/No) | Yes * |
|
Follow-up History | Section | — | Heading observed; details not shown. |