
FIELD USER GUIDE- STOP TB Mobile Application
Household Registration • Head of Family • Family Members • Anthropometry
(Registrar Module)
Table of Contents
1. About This Guide3
2. Getting Started4
3. Workflow Overview6
4. Module 1- Household Registration 7
5. Module 2- Head of Family (HoF) Registration12
6. Module 3- Adding Family Members18
7. Module 4- Anthropometry Assessment22
8. Tips and Best Practices25
9. Troubleshooting and FAQs26
10. Quick Reference28
1. About This Guide
1.1 Purpose and Audience
This guide explains how to use the Stop TB-UAT mobile application to register households and beneficiaries and to record basic physical measurements (anthropometry) during field visits. It covers four tasks:
- Household Registration- creating a record for a family and its dwelling.
- Head of Family (HoF) Registration- adding the head of the family as the first beneficiary.
- Adding Family Members- adding the remaining members of the household as beneficiaries.
- Anthropometry Assessment- recording Weight, Height, BMI and Temperature for a beneficiary.
1.2 Who Uses It, and When
- Use this guide during training, and keep it on hand in the field whenever you are unsure of a step, see an unexpected message, or need to fix an entry.
- The tasks are normally performed in order: first register the household, then its Head of Family, then the other members, and finally carry out the anthropometry assessment for each beneficiary during the screening camp.
- Screens in this guide are real screenshots from the application. Colored boxes, numbers and arrows have been added on top of some screenshots to point out the important fields and buttons — they are not part of the app.
2. Getting Started
Before you can register anyone, you must sign in and select the village you are working in.
2.1 Signing In
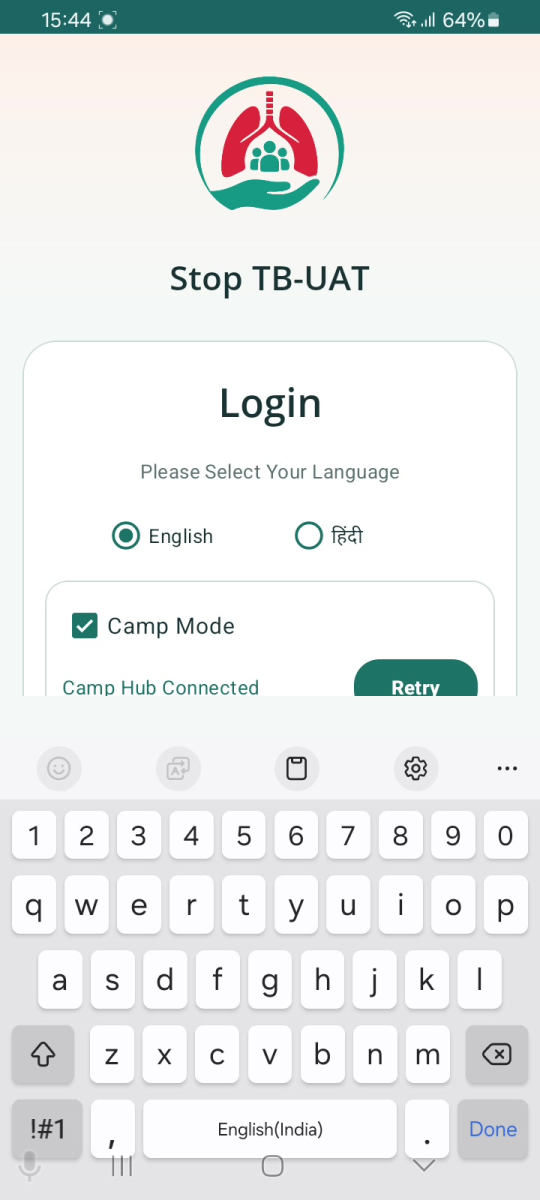
- Open the Stop TB-UAT application. The Login screen appears.
- Under Please Select Your Language, choose English or हिंदी (Hindi).
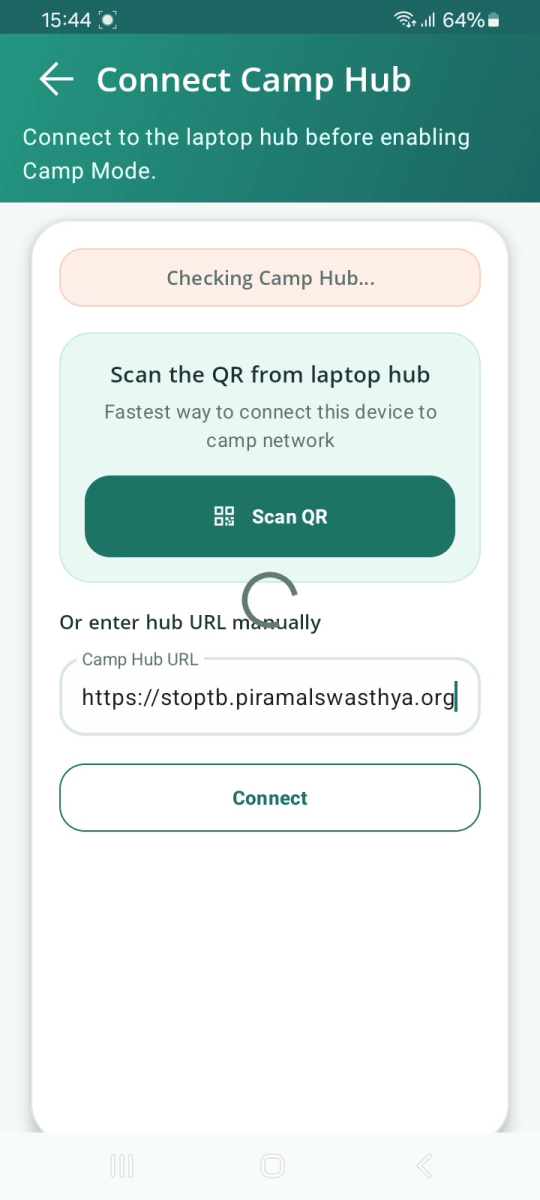
- If you are working at a camp connected to a laptop hub, tick Camp Mode. The Connect Camp Hub screen opens — either tap Scan QR to scan the code shown on the laptop hub, or type the Camp Hub URL under "Or enter hub URL manually" and tap Connect. Wait for the status to change to Camp Hub Connected. If it does not connect, tap Retry.
- Enter your Username and Password (tap the eye icon to check what you typed). Tick Remember me if this is your own device.
- Tap Login.
NOTE Camp Mode is optional. If you are not at a hub-connected camp, leave Camp Mode unticked and simply log in with your username and password. | |
|
|
2.2 Selecting Your Village
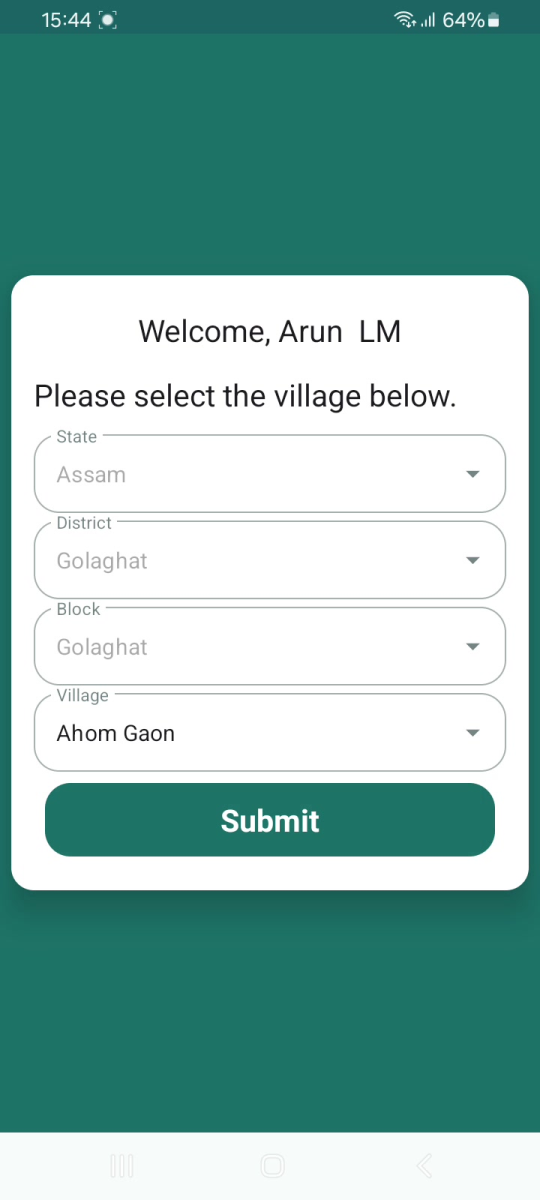
After you log in, the app greets you by name and asks you to choose your work location. Select each dropdown in order — the next one becomes available after the previous choice:
- Choose your State (e.g., Assam).
- Choose your District (e.g., Golaghat).
- Choose your Block (e.g., Golaghat).
- Choose your Village (e.g., Ahom Gaon).
- Tap Submit.
|
3. Workflow Overview
The diagram on the next page shows the complete journey from registering a household through to completing an anthropometry assessment. Each colour is one of the four modules described in Sections 4 to 7. Diamond shapes are decision points where the app asks you a question or where the screen changes depending on the situation.
Read it left to right: Household Registration → Head of Family Registration → Add Family Members → Anthropometry Assessment. You normally complete the modules in this order for each household. |
!worddavf3359f9dba306a56b6462d36a576af75.png|height=638,width=762!h1.4. Module 1 — Household Registration
4.1 Overview
Household Registration creates the master record for one family and the dwelling they live in. It captures who the head of the family is, how to contact them, the family's socio-economic category, and details about the house and its basic amenities.
Complete this module first for every new family you encounter. It is performed by the field team conducting the household visit or operating the screening camp. Each household is saved with its own Household ID generated by the app.
4.2 Step-by-Step
- On the Home Dashboard, open All Household (tap the card or "View Details").
- Tap the New Household Registration button at the bottom of the list.
- Under Family Details, fill in the head of the family's First Name, Last Name / Surname and Mobile No. Optionally add House No, Ward No, Ward Name and Mohalla Name.
- Select the Socioeconomic Status — APL, BPL or Unknown.
- Under Household Details, choose the Type of residential area, Type of house and House ownership (Yes/No).
- Under Household Amenities, set Separate Kitchen, and choose the Type of fuel used for Cooking, Primary Source of Water, Availability of Electricity and Availability of Toilet.
- Tap Submit. A "Save Successful" message confirms the household is saved, and the app immediately asks whether to add the Head of Family as a beneficiary.
Two headings, one form: The screen scrolls. "Family Details" is at the top; keep scrolling to reach "Household Details" and then "Household Amenities". All three belong to the same registration form and are saved together by one Submit. |
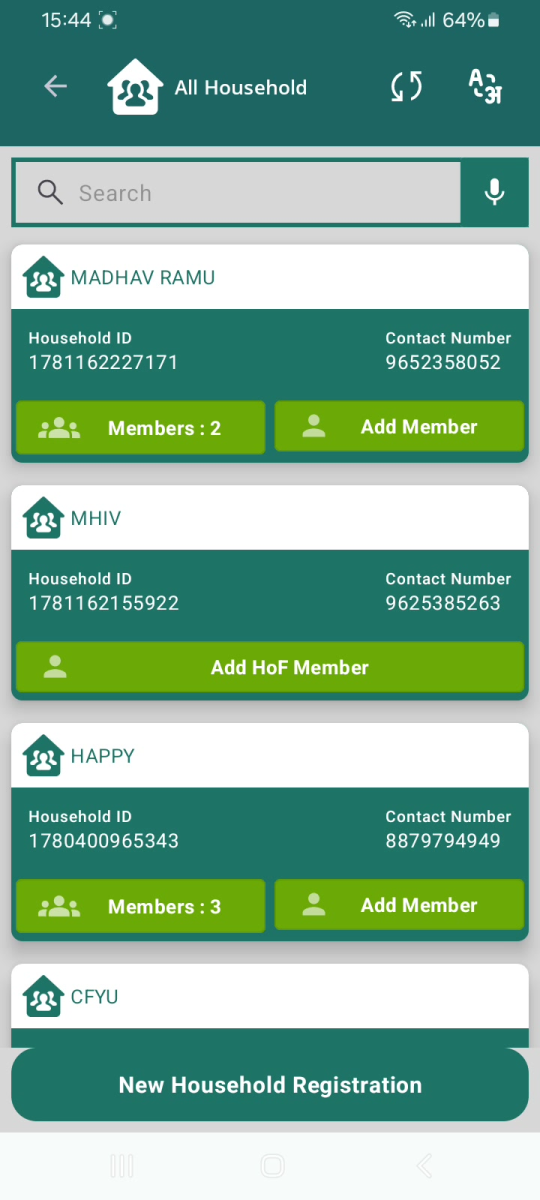
The All Household list. Each card shows a household; the "New Household Registration" button is at the bottom. 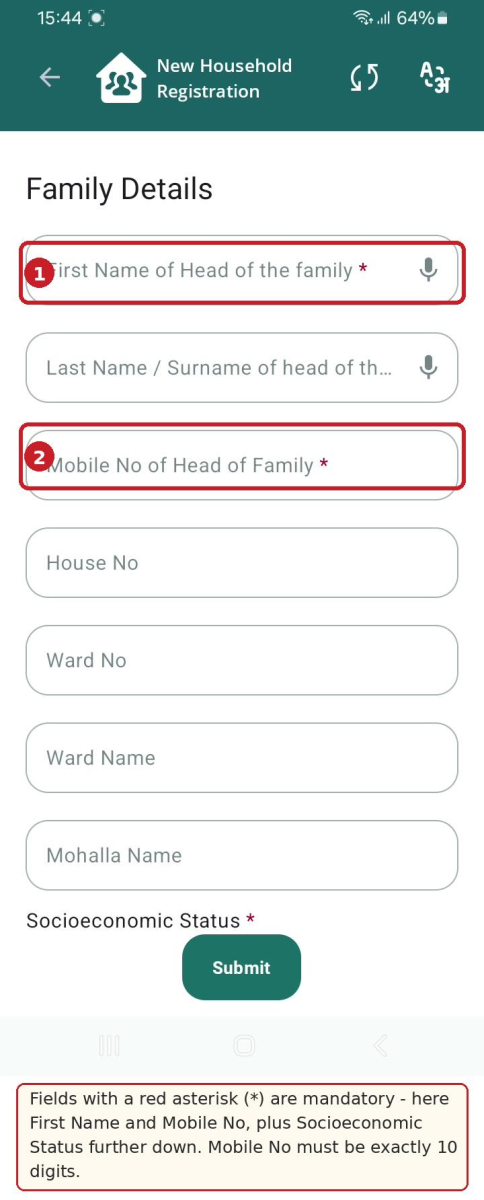
Family Details. Fields with a red asterisk  must be filled.
4.3 Field Descriptions and Validations
Family Details
Field | Required? | What to enter / allowed values |
|---|---|---|
First Name of Head of the family | Yes * | The head of the family's first name (text). |
Last Name / Surname of head of the family | Yes | The head of the family's surname (text). |
Mobile No of Head of Family | Yes * | A valid 10-digit mobile number (digits only). |
House No | Optional | House number, e.g., 635 E. |
Ward No | Optional | Ward number / identifier. |
Ward Name | Optional | Name of the ward. |
Mohalla Name | Optional | Name of the mohalla / locality. |
Socioeconomic Status | Yes * | Select one: APL, BPL or Unknown. |
Household Details
Field | Required? | Allowed values (choose from the dropdown / option) |
|---|---|---|
Type of residential area | Yes | Rural, Urban, Tribal, Tea Garden, Other. |
Type of house | Yes * | None, Kuchha, Pucca, Other. |
House ownership | Yes * | Yes or No. |
Household Amenities
Field | Required? | Allowed values |
|---|---|---|
Separate Kitchen | Yes * | Yes or No. |
Type of fuel used for Cooking | Yes * | Firewood, Crop Residue, Cow dung cake, Coal, Kerosene, LPG, Induction, Other. |
Primary Source of Water | Yes * | Select the source from the list (e.g., "Hand pump inside house"). |
Availability of Electricity | Yes * | Electricity Supply, Generator, Solar Power, Kerosene Lamp, Other. |
Availability of Toilet | Yes * | Flush toilet with running water; Flush toilet without water; Pit toilet with running water supply; Pit toilet without water supply; Other; None. |
Dropdowns you will use
|
|
|
|
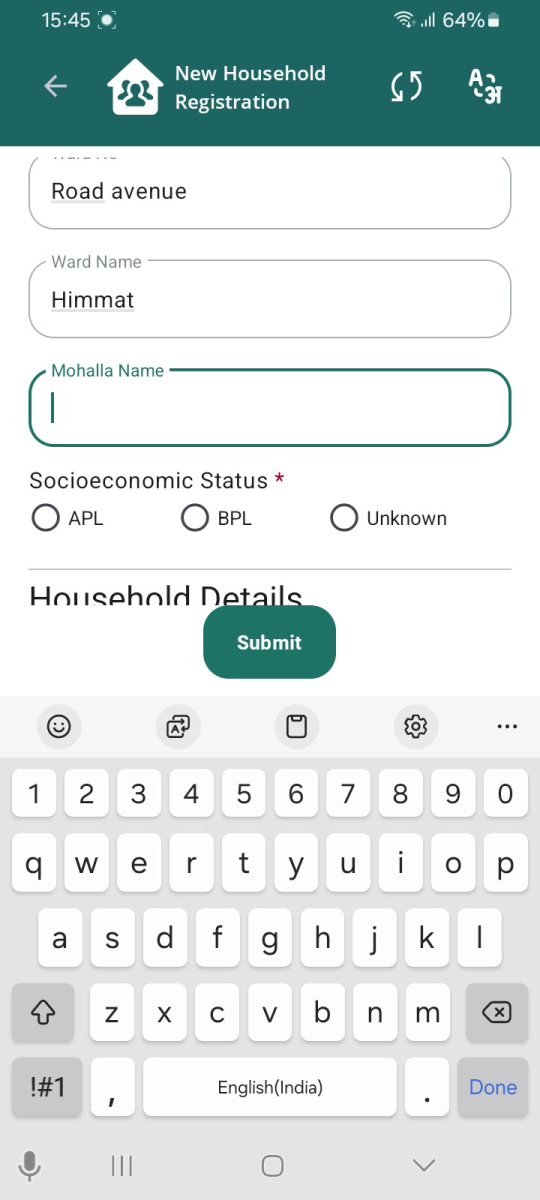
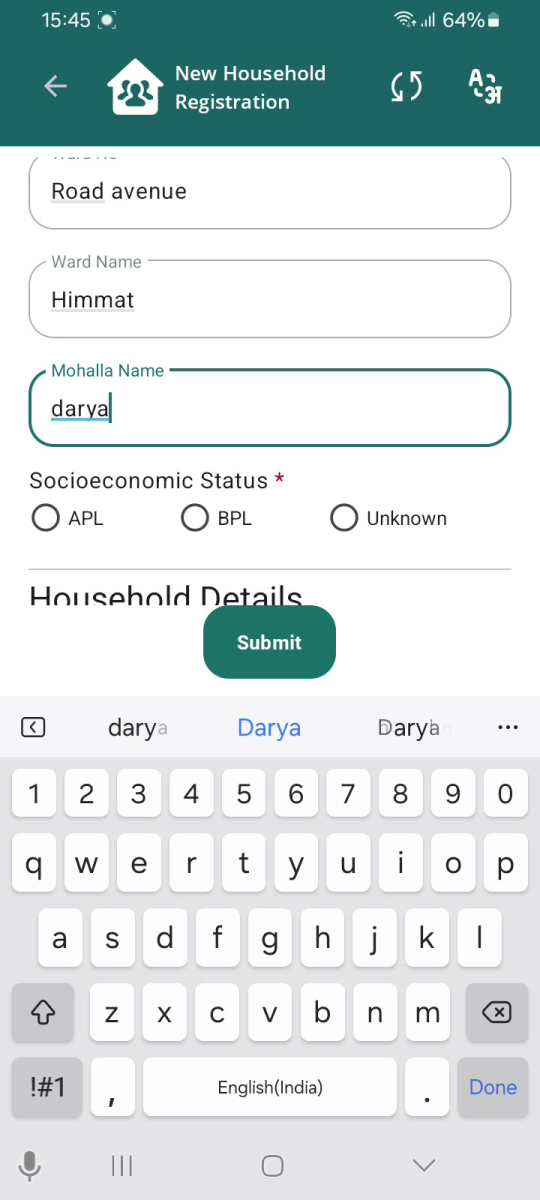
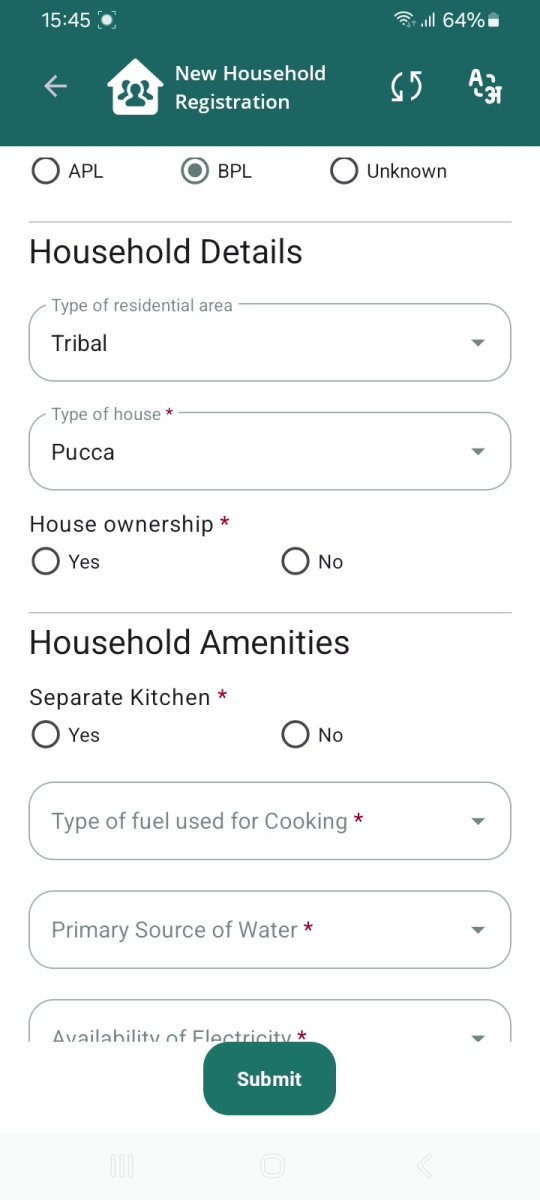
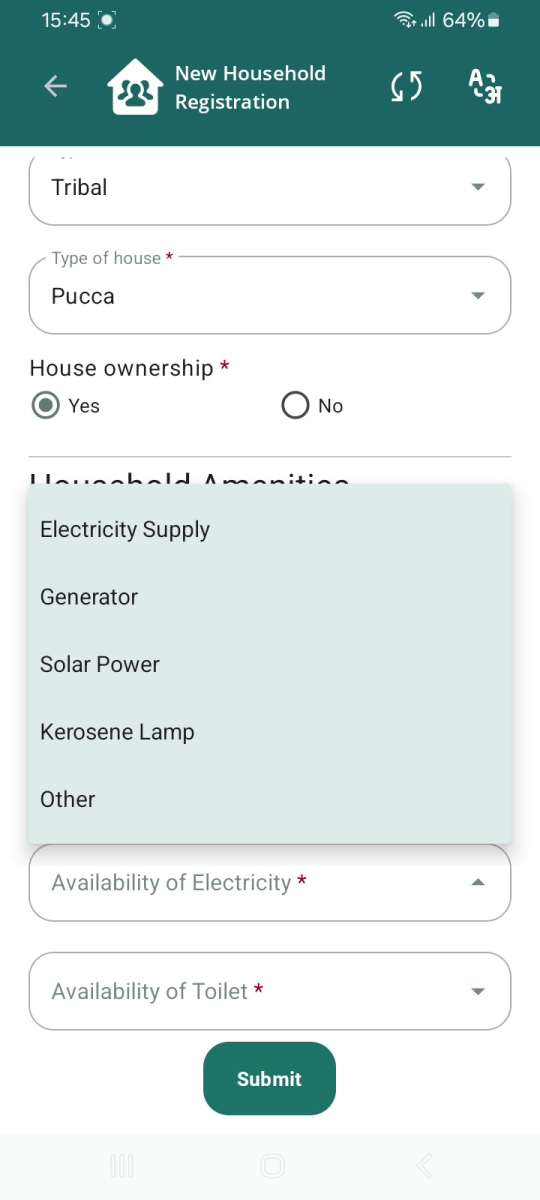
Validations and messages
Mobile number must be 10 digits. If the mobile number is not exactly 10 digits, the field turns red and shows "Invalid Mobile Number !" with a red (!) icon. You cannot save the household until a valid number is entered. |
Mandatory fields: Fields marked with a red asterisk |
Confirmation: A grey "Save Successful" message appears briefly when the household is stored. Immediately afterwards the app shows the "ADD Head Of Family" prompt — this leads straight into Module 2. |
5. Module 2 — Head of Family (HoF) Registration
5.1 Overview
Right after a household is saved, the app offers to register the Head of the Family as the first beneficiary. A beneficiary is a person whose health details are recorded and who can later be examined (Module 4). The HoF must be registered before other members can be added.
5.2 Step-by-Step
- On the "ADD Head Of Family" prompt ("Would you like to add <name> as a HoF Beneficiary?"), tap Yes.
- Read the Consent Form. Tick the consent box and tap AGREE to continue. (Tap DISAGREE only if the person does not consent.)
- Complete the beneficiary form. The head's First Name and Last Name are already filled in from the household. Set the Date of Registration (today's date is pre-filled), Person from and Type of Case Finding.
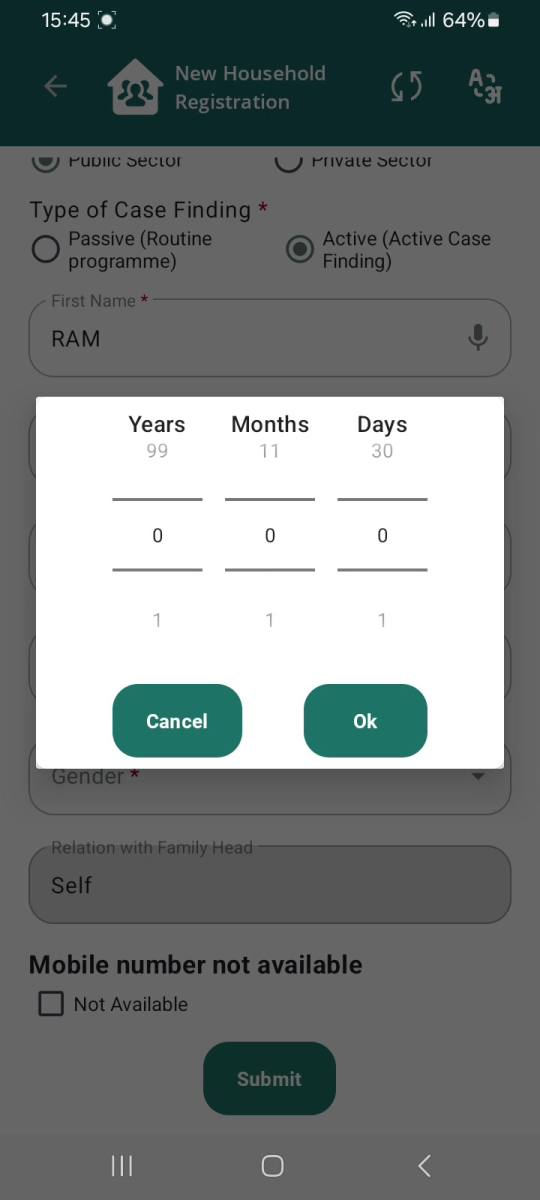
- Enter the Age using the Years / Months / Days picker and tap Ok. The Date of Birth is filled in automatically from the age.
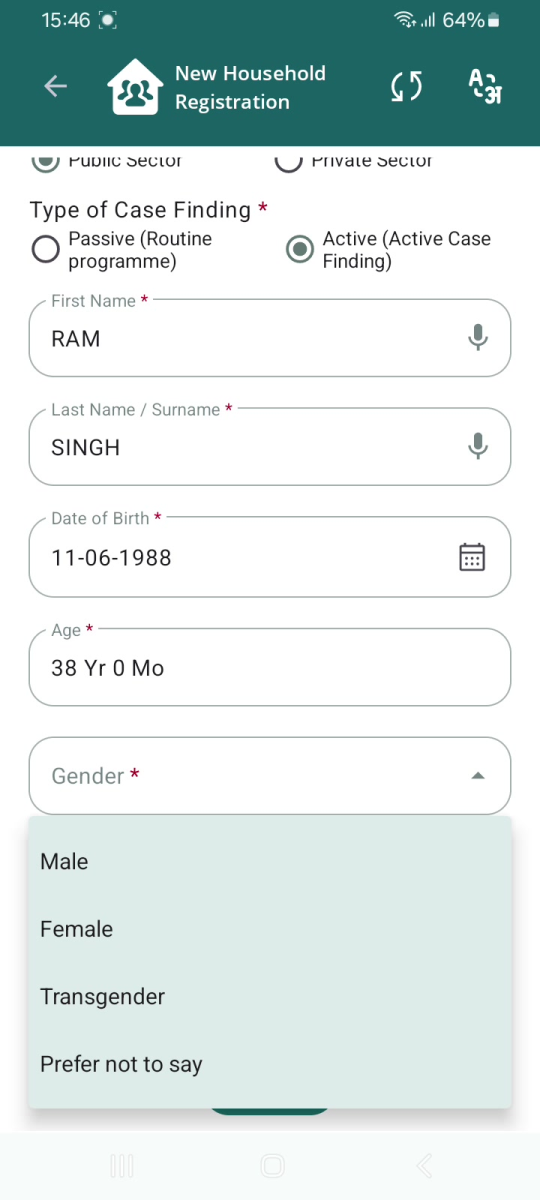
- Select Gender. The Relation with Family Head is set to Self automatically and cannot be changed for the HoF.
- Enter the Contact Number and Whose mobile number it is. If the person has no phone, tick Not Available under "Mobile number not available".
- Fill in Address, Village / Hamlet, Marital Status, Caste, Type of residential area, Occupation and Socioeconomic Status. Father's Name and Mother's Name are optional.
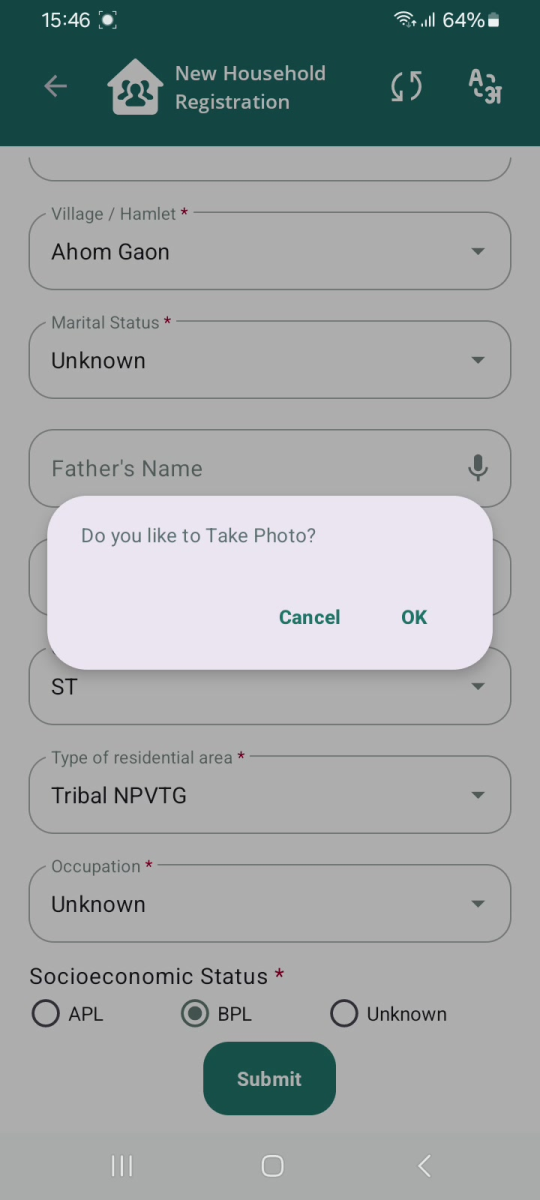
- Tap Submit. When asked "Do you like to Take Photo?", tap OK to capture a photo or Cancel to skip.
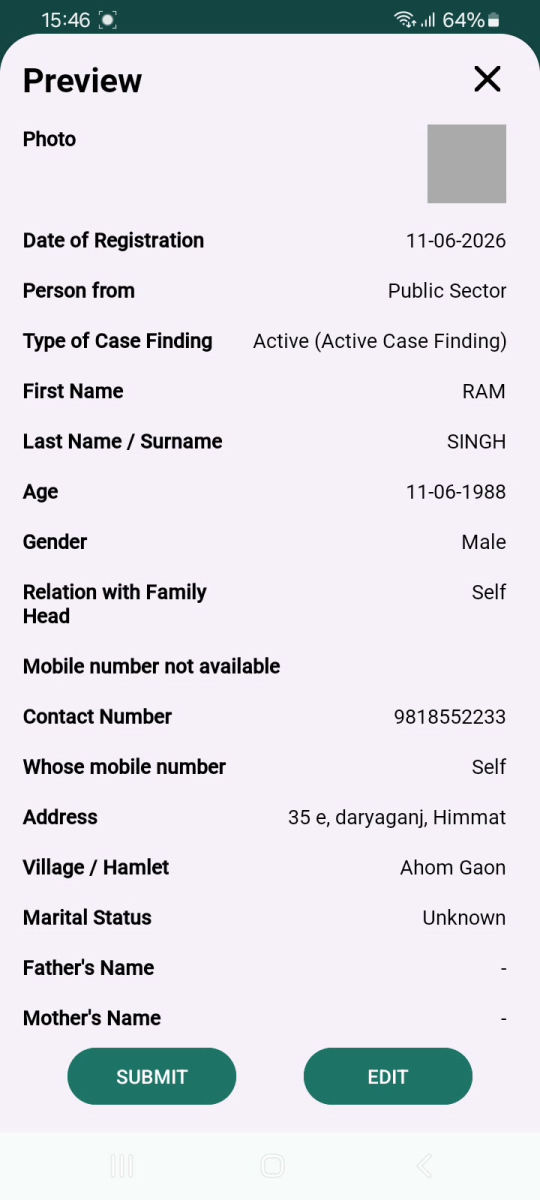
- Check the Preview screen. Tap EDIT to make corrections, or SUBMIT to save. "Save Successful" confirms the HoF is registered.
Entering Age fills the Date of Birth: You do not have to know the exact birth date. Enter the age in years (and months/days if known); the app calculates and fills the Date of Birth for you. In the example, entering 38 years produced a Date of Birth of 11-06-1988. |
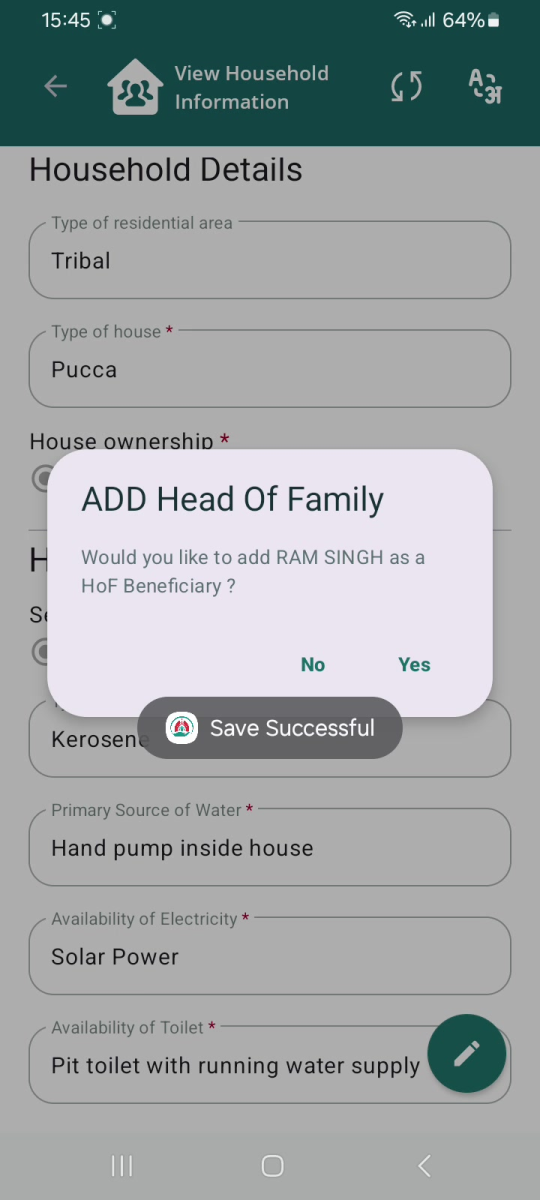
"Save Successful", then the prompt to add the Head of Family.
|
|
|
|
|
|
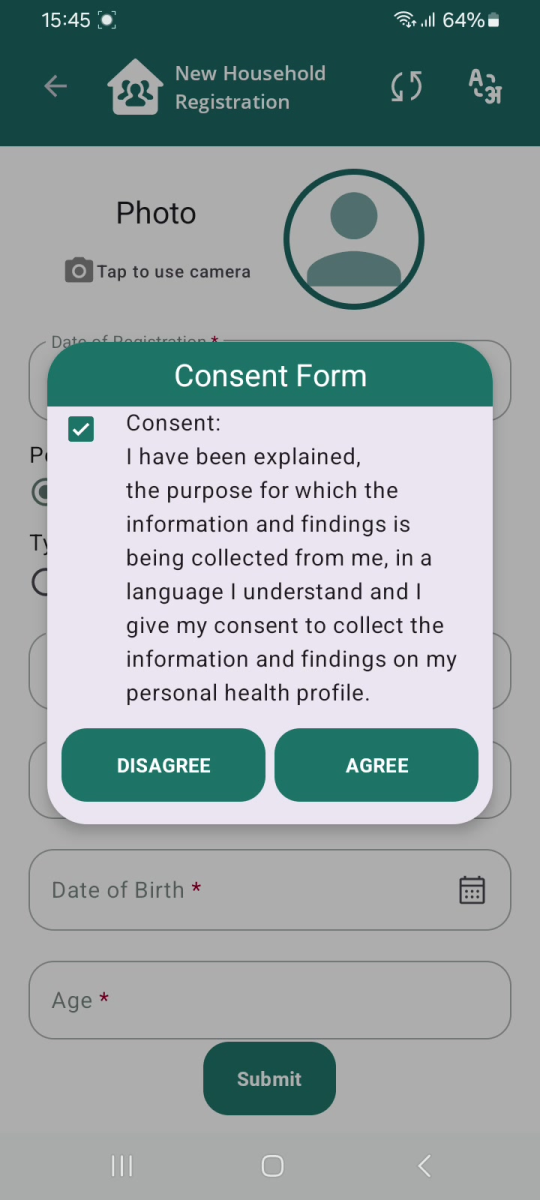
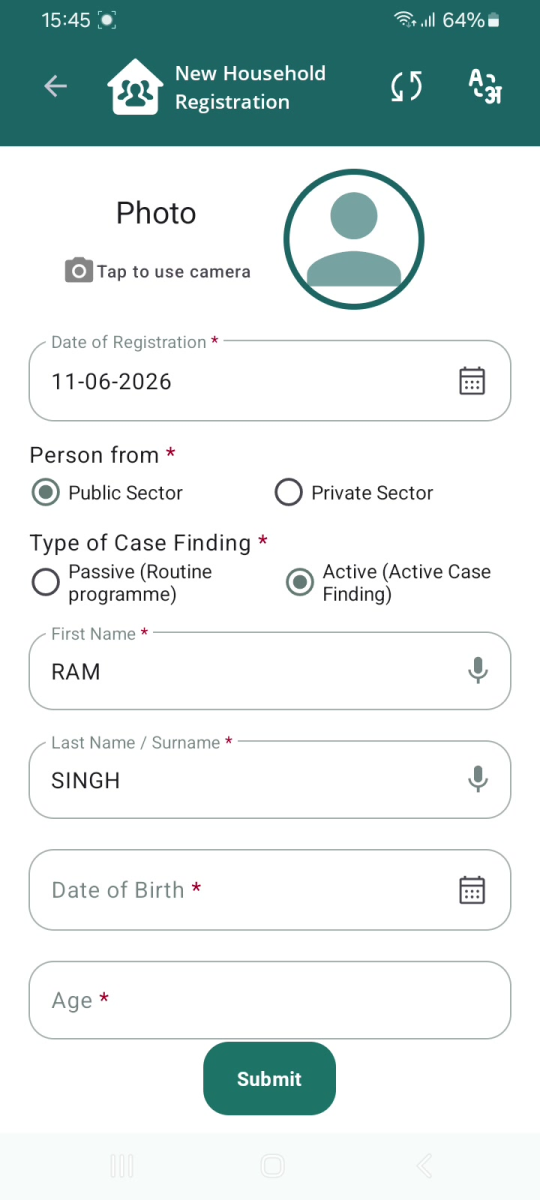
5.3 Field Descriptions and Validations
Field | Required? | What to enter / allowed values |
|---|---|---|
Date of Registration | Yes * | Date of registration (today is pre-filled). Tap the calendar to change. |
Person from | Yes * | Public Sector or Private Sector. |
Type of Case Finding | Yes * | Passive (Routine programme) or Active (Active Case Finding). |
First Name / Last Name | Yes * | Pre-filled from the household for the HoF. |
Date of Birth | Yes * | Filled automatically from Age; can be set with the calendar. |
Age | Yes * | Years / Months / Days picker. Shown as e.g. "38 Yr 0 Mo". |
Gender | Yes * | Select from the list (e.g., Male, Female, Transgender). |
Relation with Family Head | Auto | "Self" for the Head of Family — locked, cannot be changed. |
Not Available (mobile) | Optional | Tick if the person has no contact number. |
Contact Number | Yes * | Phone number (digits). |
Whose mobile number | Yes * | Self, Husband, Mother, Father, Family Head, Other. |
Address | Yes * | Full address of the beneficiary. |
Village / Hamlet | Yes * | Select the village / hamlet. |
Marital Status | Yes * | Single, Married, Unknown. |
Father's Name / Mother's Name | Optional | Text. |
Caste | Yes * | SC, ST, Other. |
Type of residential area | Yes * | Tribal NPVTG, Tribal-PVTG, Rural, Urban, Urban Slum, Unknown. |
Occupation | Yes * | Select the occupation (e.g., Unknown). |
Socioeconomic Status | Yes * | APL, BPL, Unknown. |
6. Module 3 — Adding Family Members
6.1 Overview
Once the Head of Family exists, add the rest of the household's members. Each member is registered as a beneficiary using almost the same form as the HoF — the difference is that you first choose the member's gender and relationship to the head, and a few fields appear or pre-fill based on those choices.
6.2 Step-by-Step
- Open All Household and find the family's card.
- Tap Add Member on the card. (If the card instead shows Add HoF Member, the Head of Family has not been registered yet — register the HoF first, then return.)
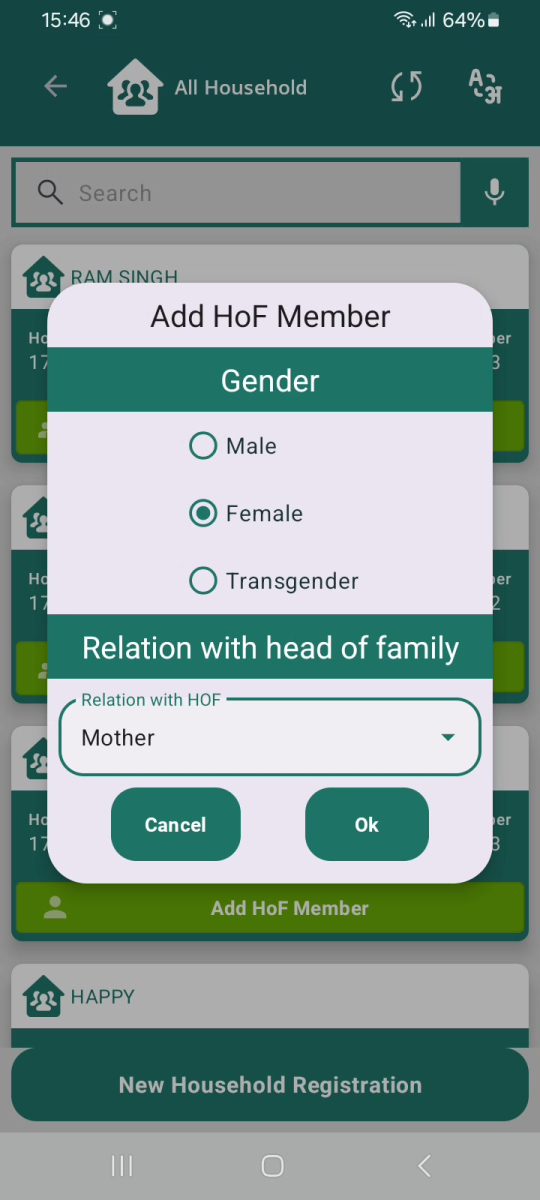
- In the popup, choose the member's Gender (Male / Female / Transgender) and the Relation with head of family from the list, then tap Ok. The relationship list changes to match the gender you picked.
- On the Consent Form, tick the box and tap AGREE.
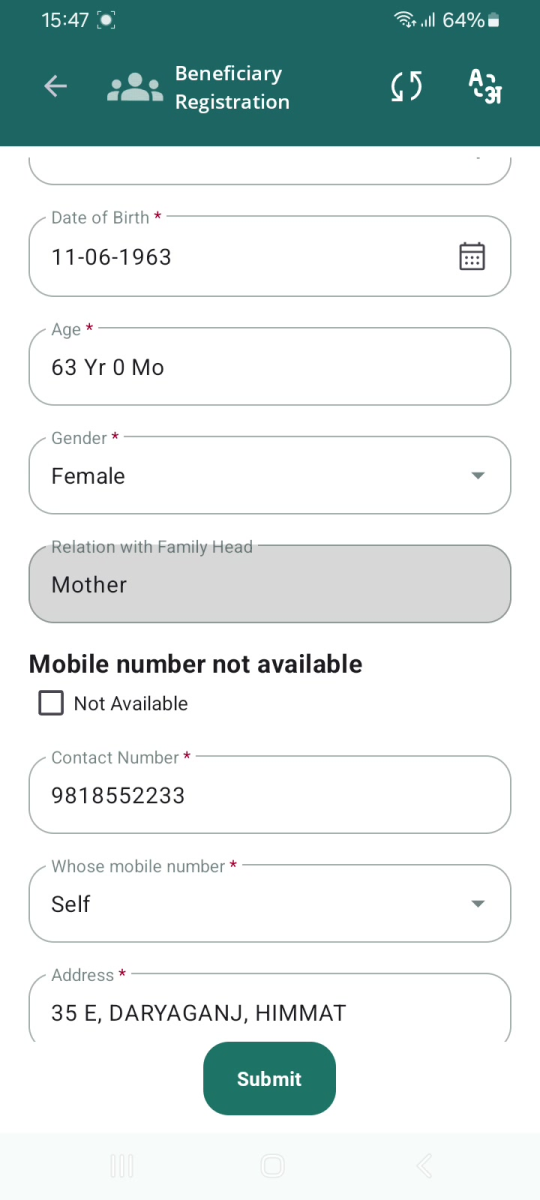
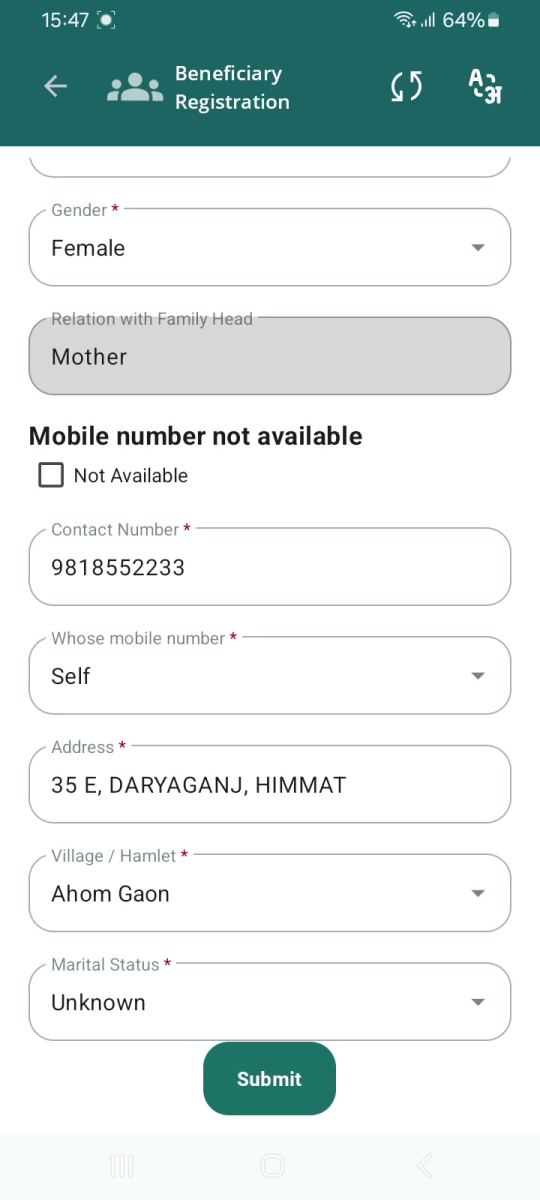
- Complete the Beneficiary Registration form. Gender and Relation with Family Head are already filled from your popup choices. Enter Name, Age (Date of Birth auto-fills), contact, address and the remaining details — exactly as for the HoF.
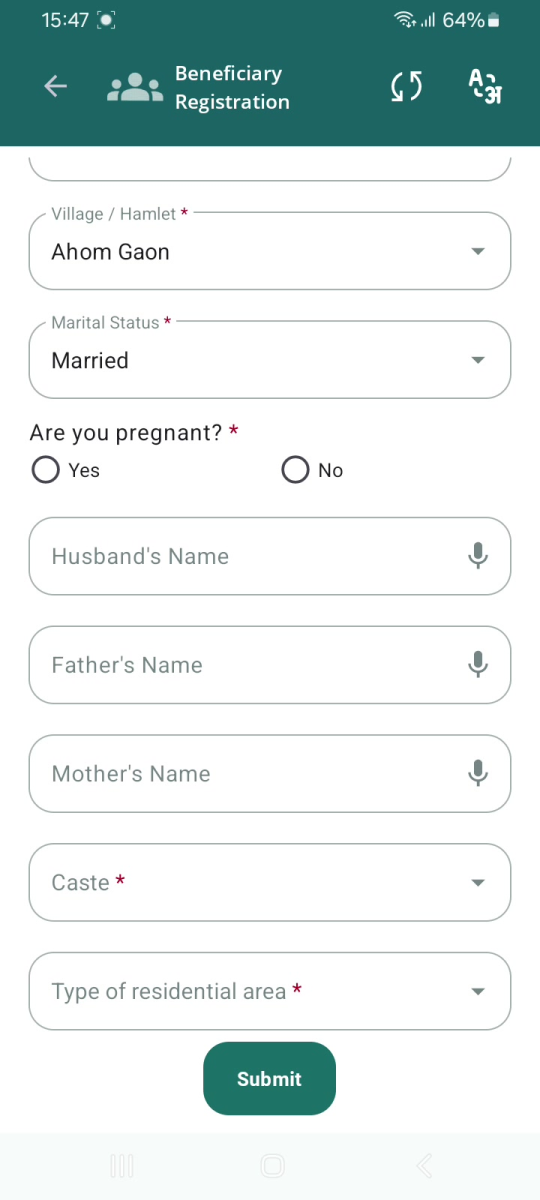
- If the member is a married female, two extra items appear: "Are you pregnant?" (Yes / No) and Husband's Name.
- Tap Submit, choose whether to take a photo, review the Preview, and tap SUBMIT. The household's "Members" count increases by one.
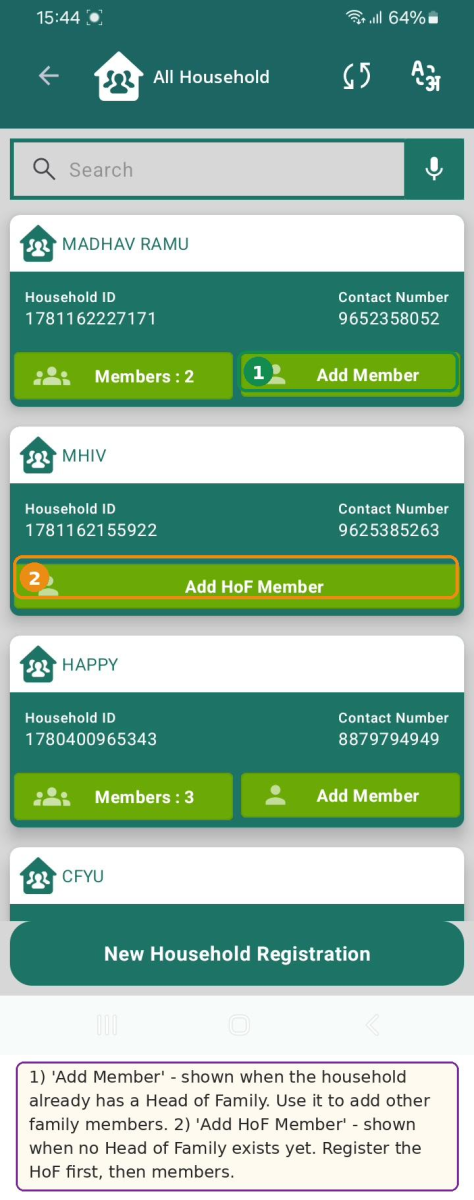
"Add Member" vs "Add HoF Member" on a household card.
|
|
|
|
6.3 Notes on the Member Form
- Relationship list adapts to gender. For a female member the relations include Mother, Sister, Niece, Daughter, Grand Mother, Mother in Law, Grand Daughter, Daughter in Law, Sister in Law and Other. Choosing Male or Transgender shows the corresponding relations.
- Gender and Relation are locked. They come from your popup choices and cannot be edited on the form. If you picked the wrong one, go back and start the member again with the correct choice.
- "Whose mobile number". Choose whose phone the contact number belongs to: Self, Husband, Mother, Father, Family Head or Other.
- Married female extras. Selecting Marital Status = Married for a female adds the "Are you pregnant?" question and a Husband's Name field.
Everything else matches Module 2: All other fields (Date of Registration, Person from, Type of Case Finding, Caste, Type of residential area, Occupation, Socioeconomic Status, etc.) behave exactly as described for the Head of Family in Section 5.3. |
7. Module 4 — Anthropometry Assessment
7.1 Overview
Anthropometry means taking simple body measurements. For each registered beneficiary you record Weight and Height; the app calculates the BMI automatically. You also record the person's Temperature. This is done from the All Beneficiaries list, at the screening camp.
7.2 Step-by-Step
- From the Dashboard, open All Beneficiaries.
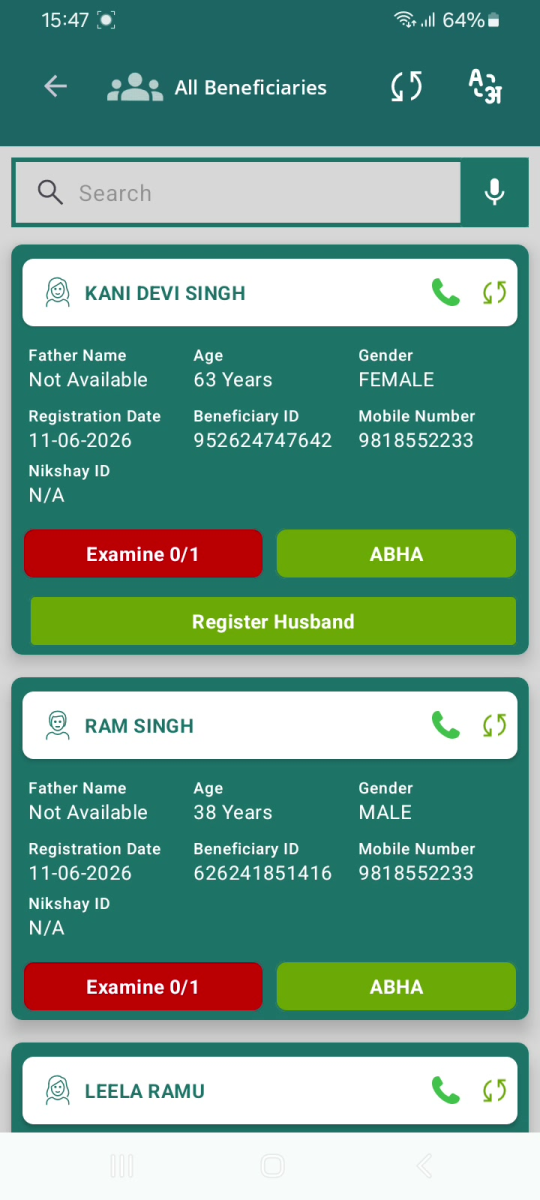
- Find the person and tap the red Examine 0/1 button on their card. ("0/1" means no examination of one has been done yet.)
- On the Examination Forms panel, tap Fill next to Anthropometry Screen.
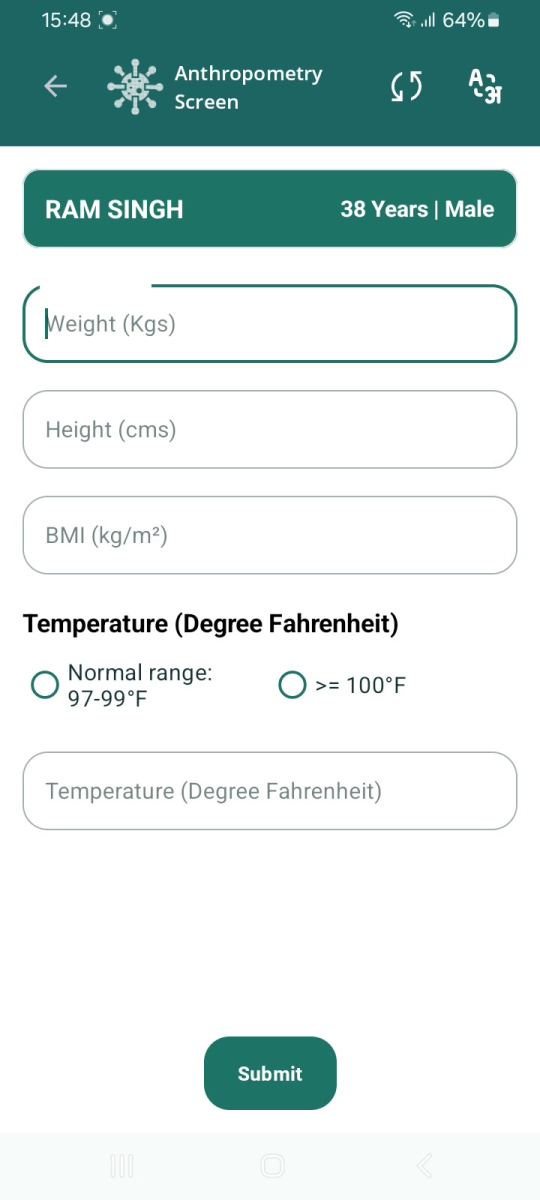
- Enter the Weight (Kgs).
- Enter the Height (cms). The *BMI (kg/m²)* is then calculated and filled in automatically — you do not type it.
- Under Temperature (Degree Fahrenheit), select the range — Normal range: 97-99°F or ≥ 100°F — then type the reading in the Temperature box.
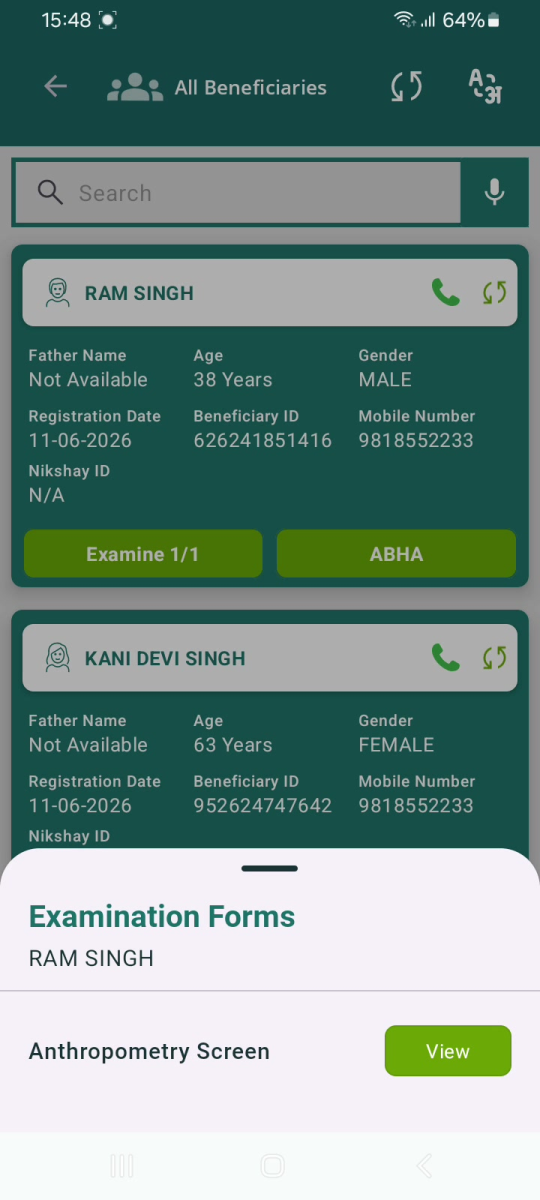
- Tap Submit. "Save Successful" appears, the card now shows Examine 1/1 (green), and the form button changes to View.
BMI is automatic. The BMI box is calculated from the Weight and Height you enter and is read-only. In the example, 89 kg with 175 cm gave a BMI of 29.1; 65 kg with 155 cm gave 27.1. | ||
|
|
|
7.3 Field Descriptions and Validations
Field | Required? | What to enter / behaviour |
|---|---|---|
Weight (Kgs) | Optional | The beneficiary's weight in kilograms (numbers). |
Height (cms) | Optional | The beneficiary's height in centimetres (numbers). |
BMI (kg/m²) | Auto | Calculated automatically from Weight and Height. Read-only — do not type. |
Temperature range | Optional | Choose "Normal range: 97-99°F" or "≥ 100°F". |
Temperature (Degree Fahrenheit) | Optional | Type the temperature reading in °F (e.g., 98.0). |
The banner confirms who you are examining. A green banner at the top of the Anthropometry Screen shows the beneficiary's name, age and gender (e.g., "RAM SINGH | 38 Years | Male"). Check it before you enter measurements so the readings go to the right person. |
8. Tips and Best Practices
8.1 Do these every time
- Register in order: household first, then the Head of Family, then other members, then anthropometry.
- Enter the mobile number as a full 10-digit number. If the person has no phone, tick "Not Available" instead of inventing a number.
- Use the Age picker — let the app fill the Date of Birth — rather than guessing a birth date.
- Always read the Preview screen before the final SUBMIT, and use EDIT to fix anything wrong.
- Check the green banner on the Anthropometry Screen so measurements are saved to the correct person.
- Tap Refresh on the Dashboard to confirm your new records were counted.
8.2 Common mistakes to avoid
- Wrong gender or relation for a member. These are chosen in the popup and lock on the form. Choose carefully — to change them you must restart that member.
- Tapping "Add HoF Member" when you meant to add an ordinary member. "Add HoF Member" appears only while the household has no Head of Family. Register the HoF first; the button then becomes "Add Member".
- Typing in the BMI box. BMI is automatic. Enter Weight and Height and let the app compute it.
- Picking the wrong residential-area list. The household form and the beneficiary form offer different options — read the choices on the current screen.
- Skipping consent. You must tick the consent box and tap AGREE before a beneficiary form opens.
Confirm before you move on: After each Submit, wait for the "Save Successful" message. If you do not see it, the record may not have saved — check the list before starting the next person. |
9. Troubleshooting and FAQs
9.1 Frequently encountered issues
Problem | What it means / what to do |
|---|---|
"Invalid Mobile Number !" (red field) | The mobile number is not 10 digits. Re-type a full 10-digit number. If there is no phone, tick "Not Available". |
Submit does not respond | A mandatory field (red asterisk) is empty. Scroll up and down and fill every starred field, then Submit again. |
"Camp Hub Not Connected" | Camp Mode is on but the hub is not linked. Tap Scan QR or enter the hub URL and Connect, or tap Retry. If you are not at a camp, untick Camp Mode. |
Card shows "Add HoF Member", not "Add Member" | The household has no Head of Family yet. Register the HoF first; the button then changes to "Add Member". |
BMI box will not let me type | BMI is calculated automatically from Weight and Height — that is expected. Just enter Weight and Height. |
Gender / Relation cannot be edited on the form | They are set from the popup and locked. Restart the member with the correct gender and relation. |
Counts on the Dashboard look wrong | Tap "Refresh" to update the All Household and All Beneficiaries figures. |
9.2 When a household or beneficiary cannot be found
- Use the Search bar at the top of the All Household or All Beneficiaries list and type the name.
- If the list shows "No Household records found.", either there are no matching records or your search text excludes them — clear the search box to see the full list.
- Tap "Refresh" on the Dashboard, then open the list again — a newly added record may not yet be showing.
- Confirm you selected the correct State / District / Block / Village at sign-in; records belong to the location you chose.
Still missing? If a record you definitely saved cannot be found after refreshing, note the person's name and the time, finish your other work, and report it to your supervisor / the app support team. Do not register the same person twice unless you are sure the first attempt failed. |
9.3 Incomplete registrations and incorrect entries
- Caught it on the Preview screen? Tap EDIT, correct the field, then SUBMIT.
- Mobile number rejected? You cannot save until it is a valid 10-digit number (or "Not Available" is ticked).
- Wrong gender or relation for a member? Restart that member from "Add Member" and choose correctly in the popup.
- Not sure a record saved? Look for "Save Successful" and check the list before re-entering, to avoid duplicates.
- Anything you cannot fix in the app? Record the Household ID / Beneficiary ID and details and pass them to your supervisor for correction.
9.4 Frequently Asked Questions
Do I have to be online / connected to a camp hub?
Camp Mode (the hub connection) is optional. Use it only when your camp setup requires it; otherwise log in normally with your username and password.
I don't know the exact date of birth. What do I enter?
Enter the Age in the Years / Months / Days picker. The app fills the Date of Birth automatically.
The person has no phone. What goes in the mobile field?
Tick "Not Available" under "Mobile number not available" instead of entering a number.
Why does the Head of Family show "Self" for relation?
Because the head of the family is the reference person; the app sets and locks the relation to "Self" for the HoF.
How do I know an examination is done?
The beneficiary's card changes from a red "Examine 0/1" to a green "Examine 1/1", and the form button changes from "Fill" to "View".
10. Quick Reference
10.1 Buttons and labels you will see
Button / label | Meaning |
|---|---|
New Household Registration | Start registering a new family (bottom of the All Household list). |
Add Member | Add another beneficiary to a household that already has a Head of Family. |
Add HoF Member | Register the Head of Family for a household that has none yet. |
Examine 0/1 (red) | No anthropometry done yet for this beneficiary — tap to begin. |
Examine 1/1 (green) | The anthropometry assessment is complete. |
Fill / View | "Fill" opens an empty examination form; "View" shows a completed one. |
Register Husband | Shown for a married female whose husband is not yet registered. |
Refresh | Update the figures and lists on the Dashboard. |
10.2 Dropdown values at a glance
Field | Options |
|---|---|
Socioeconomic Status | APL, BPL, Unknown. |
Type of residential area (household) | Rural, Urban, Tribal, Tea Garden, Other. |
Type of house | None, Kuchha, Pucca, Other. |
Type of fuel for cooking | Firewood, Crop Residue, Cow dung cake, Coal, Kerosene, LPG, Induction, Other. |
Availability of Electricity | Electricity Supply, Generator, Solar Power, Kerosene Lamp, Other. |
Availability of Toilet | Flush toilet with running water; Flush toilet without water; Pit toilet with running water supply; Pit toilet without water supply; Other; None. |
Person from | Public Sector, Private Sector. |
Type of Case Finding | Passive (Routine programme), Active (Active Case Finding). |
Whose mobile number | Self, Husband, Mother, Father, Family Head, Other. |
Marital Status | Single, Married, Unknown. |
Caste | SC, ST, Other. |
Type of residential area (beneficiary) | Tribal NPVTG, Tribal-PVTG, Rural, Urban, Urban Slum, Unknown. |
Gender (member popup) | Male, Female, Transgender. |
Temperature range | Normal range: 97-99°F; ≥ 100°F. |